

If you are looking for the best way to remotely manage and connect to your Windows Server, you might toss out there WinRM (probably not), RDP, or some other type of tool that you can use to manage and administer your Windows Server. However, what if I told you the best way to manage your Windows Server from the command line is using OpenSSH?
Trust me, if you are automating your Windows estate, you likely will get frustrated with WinRM and other native ways to administer your Windows Server. OpenSSH is free, its fairly easy to install, and it allows you to run commands and copy files remotely with only a single network port needed, port 22.
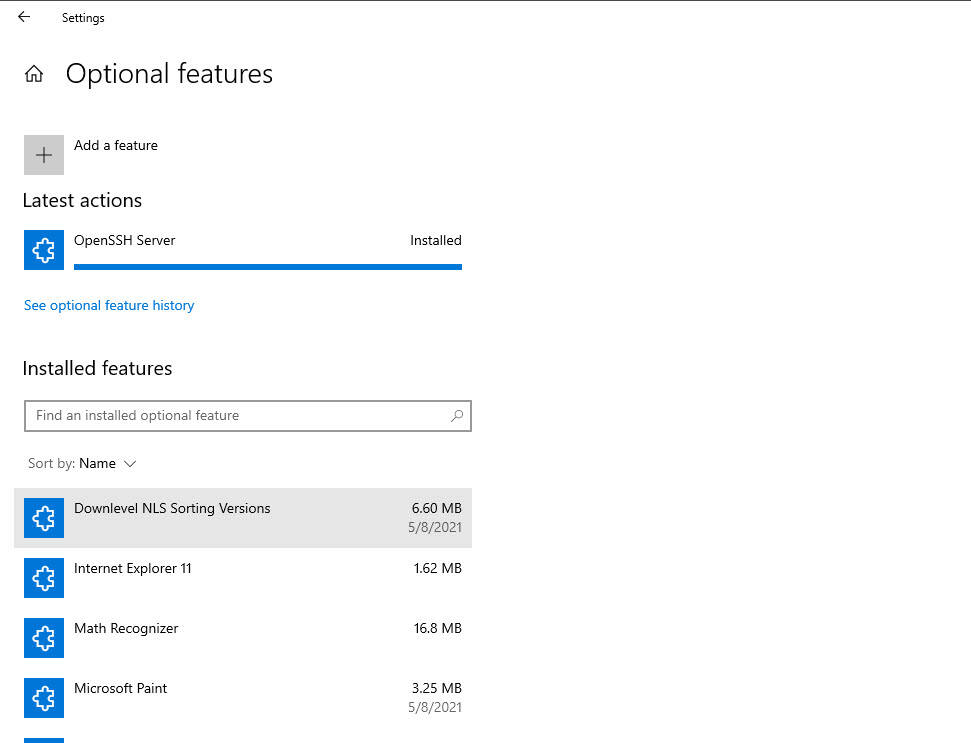
In Windows Server, navigate to Settings > Apps > Optional features and search for OpenSSH. Add the OpenSSH Server option.
Once you have the component installed, then we need to change the configuration of the Windows service to start automatically. By default it is set to Manual. We need to set this to Automatic.
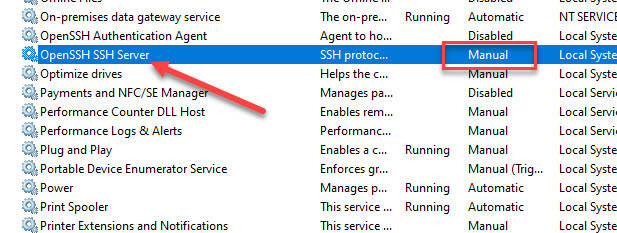
Set the service to automatic.
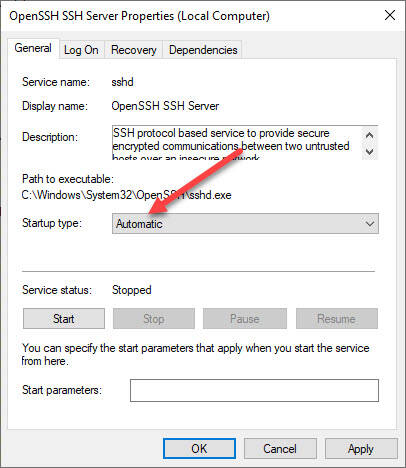
Setting to automatic will make sure it will start when the server starts. When you start the service, it will create and populate the following directory: C:\ProgramData\ssh.

Install OpenSSH with PowerShell
You can also use PowerShell to install the Windows feature. To install OpenSSH SSH Server using PowerShell, use the following command from an admin PowerShell prompt:
Add-WindowsCapability -Online -Name OpenSSH.Server~~~~0.0.1.0
After you install it with PowerShell, you will need to follow the same steps above to set the service to automatic. You can also do this with PowerShell as well:
Start-Service -Name "sshd"

Set-Service -Name "sshd" -StartupType Automatic
SSHD_config file
The sshd_config file is the heart of the solution's configuration. You can open this file up and make changes to configuration settings there. Below is an example of what your sshd_config file might look like. Below, I have enabled public key authentication and commented out the Group Administrators line as this can cause issues with public key authentication. Keep in mind if you change anything in this file, you will need to restart the OpenSSH SSH Service.
Note below, I have changed the SyslogFacility LOCAL0 and LogLevel Debug3. Adding this configuration for logging will allow logging to be captured in the "logs" folder of the c:\programdata\ssh folder.
# This is the sshd server system-wide configuration file.  See
# sshd_config(5) for more information.

# The strategy used for options in the default sshd_config shipped with
# OpenSSH is to specify options with their default value where
# possible, but leave them commented.  Uncommented options override the
# default value.

#Port 22
#AddressFamily any
#ListenAddress 0.0.0.0
#ListenAddress ::

#HostKey __PROGRAMDATA__/ssh/ssh_host_rsa_key
#HostKey __PROGRAMDATA__/ssh/ssh_host_dsa_key
#HostKey __PROGRAMDATA__/ssh/ssh_host_ecdsa_key
#HostKey __PROGRAMDATA__/ssh/ssh_host_ed25519_key

# Ciphers and keying
#RekeyLimit default none

# Logging
SyslogFacility LOCAL0
LogLevel Debug3

# Authentication:

#LoginGraceTime 2m
#PermitRootLogin prohibit-password
#StrictModes yes
#MaxAuthTries 6
#MaxSessions 10

PubkeyAuthentication yes

# The default is to check both .ssh/authorized_keys and .ssh/authorized_keys2
# but this is overridden so installations will only check .ssh/authorized_keys
AuthorizedKeysFile	.ssh/authorized_keys

#AuthorizedPrincipalsFile none

# For this to work you will also need host keys in %programData%/ssh/ssh_known_hosts
#HostbasedAuthentication no
# Change to yes if you don't trust ~/.ssh/known_hosts for
# HostbasedAuthentication
#IgnoreUserKnownHosts no
# Don't read the user's ~/.rhosts and ~/.shosts files
#IgnoreRhosts yes

# To disable tunneled clear text passwords, change to no here!
PasswordAuthentication no
#PermitEmptyPasswords no

# GSSAPI options
#GSSAPIAuthentication no

#AllowAgentForwarding yes
#AllowTcpForwarding yes
#GatewayPorts no
#PermitTTY yes
#PrintMotd yes
#PrintLastLog yes
#TCPKeepAlive yes
#UseLogin no
#PermitUserEnvironment no
#ClientAliveInterval 0
#ClientAliveCountMax 3
#UseDNS no
#PidFile /var/run/sshd.pid
#MaxStartups 10:30:100
#PermitTunnel no
#ChrootDirectory none
#VersionAddendum none

# no default banner path
#Banner none

# override default of no subsystems
Subsystem	sftp	sftp-server.exe

# Example of overriding settings on a per-user basis
#Match User anoncvs
#	AllowTcpForwarding no
#	PermitTTY no
#	ForceCommand cvs server

#Match Group administrators
#       AuthorizedKeysFile __PROGRAMDATA__/ssh/administrators_authorized_keys
Public key authentication
To get public key authentication to work, you need to perform the following steps:
- Generate a key pair (on the machine you will be connecting from)
- To do this, you an use the ssh-keygen command. It will step you through creating the public and private key pair
- Copy the public side of the public/private key pair to the target server you will be connecting to
- Make sure you have firewall exceptions for port 22 on your target server and any firewalls in between your workstation and Windows Server
- For the user you want to target to use with the public key authentication, you need to create an authorized_keys file in the path c:\users\<user>\.ssh folder. In this file, you will paste the contents of the public key file you generated with the ssh-keygen file. This will tie the private key and public key components together when you connect.
- Use the user you have the public key configured with on the target server when you call the SSH command
Connecting using public key authentication
To connect using public key authentication, you can call the private key with the ssh command which will pass along the private key component for authentication against the public key. You will also pass in the user that you are using on the target side:
ssh -i private_key administrator@<ip or fqdn of windows server>
Great summary, the Public Key Authentication section is the most helpful one I've seen (Better than ChatGPT 5)!
One thing I'll add in case someone ends up here while trying to setup an SFTP Server is when trying to jail a folder in windows make sure your "Match User" actually matches the user name. After you connect via SSH run "whoami" and get your username exactly. Put this as the match user!!!
Great guide, I made an account just to comment this.
@mat-of-ulster so glad the guide was helpful and that we humans are still ahead of AI in some ways. Thanks again!
Brandon