If you haven’t downloaded StarWind V2V in a while, there has been a major series of updates to the tool as of late. It now has the ability to convert from VMware to Proxmox as of late, as well as several new options since the early days of the tool. Early on, it was simply Hyper-V and VMware. However, now, it is able to also do cloud source and target as well as other hypervisors like Proxmox, oVirt, etc. Let’s take a look at how to convert from VMware to Proxmox which is a hot topic these days, especially in home labs.
Table of contents
What is the StarWind V2V Converter?
If you are wondering what StarWind V2V Converter is, it is a lightweight tool that allows you to perform disk conversions. This can be used for both physical machines and virtual machines. If you are migrating from VMware ESXi, Hyper-V, VirtualBox or now even Proxmox as well as cloud environments like AWS, Azure, etc.
StarWind V2V Converter is also one of the quickest tools since it performs direct conversion of disks. This saves a ton of time and keeps things as simple as possible. You can also use the tool to perform live conversion. This is a major benefit since it means little to no downtime other than the time it takes to switchover to the new environment.
Installing StarWind V2V Converter
Installing StarWind V2V Converter is also very simple. The longest part of the process is just filling in the form on the StarWind website. Yes, you will have to sign up on their website by entering your first, last, business email, business name, etc to get an email sent to you with the download link.
After that, the download is just a simple .exe file that you install using a very “next, next, finish” type process.
Running through the conversion process
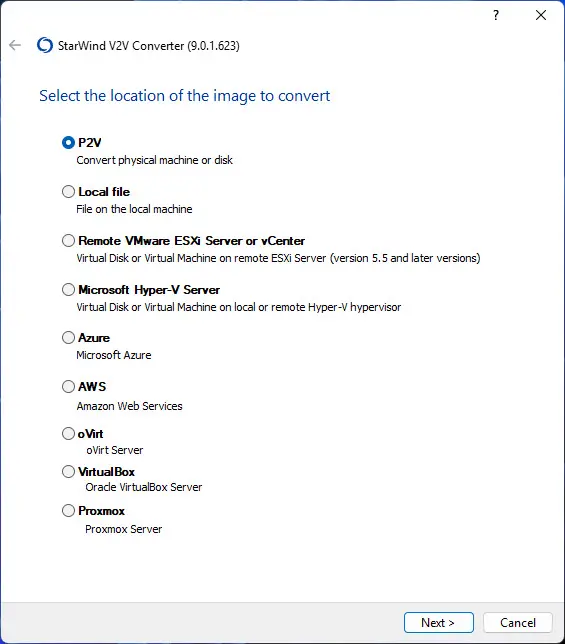
Once installed, you can launch and you will see the screen below as the first stop of the process. Here you select the location of the image to convert. The options are:
- P2V – convert physical machine or disk
- Local file – file on the local machine
- Remote VMware ESXi Server or vCenter – Virtual Disk or Virtual Machine on remote ESXi Server (version 5.5 and later versions)
- Microsoft Hyper-V Server – Virtual Disk or Virtual Machine on local or remote Hyper-V hypervisor
- Azure – Microsoft Azure
- AWS – Amazon Web Services
- oVirt – oVirt Server
- VirtualBox – Oracle VirtualBox Server
- Proxmox – Proxmox Server
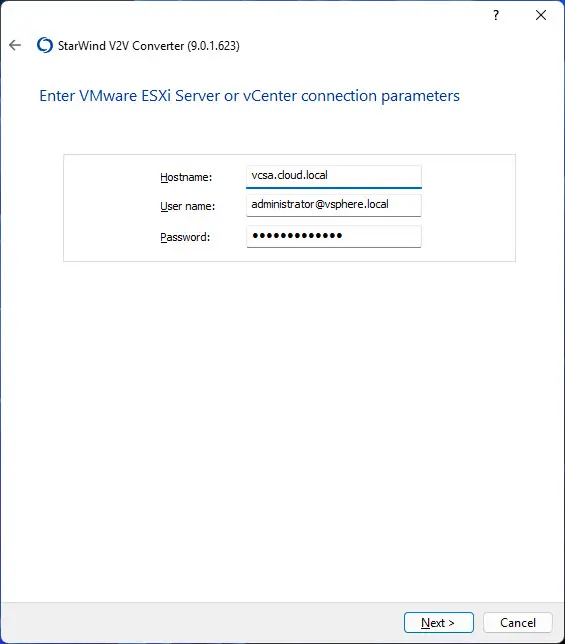
Next, we enter the credentials for the source environment. Below we are using a vCenter Server connection as the source environment connection.
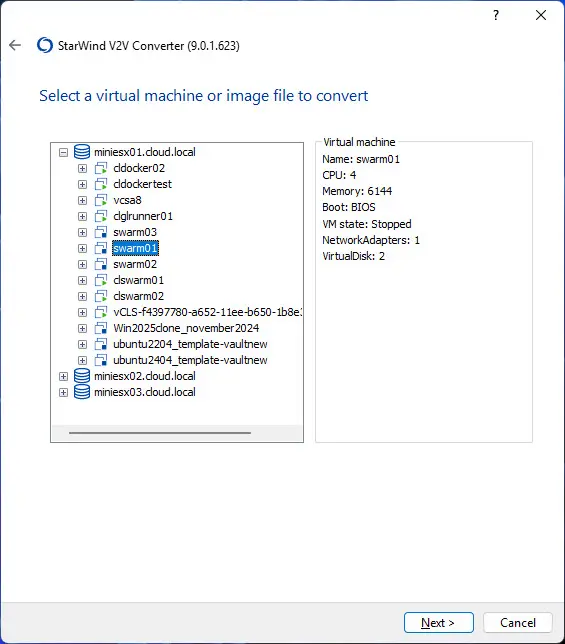
Next, we select a virtual machine or image file to convert.
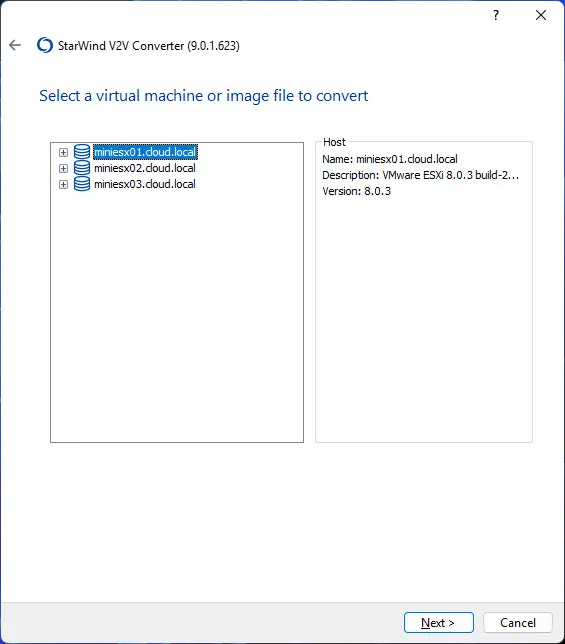
I have expanded the environment so you can see what this step looks like to pick a VM. One thing to note. On this screen, at least that I could find, there isn’t a way to multi-select VMs.
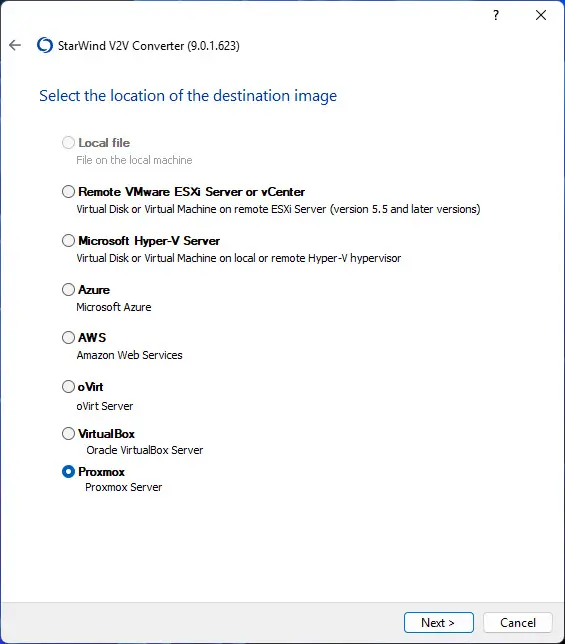
Next, we select the target environment. The options for this are the same minuse the P2V option. Also, local file is not available at this step either. Here I am targeting a Proxmox VE Server.
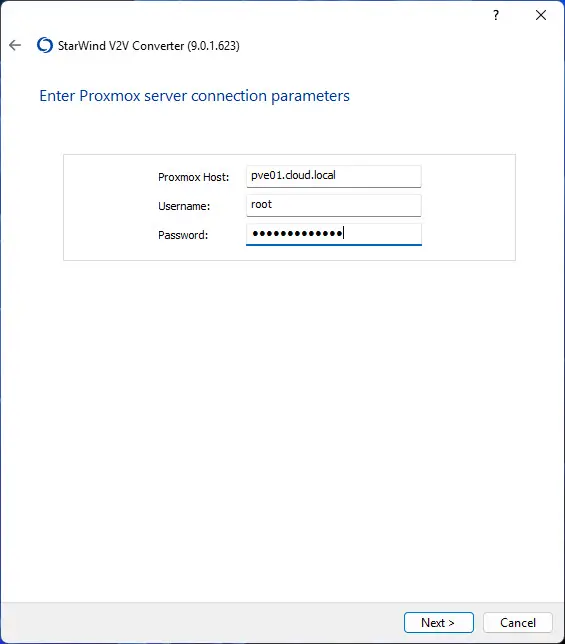
Like the source environment, we need to enter the connection information for the connection to Proxmox.
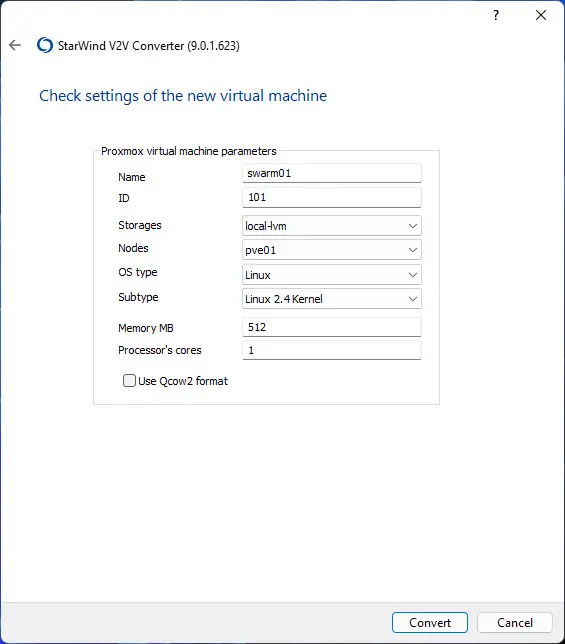
Next, we check the settings of the new virtual machine. Here I am targeting the local-lvm storage, and you also have the choice of whether or not you want to use the Qcow2 format or not. Note the following information to learn more about whether or not to use Qcow2.
When converting a virtual machine to Proxmox VE using StarWind V2V Converter, the “Use QCOW2 format” checkbox determines the disk format of the converted VM. Here’s when you should or shouldn’t check it:
Use Qcow2 if:
- You want to use Proxmox’s default disk format:
- Proxmox VE natively uses QCOW2 (QEMU Copy-On-Write v2)
- Using this you can support snapshots, compression, and dynamic allocation. It will be the most efficient type of storage
- You’re converting from another hypervisor
- If your source VM is in VMDK (VMware), VHDX (Hyper-V), or RAW, checking this box makes sure your VMs are converted to a compatible format
- You plan to enable snapshots on the Proxmox VM
- QCOW2 is required for internal Proxmox snapshots
- You want to thin provisision
- QCOW2 supports thin provisioning
Do not use QCOW2 format if:
- Performance is the main objective
- If you want the best possible disk performance, RAW format (uncompressed, pre-allocated) is faster than QCOW2.
- In Proxmox, RAW disks are usually stored in an LVM thin pool or a ZFS dataset
- You are using Ceph RBD in Proxmox
- Proxmox stores Ceph RBD volumes as RAW disks, so you should avoid QCOW2 in this case
- You plan to convert the disk later
- If you intend to optimize or modify the disk manually you may want to leave it in a different format and convert it yourself.
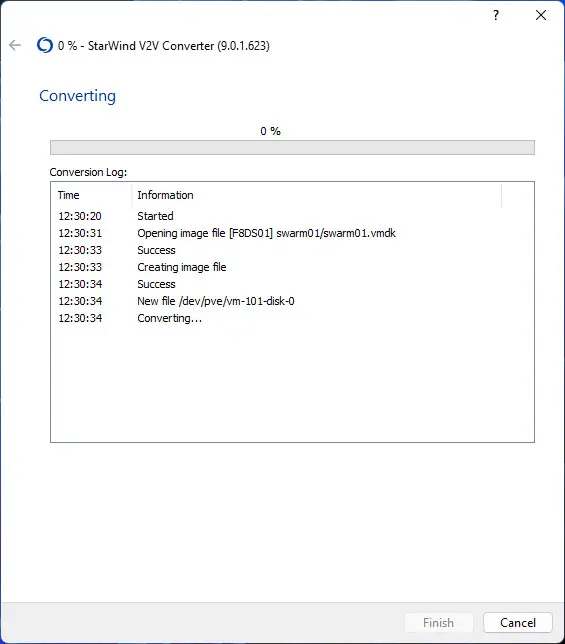
The conversion process begins.
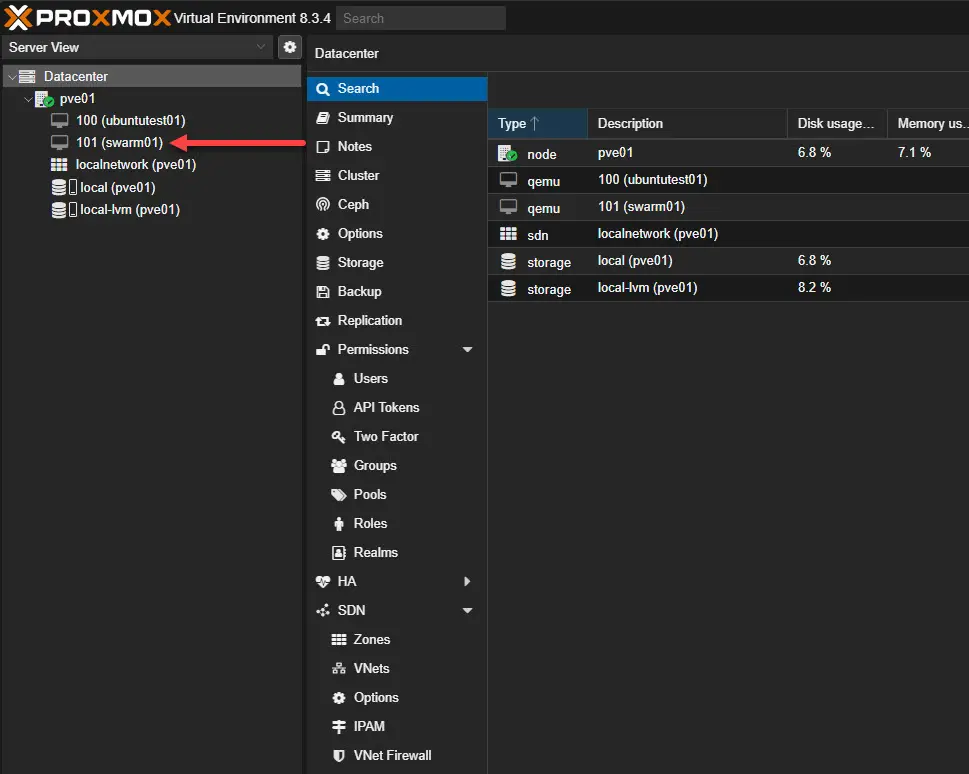
As you can see below, the tool automatically registers the new VM in Proxmox so that it is ready to go and you don’t have to do this manually.
StarWind V2V Converter CLI
The newest version of StarWind V2V Converter has a CLI tool as part of tool. This will be super handy in automating conversions from one environment to another.
As an example, to convert a VM called testvm1 and its disk from VMware ESXi to Proxmox (QCOW2 format), you can do something like the following:
.\V2V_ConverterConsole.exe convert `
  in_host_type=esx `
  in_host_address="vmware_host_ip" `
  in_host_username="vmware_username" `
  in_host_password="vmware_password" `
  in_file_name="[datastore] testvm1/testvm1.vmdk" `
  out_host_type=proxmox `
  out_host_address="proxmox_host_ip" `
  out_host_username="proxmox_username" `
  out_host_password="proxmox_password" `
  out_file_name="/var/lib/vz/images/testvm1.qcow2" `
  out_file_type=ft_qcow2
Explanation of the parameters above:
in_host_type=esxSource hypervisor is VMware ESXi.in_host_address="vmware_host_ip"Replace with your ESXi host’s IP.in_host_username="vmware_username"Your ESXi login.in_host_password="vmware_password"ESXi password.in_file_name="[datastore] testvm1/testvm1.vmdk"Path to the existing VM disk on ESXi.out_host_type=proxmoxTarget hypervisor is Proxmox.out_host_address="proxmox_host_ip"Replace with your Proxmox host’s IP.out_host_username="proxmox_username"Your Proxmox login.out_host_password="proxmox_password"Proxmox password.out_file_name="/var/lib/vz/images/testvm1.qcow2"Destination path on Proxmox.out_file_type=ft_qcow2Converts to the QCOW2 format.
Steps to keep in mind after conversion
There are a few things to keep in mind after you perform a conversion on your source VM over to a target like Proxmox. Note the following:
- Install the latest Libvirt tools in Windows
- Uninstall VMware Tools if you didn’t do this before (may be a little messier since it will crash trying to uninstall, but there is a free PowerShell script to forcibly get rid of VMware Tools).
- Make any resource adjustments in Proxmox as needed
Wrapping up
The StarWind V2V Converter is a powerful tool in its latest version. It provides all the tools you need to convert your virtual machines from VMware ESXi over to Proxmox or another hypervisor. This is one of the best “free” tools that you can use for disk conversion. It has been known for years. However, the new source and target possibilities may not be so well known, especially the Proxmox capabilities.
Google is updating how articles are shown. Don’t miss our leading home lab and tech content, written by humans, by setting Virtualization Howto as a preferred source.
About The Author