
When building out your home lab, the storage layer is arguably one of the most important. Choosing the right storage solution is key to having a platform that can run virtual machines and containers effectively. Traditional hard drives (spindles) are considered super slow by today’s standards. While they have their place, SSDs and NVMe drives are used most frequently for virtualized workloads. Let’s see how we can optimize SSD and NVMe storage for virtualization in the home lab.
Table of contents
SATA SSDs vs. NVMe storage
When we talk about fast storage in a home lab today, there are basically two types of fast storage – SSDs and NVMe storage. Both of these storage types have their use cases and can be effectively used in a home lab environment. Take a look at the following comparisons between SSDs and NVMe
SATA SSDs
The traditional SATA SSD has a lot of potential in terms of speed over spindle hard drives. With the SATA III interface, it maxes out at 6 Gbps which is around 550 MB/s in a real-world scenario. SATA SSDs are generally cheaper than NVMe drives, but their performance is only a percentage of what an NVMe can do.
NVMe
NVMe drives directly use the PCIe interface so there isn’t a bottleneck with interfaces in between. This drastically improves speed with read/write capabilities. As an example, a Gen 4 NVMe drive can reach 7,000 MB/s. They also support more concurrent I/O operations, and queue depth which is ideal for running multiple virtual machines simultaneously.
Use Cases
- SATA SSDs: If you want to use a SATA SSD for non performance-critical VMs, boot drives, and general-purpose workloads. This is where I would also load the hypervisor as well as you saw in my recent build using the Minisforum BD795M.
- NVMe SSDs: NVMe is best for high-performance virtual machines and these are what I use for my virtual machine datastores, whether in VMware or Proxmox.
- Hybrid Approach: You can also use a hybrid approach by using NVMe for primary workloads and SATA SSDs for secondary storage or another “tier” of storage.
Let’s see how we can optimize both SSD drives and NVMe for virtualization.
Align Partitions for Performance
One of the things you can do to optimize ssd and nvme storage for virtualization performance is make sure your partitions are aligned to improve performance and the longevity of your SSDs and NVMe drives. Modern OS’es and hypervisors can automatically align partitions. However, you can make sure of this and verify using the following command in Linux:
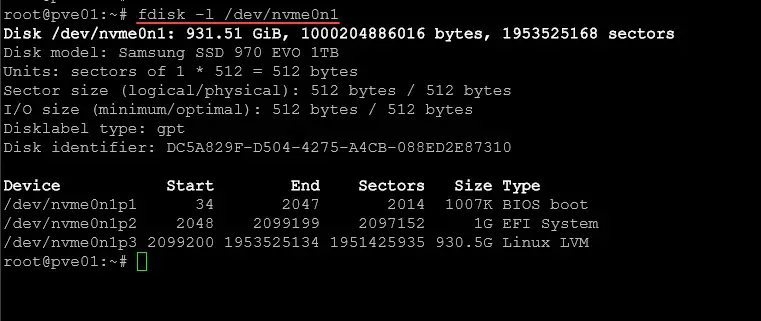
sudo fdisk -l /dev/nvme0n1Below we see the sectors for EFI and Linux are aligned since they are multiples of 2048. What is the significance of 2048?
Why 2048 Sectors?
- Each sector = 512 bytes (in most SSDs).
- 2048 sectors × 512 bytes = 1 MiB (Megabyte) alignment.
- 1MiB alignment makes sure that partitions start on erase block boundaries, which prevents performance degradation due to unaligned writes.
- Modern operating systems and tools like
fdiskandpartedautomatically use 2048 as the default start sector for optimal alignment.
For Windows, such as using Hyper-V
Get-Partition -DiskNumber 1 | Select PartitionNumber, AlignmentIf misaligned you can repartition using tools like GParted or Disk Management.
Use TRIM for SSDs
TRIM helps with SSD performance by clearing unused data blocks. This helps to reduce write amplification. TRIM should be be enabled to help lengthen your SSD lifespan and improve efficiency. This helps to optimize SSD and NVMe storage for virtualization
Check if TRIM is enabled on Linux:
sudo fstrim -v /For Windows:
fsutil behavior query DisableDeleteNotifyA value of 0 means TRIM is enabled.
Optimizing File Systems
File systems play a key role in performance of virtualized environments. Choosing the right one can make a huge impact.
- EXT4/XFS (Linux): In Linux, this works well with SSDs, supports TRIM, and offers good performance for virtualization.
- NTFS (Windows): Standard for Windows but may not fully optimize for NVMe speed
- ZFS: Great for redundancy and snapshots but requires more RAM
Virtualization Best Practices for SSD and NVMe Storage
Note the following best practices for SSD and NVMe storage.
1. Separate Storage for VMs and OS
Make sure to install your OS/hypervisor host on a different storage layer than your VMs will run. So separating these out between hard drives is a good idea for performance, stability, and troubleshooting.
2. Use NVMe Drives for Caching
NVMe drives make a great storage type for caching. in Proxmox, VMware ESXi or another hypervisor, you can use NVMe drives as a caching layer in front of spindles or even SSDs to enhance performance. With Proxmox, you can set up an LVM cache, and in VMware ESXi, NVMe can be used in vSAN storage for accelerating performance there.
3. RAID Considerations for SSDs and NVMe
RAID configurations improve performance and redundancy, but choosing the right RAID level is a good idea when dealing with SSDs and NVMe. There are also considerations to be made for SSD wear.
- RAID 0: High performance but no redundancy.
- RAID 1: Mirroring for redundancy, best for critical workloads
- RAID 5/6: RAID 5 with SSDs may be ok, however, RAID 6 will likely lead to unnecessary write amplification and premature drive wear. However, if you absolutely need the redundancy it still works like a spindle, just keep this in mind.
- RAID 10: Best for virtualization with a combination of speed and redundancy.
If using ZFS, you don’t need a traditional RAID controller as ZFS manages all of this natively so you just present the drives to ZFS as JBOD and configure it accordingly.
4. Monitoring SSD Health and Wear Levels
SSDs have limited write cycles. There are commands that allow monitoring their health to prevent failures. Use SMART monitoring tools:
sudo smartctl -a /dev/nvme0n1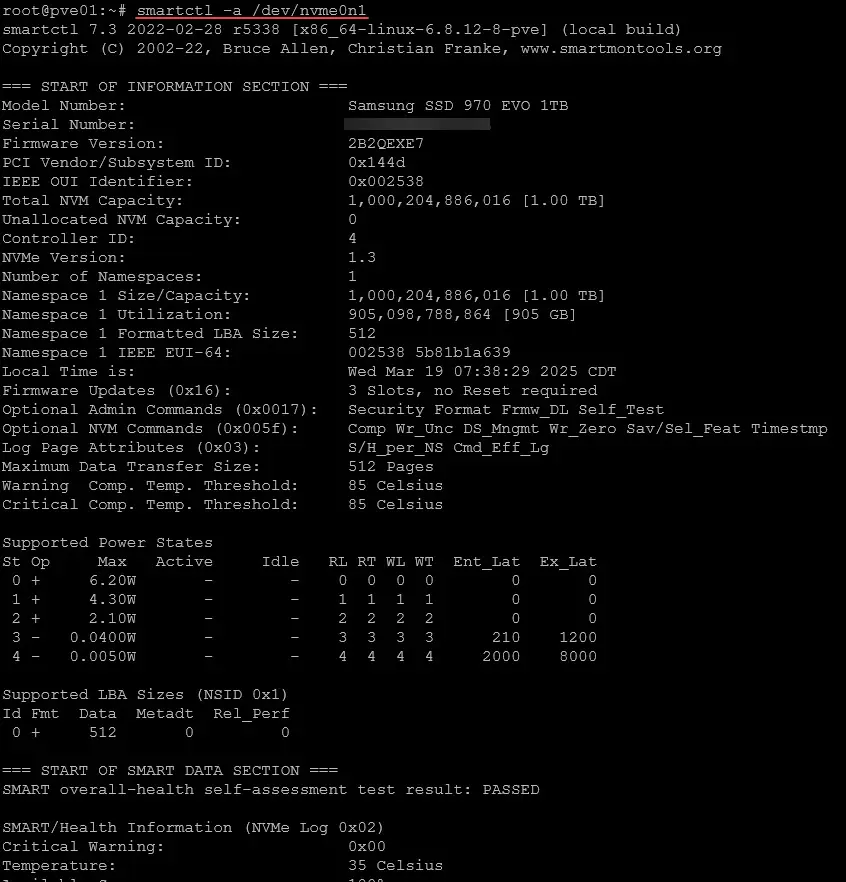
For Windows, CrystalDiskInfo provides a graphical interface for monitoring drive health.
5. Enabling Write-Back Cache
Write-back caching can improve write speeds, but it introduces a risk of data loss if power fails. RAID controllers have BBUs to help mitigate this risk. Also, for enterprise-level protection, use a UPS on servers to help prevent them from going down dirty, leading to the possibility of data corruption
On Linux, enable write-back cache with:
sudo hdparm -W1 /dev/nvme0n1Specific settings for VMware SSD and NVMe
Let’s first look at VMware and tuning SSD and NVMe for optimization. Note the following points and specific settings.
Enable NVMe High-Performance Mode
In ESXi 7.0 and later, NVMe SSDs can be tuned for high performance. You can do some of this by adjusting queue depth and storage settings. Use the following command to check and modify NVMe queue depth:
esxcli storage core device list | grep Queue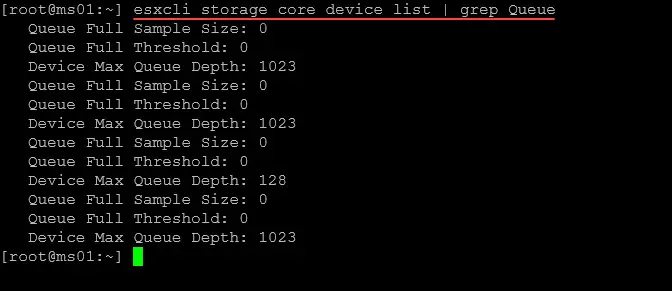
To modify the queue depth:
esxcli storage core device set -d <DeviceID> -O <NewQueueDepth>Use NVMe SSDs for vSAN Cache
- If using VMware vSAN, dedicate NVMe drives as cache devices for better performance.
- Make sure the cache-to-capacity ratio is 1:10 to be optimal.
Configure SSDs for TRIM/UNMAP Support
Enable TRIM for SSDs to prevent performance degradation:
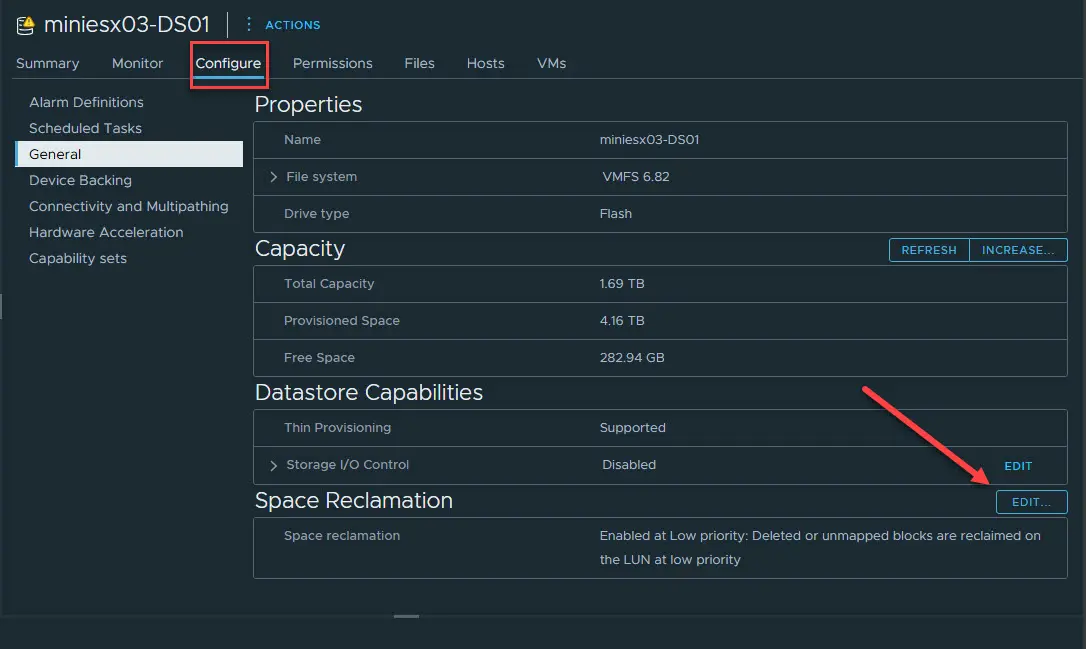
esxcli storage vmfs reclaim config set -l <DatastoreName> -e trueSee if unmapping is turned on, which it should be by default in recent VMware ESXi versions
You can look at your datastore in the vSphere Client. Navigate to your datastore Configure > General > Space Reclamation. You can click Edit to see the configured settings by default.
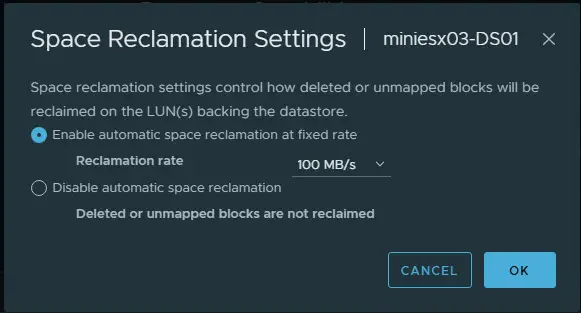
Check unmap settings from the command line
You can use the following command to check unmap settings from the command line:
esxcli storage vmfs reclaim config get --volume-label <datastore>
Manually force an unmap
If you want to manually force an unmap operation, you can do that with the following command (replace the datastore with your own datastore:
esxcli storage vmfs unmap -l <datastore>Avoid Thick-Provisioned Disks on SSDs
- Use thin Provisioning for SSD-backed VMs to maximize storage efficiency. Thin provisioning does not allocate all of the storage on the frontend, but instead allocates as data blocks are used.
Use Datastore-Level Storage I/O Control (SIOC)
- Enable Storage I/O Control (SIOC) to prevent I/O starvation when multiple VMs access the same SSD storage.
Take a look at the overall performance best practices for VMware here:
Specific settings for Proxmox SSD and NVMe
Note the following settings for Proxmox to tweak and tune your SSDs and NVMe drives.
Use ZFS with NVMe SSDs for High Performance
ZFS with NVMe drives helps with improved caching and resilience. Recommended command for creating a ZFS pool on an NVMe drive:
zpool create -f -o ashift=12 mypool nvme0n1- Ashift=12 ensures proper block size alignment.
Enable SSD TRIM Support
Run TRIM manually or enable periodic trimming:
fstrim -av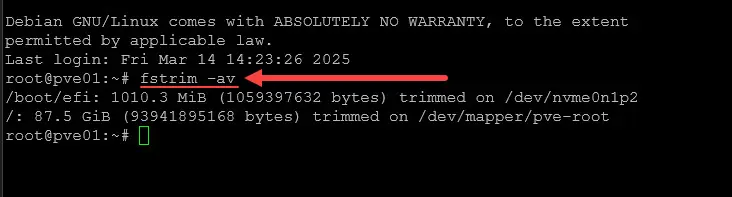
Automate with a weekly cron job:
echo "0 3 * * 0 root fstrim -av" >> /etc/cron.d/fstrimSeparate Boot and VM Storage
- Boot Proxmox from a SATA SSD and store VM disks on a high-speed NVMe drive.
Tweak Proxmox Disk Scheduler for NVMe
Change the I/O scheduler to none or mq-deadline for better NVMe performance:
echo "none" > /sys/block/nvme0n1/queue/schedulerWrapping up
The process to optimize SSD and NVMe storage for virtualization in your home lab is an important part of your home lab in general and can make a huge difference in how well things perform and work. Also, this isn’t just for home lab. The practices and tools that we have described also are important for production. Keep in mind that modern hypervisors do much of this for you, so there may not be a need to manually make changes. But, it is good to know which tools you can use and checks to make to see how things are configured.
Google is updating how articles are shown. Don’t miss our leading home lab and tech content, written by humans, by setting Virtualization Howto as a preferred source.
About The Author


Some Linux, such as the openSUSE Tumbleweed I use, have the BTRFS file system. This is a bit more complicated than EXT4 but enables snapshots and relatively easy rollback if something goes wrong with the OS. Some other distros are considering migrating to that file system.
Might want to add something about that file system to compare it with ZFS and what its impact might be on use with hypervisors.
Richard,
Great thoughts here. I may do that in a separate post as it would lend itself for a detailed comparison. But so far, I like using BTRFS myself…using on my Synology and Terramaster NAS devices.
Brandon