How I Deployed a Self-Hosting Stack with Docker Swarm & MicroCeph
I have been on a journey to try out various self-hosting stacks in the home lab and one of the configurations that has been a great platform for learning and selfhosting has been Docker Swarm with Microceph. This combination of technologies in a tech stack has been a great platform for managing and deploying apps. I wanted to detail my experiences and challenges with the setup and the steps taken to implement the key pieces of the stack.
Table of contents
The tech stack components
Let’s talk about the components of this self-hosting stack, Docker Swarm and Microceph. They are each key to the configuration, but let’s dive deeper into each one and see how and why I chose these.
Docker Swarm: Docker Swarm is an orchestration tool developed by Docker that allows you to manage a cluster of Docker engines and turns them into a single logical Docker engine. It simplifies the deployment, management, and scaling of your containers and apps. Many may stop here and wonder, why Docker Swarm, and not Kubernetes? Well, Kubernetes is great. But it is complicated and all those additional features may not be what you are looking for. You may simply want to run containers with many of the orchestration features and high availability, but you don’t want all the complexity that Kubernetes brings. If so, Docker Swarm may be a good fit for you and your home lab. I look at Swarm as a middle ground between a standalone Docker host and Kubernetes.
MicroCeph: Microceph is a simpler implementation of Ceph HCI storage that takes some of the complexity out of deploying it. It provides a greatly simplified installation and management experience for Ceph. It makes sure of data redundancy, scalability, and HA. This makes it a good choice for both home labs and production environments. It is often mentioned along with Microk8s, but I can assure you since using it for months now, that it works equally well with Docker Swarm.
Motivation for the Setup
When it comes to running containers, I didn’t really have a high availability setup at this layer. I have always run virtualization hosts in a cluster where all VMs have high availability with the configuration, but this doesn’t get you high availability at an application layer, and, by extension, at the container level.
So you need multiple container hosts to back your applications and this requires shared storage. By using Docker Swarm together with MicroCeph, I wanted to achieve:
- High Availability: Making sure services are up even if individual nodes fail
- Scalability: Ability to add or remove nodes based on resources and requirements
- Data redundancy: Protect the data against hardware failures.
Self-hosting Stack with Docker Swarm and Microceph
Below are the high level steps for deploying Docker Swarm and Microceph. I will link to the relevant more detailed posts for each technology below as well.

1. Setting Up the Infrastructure
I started with three Ubuntu Server 24.04 nodes. Each host (virtual machine) had Docker installed, and they were interconnected via a private network. This multi-node setup forms the basis of high-availability for for both Docker Swarm and MicroCeph.
2. Initializing Docker Swarm
On my first node, I initialized the Docker Swarm cluster:. This command is only ran on one of your Docker hosts in the cluster:
docker swarm init --advertise-addr <Primary_Node_IP>
This command sets up the Swarm manager. I then added the other two nodes as workers using the join token provided by the initialization command.
Check out the following posts:
- https://www.virtualizationhowto.com/2024/10/docker-swarm-is-awesome-with-portainer/
- https://www.virtualizationhowto.com/2024/10/try-microceph-for-an-easy-ceph-install/
- https://www.virtualizationhowto.com/2024/10/cephfs-for-docker-container-storage/
3. Installing MicroCeph
MicroCeph can be installed using a single snap command:
sudo snap install microcephAfter installation, you bootstrap the Ceph cluster:
sudo microceph cluster bootstrap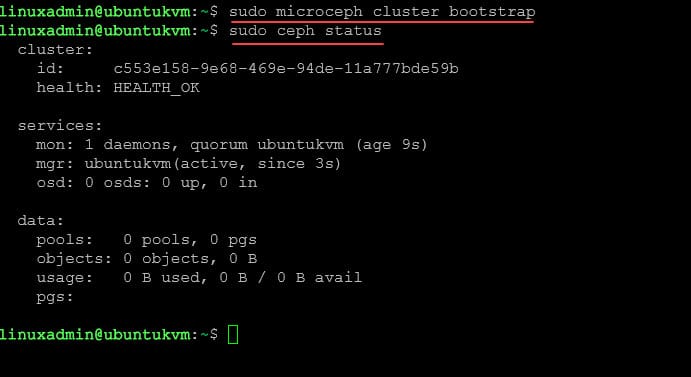
This command initializes the Ceph monitors and managers which is required for the storage cluster. This is the piece that I like about Microceph as it does the heavy lifting for you by automatically setting up these components.
Check out my in-depth post on Microceph configuration: Try Microceph for an Easy Ceph Install
4. Adding Storage to the Cluster
Each node had an additional disk dedicated to Ceph storage. I added these disks to the Ceph cluster: (your device below may be different than what I am showing here)
sudo microceph disk add /dev/sdb --wipeThis command prepares and adds the disks into the Ceph storage pool.
5. Creating CephFS
With the storage in place, I set up CephFS on top of Ceph. Why? Well, with CephFS you can work with your Docker files as simple file-level objects, making it a lot easier to work with.
sudo ceph osd pool create cephfs_data 64
sudo ceph osd pool create cephfs_metadata 64
sudo ceph fs new cephfs cephfs_metadata cephfs_data
These commands established the necessary pools and the file system. It also enables a shared storage layer accessible by all nodes.
6. Mounting CephFS on Docker Nodes
To allow Docker services to utilize the distributed storage your CephFS pool needs to be mounted on each node:
sudo mkdir /mnt/cephfs
sudo mount -t ceph <Node1_IP>:6789,<Node2_IP>:6789,<Node3_IP>:6789:/ /mnt/cephfs -o name=admin,secret=<Ceph_Admin_Key>
7. Deploying Services with Docker Swarm
Now, the fun part. With Docker Swarm and Microceph now running, you can start deploying your services. You can use Docker compose files to target your Microceph storage for your apps you deploy.
For instance, to deploy a web application with persistent storage pointing at the CephFS mount point:
version: '3.7'
services:
  webapp:
    image: my-webapp-image
    deploy:
      replicas: 3
    volumes:
      - /mnt/cephfs/webapp_data:/var/www/data
    networks:
      - webnet
networks:
  webnet:
This configuration makes sure that the web application’s persistent storage is stored across multiple nodes. This makes sure your data is redundant on CephFS.
Video
Check out my video below which details my self-hosting stack with Swarm and Microceph:
Challenges Encountered
Using Docker Swarm along with Microceph has been a fun journey, but still with a few challenges. What have I seen?
- I have had a few instances when rebooting the Docker Swarm hosts from updates, etc, that I have seen issues mounting CephFS storage on one host or another. It almost seems like a timing issue. I believe this to be weirdness with the Docker overlay networks established and the network connectivity that CephFS requires to each of the hosts in the storage cluster.
- Workarounds – I have found that if a host will not mount storage for whatever reason, I can disable docker, reboot the host, allow it to mount CephFS storage, and then reenable Docker which seems to always work.
- I think this is also due to the fact that I am using only a single network for everything. I would like to revamp my build and use a dedicated network for Ceph which is best practice anyway
- I have also seen an issue that may have more to do with Portainer than Docker Swarm – Portainer gets in a state of only seeing 2 of the 3 hosts and almost like Portainer thinks the cluster is split. I have chalked this up to possible weirdness with the Portainer agent exacerbated by the situation I described above.
Benefits of this configuration
I can now take down nodes for maintenance with relatively low downtime. Keep in mind that when you have a configuration like this, unlike virtual machines, memory isn’t getting transferred. So, containers are stopped quickly, and restarted on a different host. So, there is technically still a blip to deal with. However, this is much better than the full downtime you would encounter otherwise.
There are many benefits:
- Can now do maintenance on Docker hosts
- Can withstand a failure of a VM or an underlying host
- Provides resiliency for apps
- It’s fun 🙂
Monitoring and maintenance of the cluster
To maintain the health of the cluster, I set up monitoring tools:
- Ceph Dashboard – Check out my blog on that topic here: Ceph Dashboard Install and Configuration for Microceph
- Netdata – This is a great solution that monitors my hosts and Docker containers from the cloud – Netdata Docker Monitoring for Home Lab
- PRTG – This has been my on-premises monitoring solution of choice for a while. They have a free 100 sensor package for home labs – PRTG VMware Host Hardware Status Monitor with SNMP
Wrapping up
Deploying your own self-hosting stack with Docker Swarm and Microceph is easy to do and provides many benefits. These including having a stack that is resilient to failures and other issues that would take down a standalone Docker host. Docker Swarm isn’t perfect, but it is a nice mix and middle ground between a standalone Docker host and a full-blown Kubernetes cluster. Let me know in the comments what you are self-hosting with.