Migrate VMware to Proxmox Using Veeam for Free
You know many think about pay for enterprise tools as something they just can’t use because they don’t have a subscription or they want to use only free and open source tools. However, using Veeam, you have access to one, if not arguably, the easiest ways to migrate VMware to Proxmox that you will find. And, what’s more, we can do this for free using Veeam Community Edition.
As a note this is not a paid post by Veeam or sponsored in any way. It is strictly my thoughts from using the product for years now and testing the process to get from VMware to Proxmox.
Table of contents
- What is Veeam Community Edition?
- Veeam makes it easy to migrate VMware to Proxmox
- What about Proxmox Backup Server (PBS)?
- The process I am using to go from VMware to Proxmox
- 1. Decide what you want to do about VMware Tools
- 2. Run a full backup of VMware
- 3. Install Proxmox
- 4. Add Proxmox VE server host to Veeam
- 5. Restore the VMware disk backups to Proxmox
- Things to note
- Want to build your own Proxmox server?
- Wrapping up
What is Veeam Community Edition?
Veeam Community Edition is the free version of Veeam that allows you to use the product for 10 workloads. In other words, you get all the Veeam functionality for 10 VMs. If you are protecting virtual machine resources. You can take a look at the official page for Veeam Community Edition here: Free Backup Software For Windows, VMware, & More – Veeam.
So, just tossing out there the capability you have with an enterprise backup and recovery solution to backup 10 VMs at a time from VM (if you have more), and then migrate these to Proxmox VERY easily.
Veeam makes it easy to migrate VMware to Proxmox
With other ways to get from VMware to Proxmox, there is quite a bit of pain involved. There is the native tool that Proxmox has introduced with Proxmox 8.x that allows you to import VMware virtual machines into Proxmox. You first mount your VMware storage into Proxmox and then with the VM powered off, you migrate the disk to your Proxmox VE server. While this process works, I have found it to be fairly slow and can run into issues along the way during the disk transport and conversion.
You can also manually copy over disks to your Proxmox VE Server host storage and then run command line commands to convert your VMware disks over to QEMU disks for running in Proxmox. However, this can be time consuming and error prone.
Veeam instead makes this a super easy process now that Veeam Backup & Replication includes Proxmox VE server agentless backup as part of its latest feature set as of Veeam VBR 12.2.
What about Proxmox Backup Server (PBS)?
Well, PBS is a great solution for backing up Proxmox, once you are already on Proxmox. However, it doesn’t really offer anything in terms of how you migrate from VMware to Proxmox. We need different tools for that. This is why Proxmox has introduced the Proxmox migration wizard as part of Proxmox to allow migrating from VMware to Proxmox. However, Veeam in my opinion, is way better than this native tool at this conversion process.
Don’t know about the new Proxmox migration wizard? Check out my video here:
The process I am using to go from VMware to Proxmox
With Veeam, you can easily go from VMware to Proxmox. Here are the steps I am using:
- Decide what you want to do about VMware Tools
- Run a full backup of my VMware ESXi host in Veeam
- Install Proxmox
- Run updates
- Get storage setup and ready
- Add Proxmox VE server host to Veeam
- Restore the VMware disk backups to Proxmox
1. Decide what you want to do about VMware Tools
VMware Tools will present a problem if you leave them in place as you begin the process to migrate your virtual machines to Proxmox from VMware. However, either way, there is a path forward. If you decide to do the work up front, you will want to uninstall VMware Tools and reboot your VMs.
If you decide to wait until after you have converted your VMs to Proxmox, there is a PowerShell script you can run to cleanly uninstall VMware Tools and get rid of any lingering files, etc. Either way works, it is just a matter of “picking your poison” for the conversion process.
If you don’t uninstall from Windows before you migrate, there is a really great PowerShell script from the community that uninstalls and cleans up VMware Tools for you. Check that out here:
https://gist.github.com/broestls/f872872a00acee2fca02017160840624To uninstall from Linux (Debian):
sudo apt remove --purge open-vm-tools
sudo apt autoremove
sudo reboot
2. Run a full backup of VMware
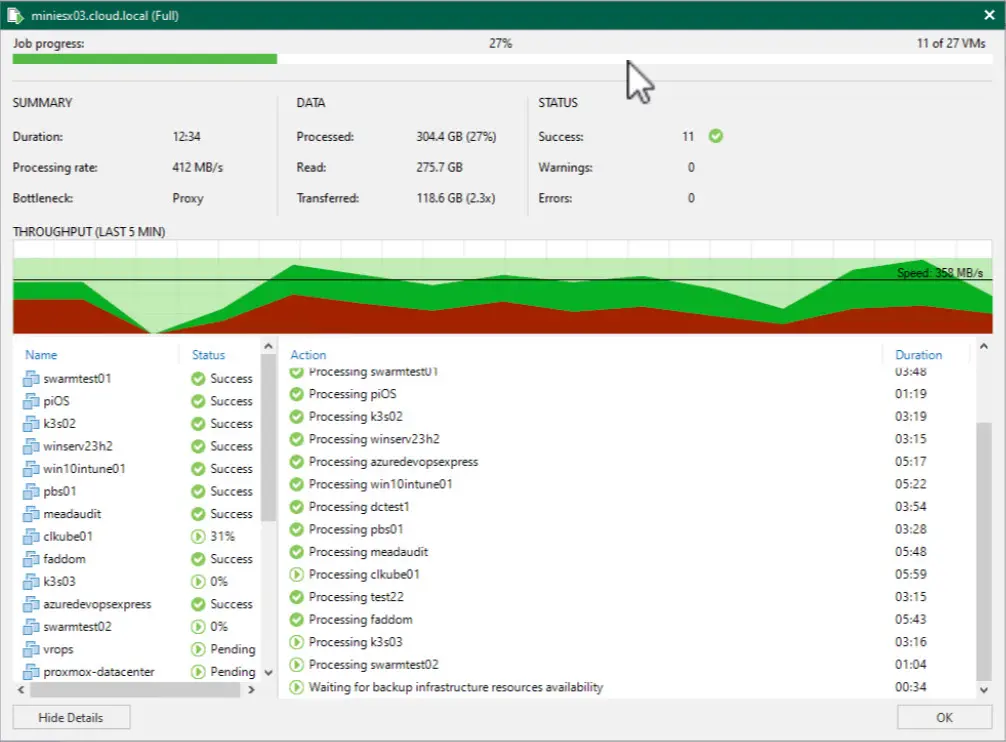
The first step I took was to run a full backup of my VMware host in Veeam. I simply created a job that encompassed the VMware ESXi host. When you point the job at the host, it will just simply back up all VMs on the host, unless you exclude VMs.
With this step, I was able to grab a good copy of all the VMs as they exist in VMware. With this step complete, we have what we need to migrate VMware to Proxmox with the features that exist in Veeam 12.2 and higher.
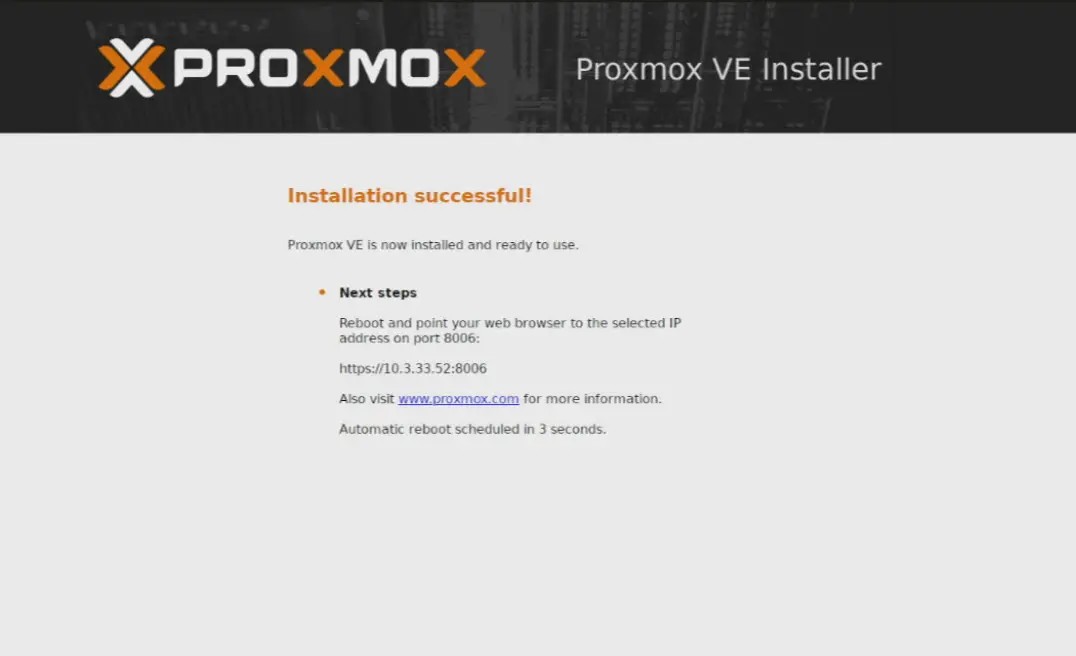
3. Install Proxmox
You will want to make sure you have your Proxmox VE Server up and running before you begin your conversion process. The process to install Proxmox is straightforward. Once you have Proxmox installed, I definitely recommend that you install all the updates that are available. Once these are installed, you can setup your storage that you want to use for your virtual machines.
Once the storage is configured, we are good to move forward preparing to migrate our VMs from VMware over to Proxmox and target the new storage that is configured. Below, you can see an NVMe drive that I have provisioned as “vmstorage” on my Promxox host.
See how to add NVMe storage to Proxmox with my guide: Proxmox add disk storage space – NVMe drive.

4. Add Proxmox VE server host to Veeam
Once Proxmox is installed, updated, and you have your virtual machine storage ready to go, we can add this to Veeam Backup & Replication and get things ready for Veeam to be able to migrate VMware to Proxmox using the built-in restore options in the Veeam Backup & Replication console.
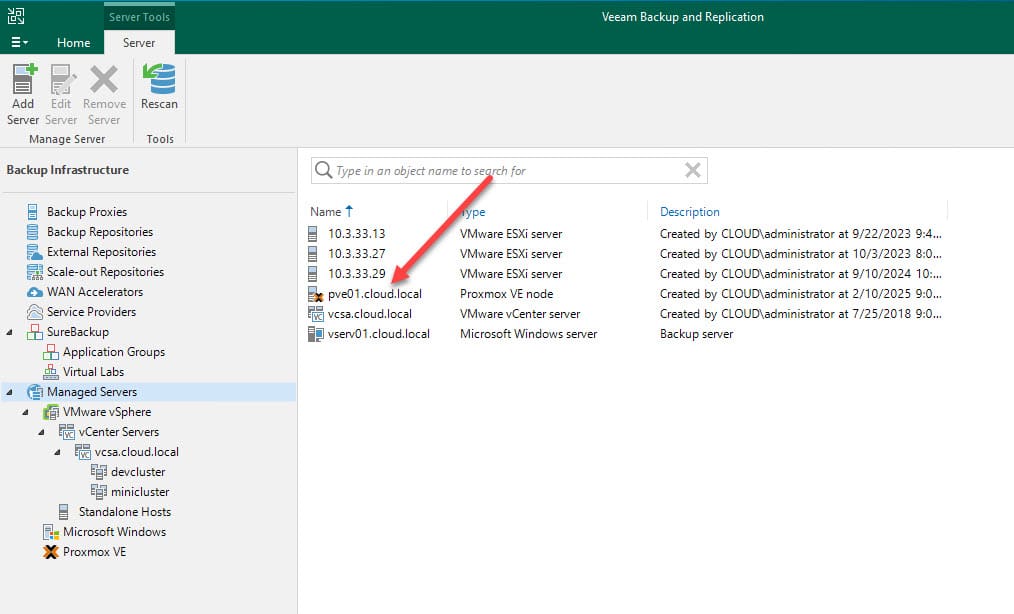
To add, click on Inventory > Add Server > Proxmox VE.
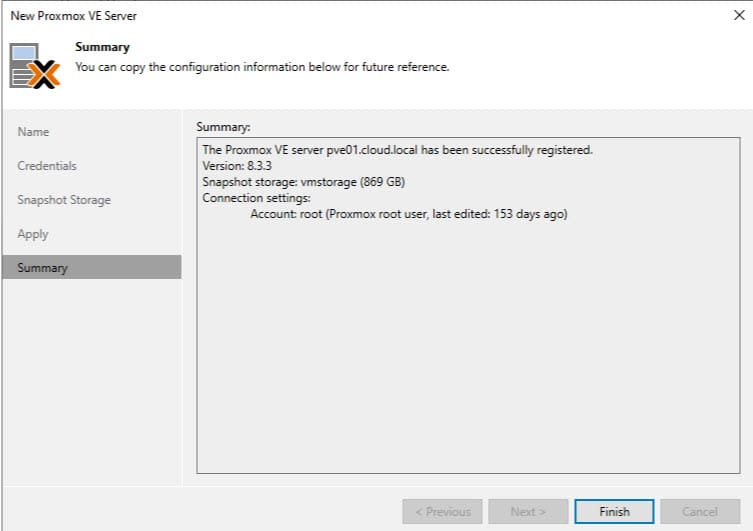
After following the wizard prompts such as providing a user with permissions to your Proxmox server, you will see the Proxmox server added to your Managed Servers inventory.
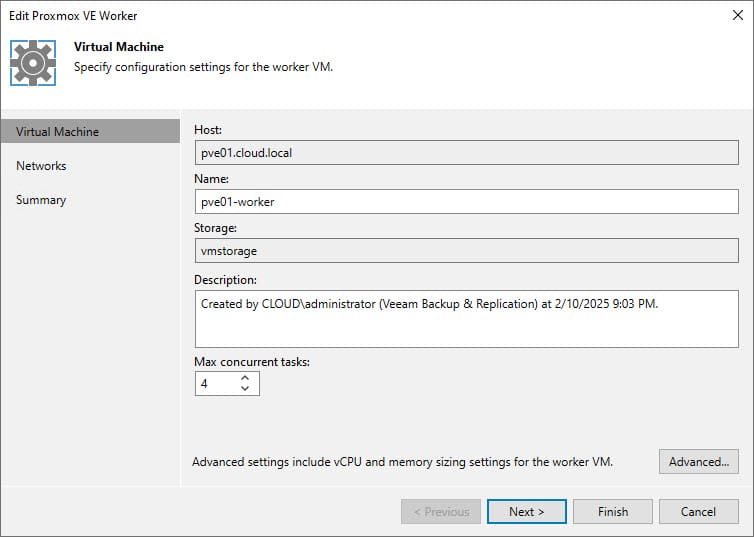
Proxmox worker node
During the process of adding Proxmox to Veeam, Veeam will provision a Proxmox “worker node” that is used for backup and restore operations. After you initially add Proxmox to Veeam, it will prompt you to add the worker node to the environment and it will step you through that wizard.
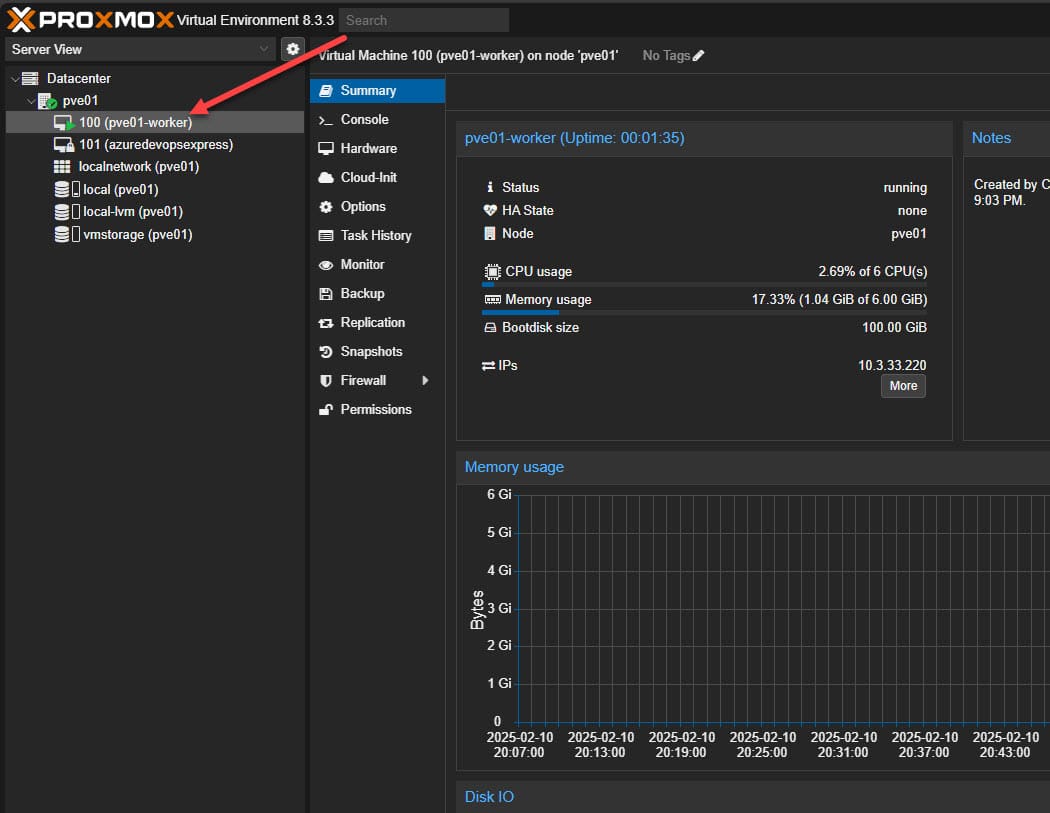
Below, you can see the worker node in Proxmox after Veeam provisions it.
5. Restore the VMware disk backups to Proxmox
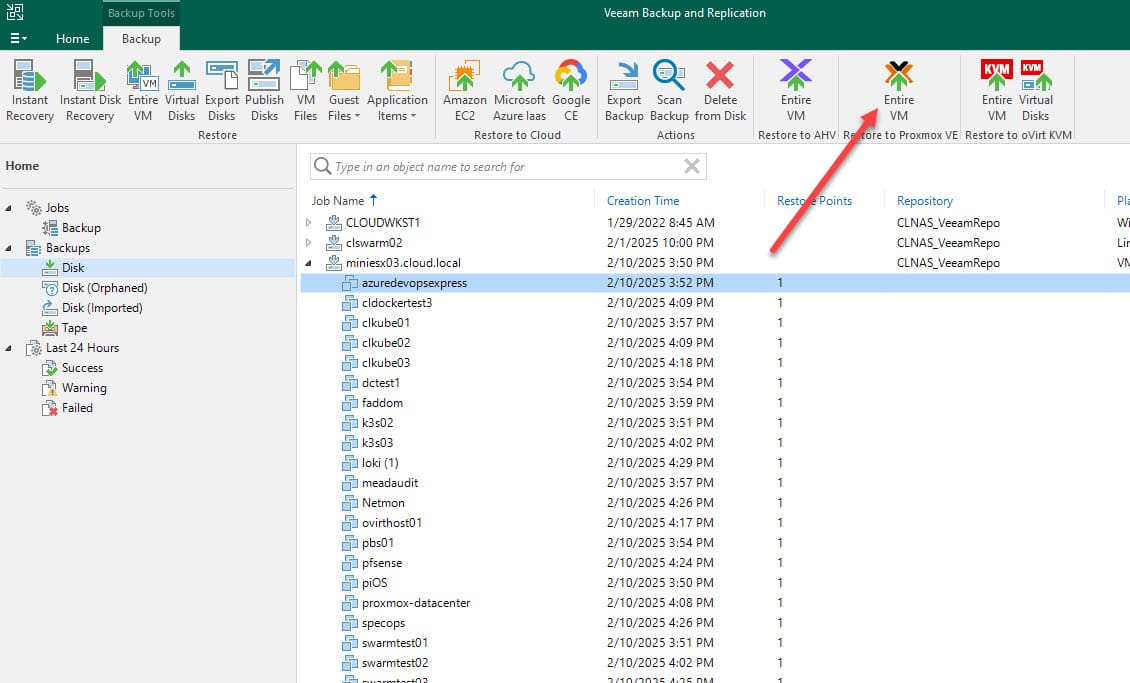
Now, comes the fun part that Veeam makes easy, restoring your VMware VM backups to Proxmox. Let’s step through the screenshots. You can see below, I have the server, azuredevopsexpress selected. But, keep in mind, here we can select multiple servers if we want. Just CTRL click or Shift + click the range of VMs you want. Then, select Entire VM to Proxmox. You can also get this choice if you right click your VM you want to restore.
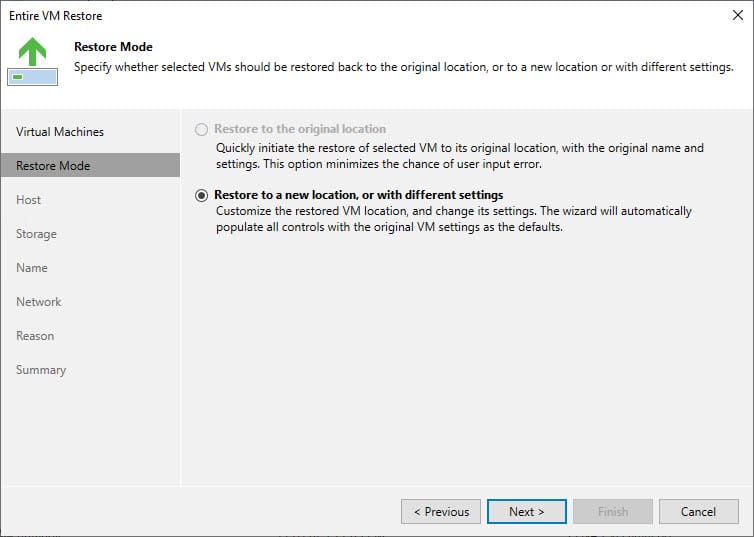
This begins the Entire VM Restore wizard. In classic Veeam fashion, here we can choose the restore point if we have multiple points on disk or add/remove virtual machines to restore.

Next, our only option is to Restore to a new location, or with different settings since we are going from VMware to Proxmox.
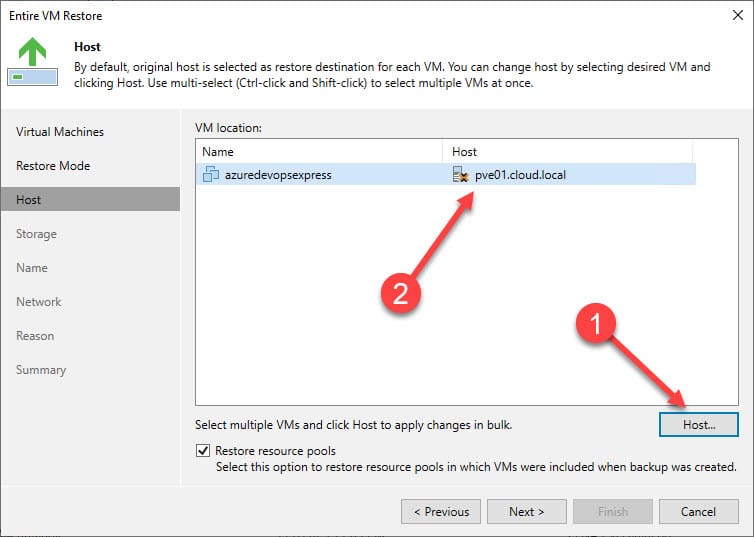
Select your Proxmox host that you want to restore to.
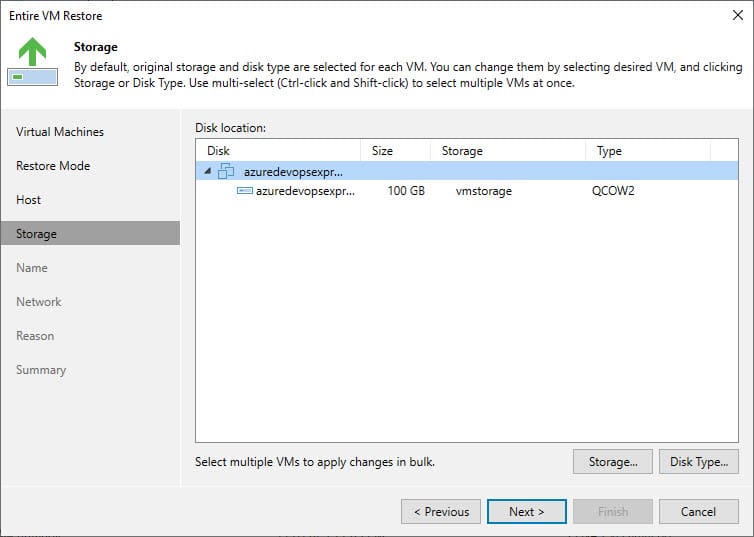
Next, we can click the Storage… and Disk Type… buttons to select the storage and disk type. Here I have selected the vmstorage on my Proxmox host and type QCOW2.
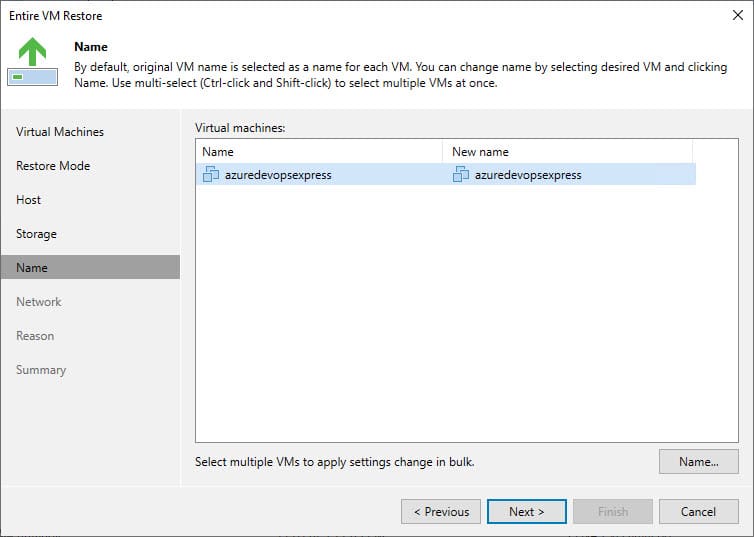
Next, we can rename the machine in Proxmox if we like.
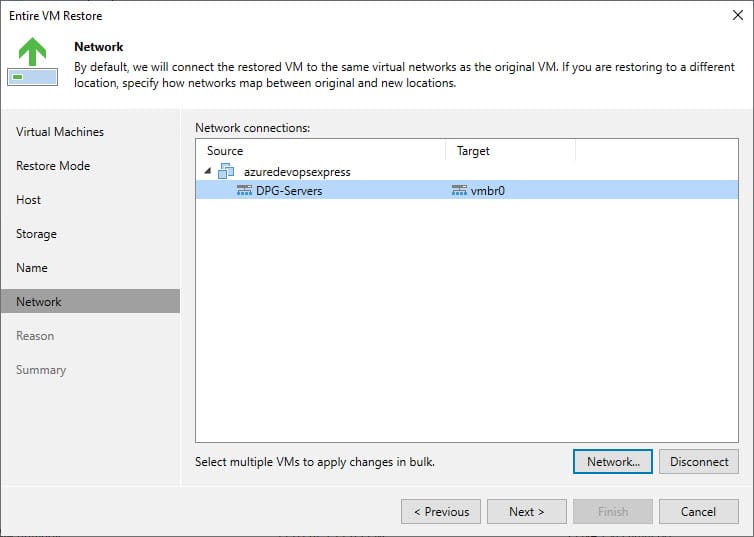
Next, select your Proxmox target networking. You can see I am just selecting the default vmbr0 Linux bridge.
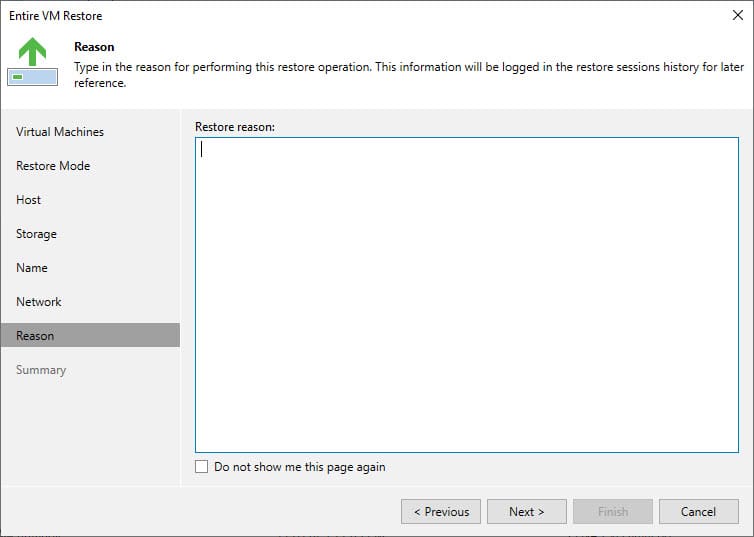
You can just next past the “restore reason” screen.
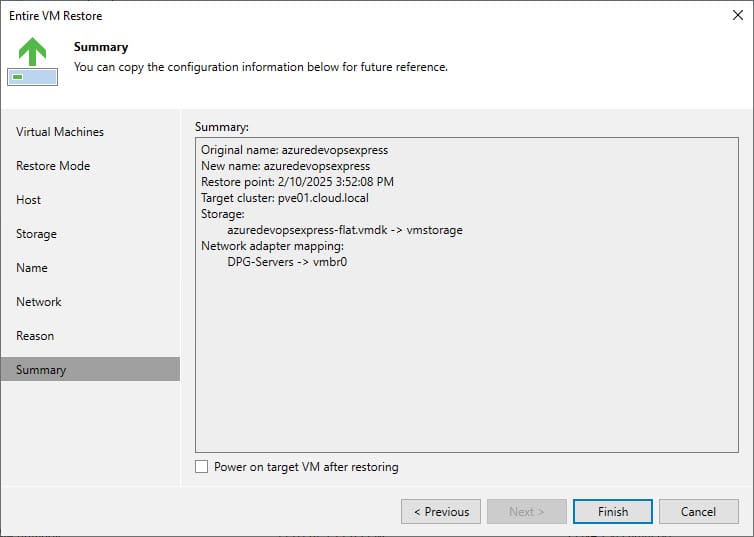
Finally, we get to the summary screen. Here you can select to Power on target VM after restoring or not and then click Finish.
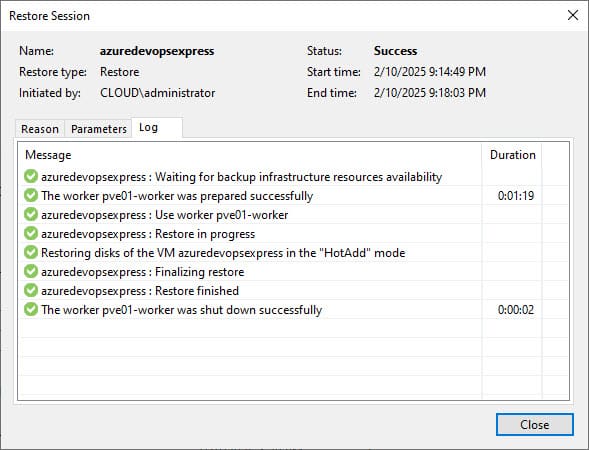
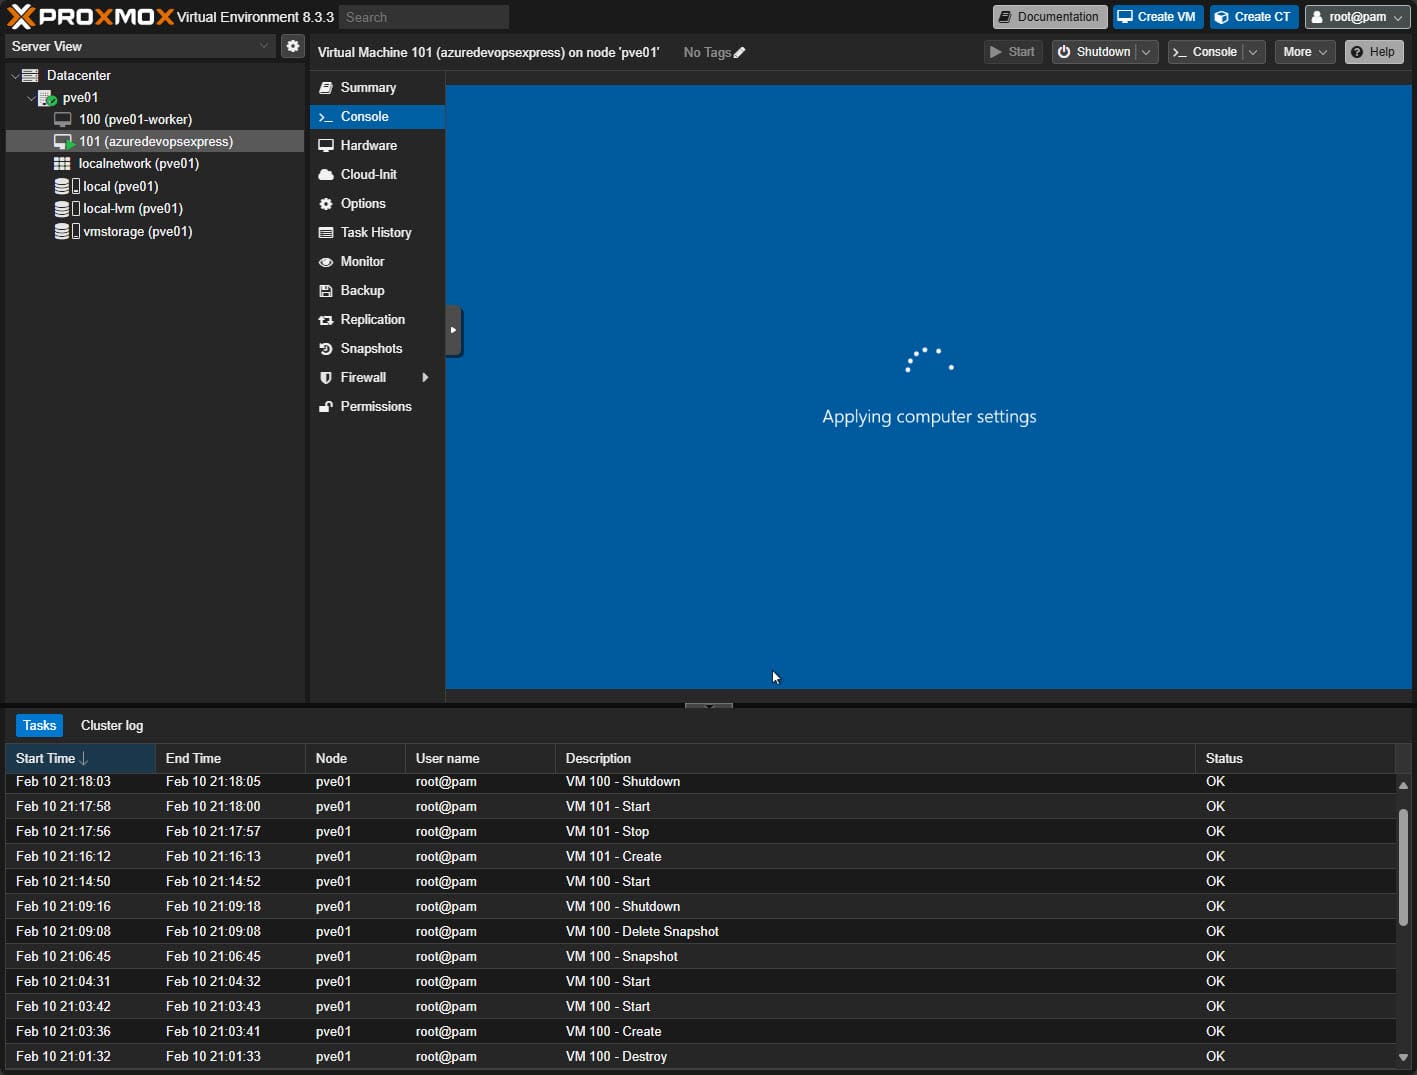
After just a few minutes, the restore completes successfully.
Below, we can see the azuredevopsexpress VM in our Proxmox inventory.
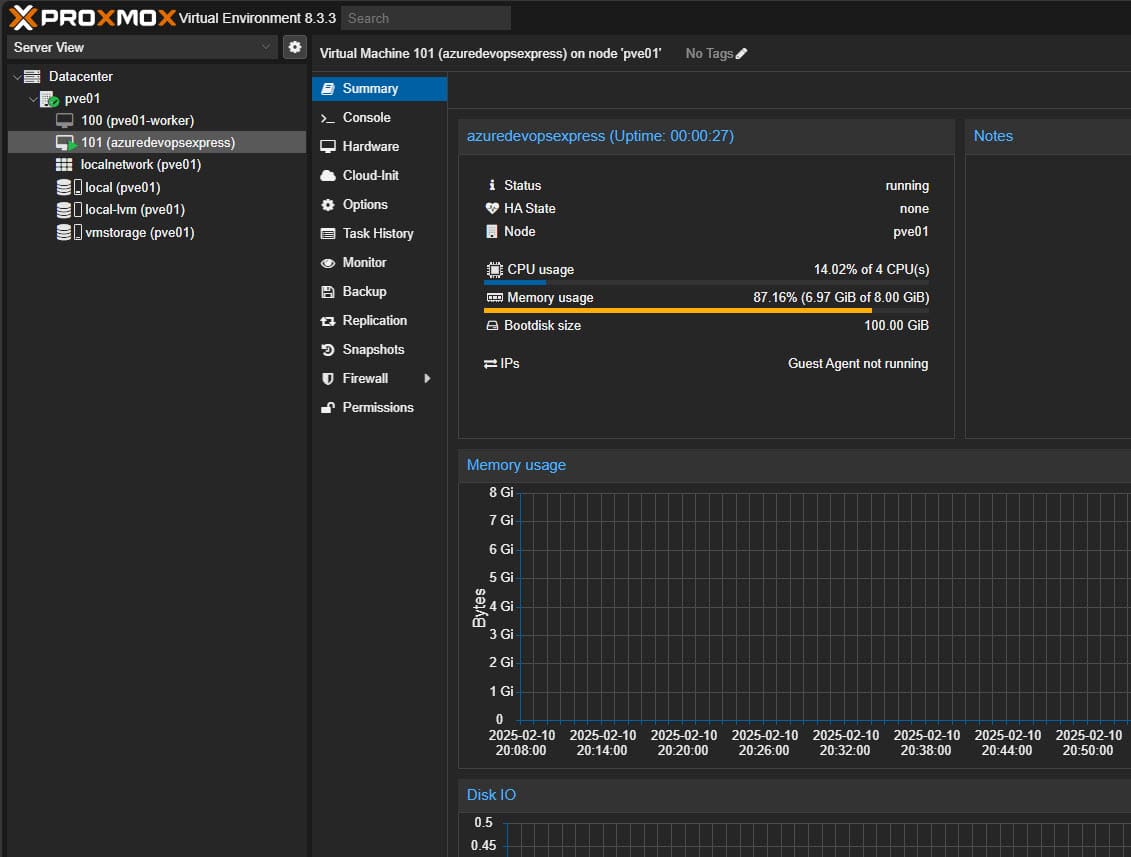
Everything is booting just fine.
Things to note
You are limited on Veeam Community Edition to 10 VMs. However, there is nothing stopping you from backing up and restoring 10 VMs at a time with your backups to convert VMware to Proxmox. This is probably going to be fine for most home labs.
Keep in mind the workflow for VMware Tools as it will give you an error in Windows each time you boot into Windows about VMware Tools crashing. You can uninstall before you migrate to Proxmox or after using the PowerShell cleanup script. Linux is less messy on that front.
Want to build your own Proxmox server?
See my bill of materials for my Proxmox Server Build 2025 below and blog post here: Proxmox Home Server Build 2025: Ryzen 9 7945HX 96GB and 10GbE
Wrapping up
Hopefully, this post helps to show just how easy it is to get from VMware to Proxmox using Veeam. Veeam is a product I have used for years now and it “just works” and always has. Even though this functionality is relatively new to convert vmware to Proxmox, I haven’t seen any issues in the migrations I have done so far. Let me know in the comments if you are using Veeam for this kind of migration, or something else.

This is an amazing guide and I also watched the youtube video. I’m about to migrate from Vmware to Proxmox and I’ve already been using veeam and I have an established backup chain, and so I may just perform a synthetic full to save time. My environment is a bit different because I don’t have an extra host – I will be backing up my vmware and then immediately blowing away that vmware OS to install proxmox. I’m very worried about data loss. Do you know how the veeam instant restore will handle a vmware VM that has multiple virtual disks? My whole reason for leaving vmware for proxmox is the 62TB limit that vmware imposes on virtual disks. One of my vmware VMs has 3 virtual disks, two of which are 62TB in size and then within the windows VM I am using a dynamic disk to present this as one 124TB volume which I then share out in windows. I would like to do my restore in such a way that this same VM has one large attached disk. Is this possible? Would you be willing to test a windows vm migration that has multiple disks attached?
I appreciate any insights,
TJ