Proxmox has many healthy options for storage that allow you to to solve many challenges and run your business critical workloads or home lab environments in a way that is resilient and gives you many options. Let’s look at Proxmox pooled storage options to consider, why you should consider them and how you configure it.
Table of contents
What is pooled storage in Proxmox?
Let’s briefly consider what pooled storage in Proxmox refers to. Pooled storage is a storage config where you have multiple disks or storage devices that are combined in a single logical storage device. The helps to improve resource use, redundancy, and gives you options when managing virtual machine disks or running containers.
There are a few options that allow you to do this, such as ZFS, LVM Thin, Ceph, and network-based storage. These give you the option to create pools of storage that are good for performance and keep your data safe.
Proxmox pooled storage options
There are a few options to take note of that we will look at in this post. These include:
- ZFS storage pools
- LVM thin pooling
- Ceph storage pool
- Directory based storage pool
- Network-based storage pool
1. ZFS Storage Pools
Many are familiar with and really like ZFS. You have probably used ZFS if you have used something like TrueNAS before. Proxmox can also take adavantage of ZFS storage. It provides high performance and provides things like volume management and other filesystem capabilities. You can do things like RAID-Z, snapshots, compression, deduplication, and other features.
ZFS has really great data corruption prevention built-in. Note the following:
- With traditional file systems, these overwrite the data in place. It means that if the system crashes or you have a sudden loss of power, data may be corrupted, or become inconsistent
- The ZFS “copy on write” feature prevents this from happening since data is not modified in place. Instead it uses a process to write new data to a different location. It then updates metadata to point to the new block of data.
- The old data remains intact which avoids corruption
- This metadata approach is also the reason why ZFS snapshots are near instantaneous
Steps to configure from the GUI
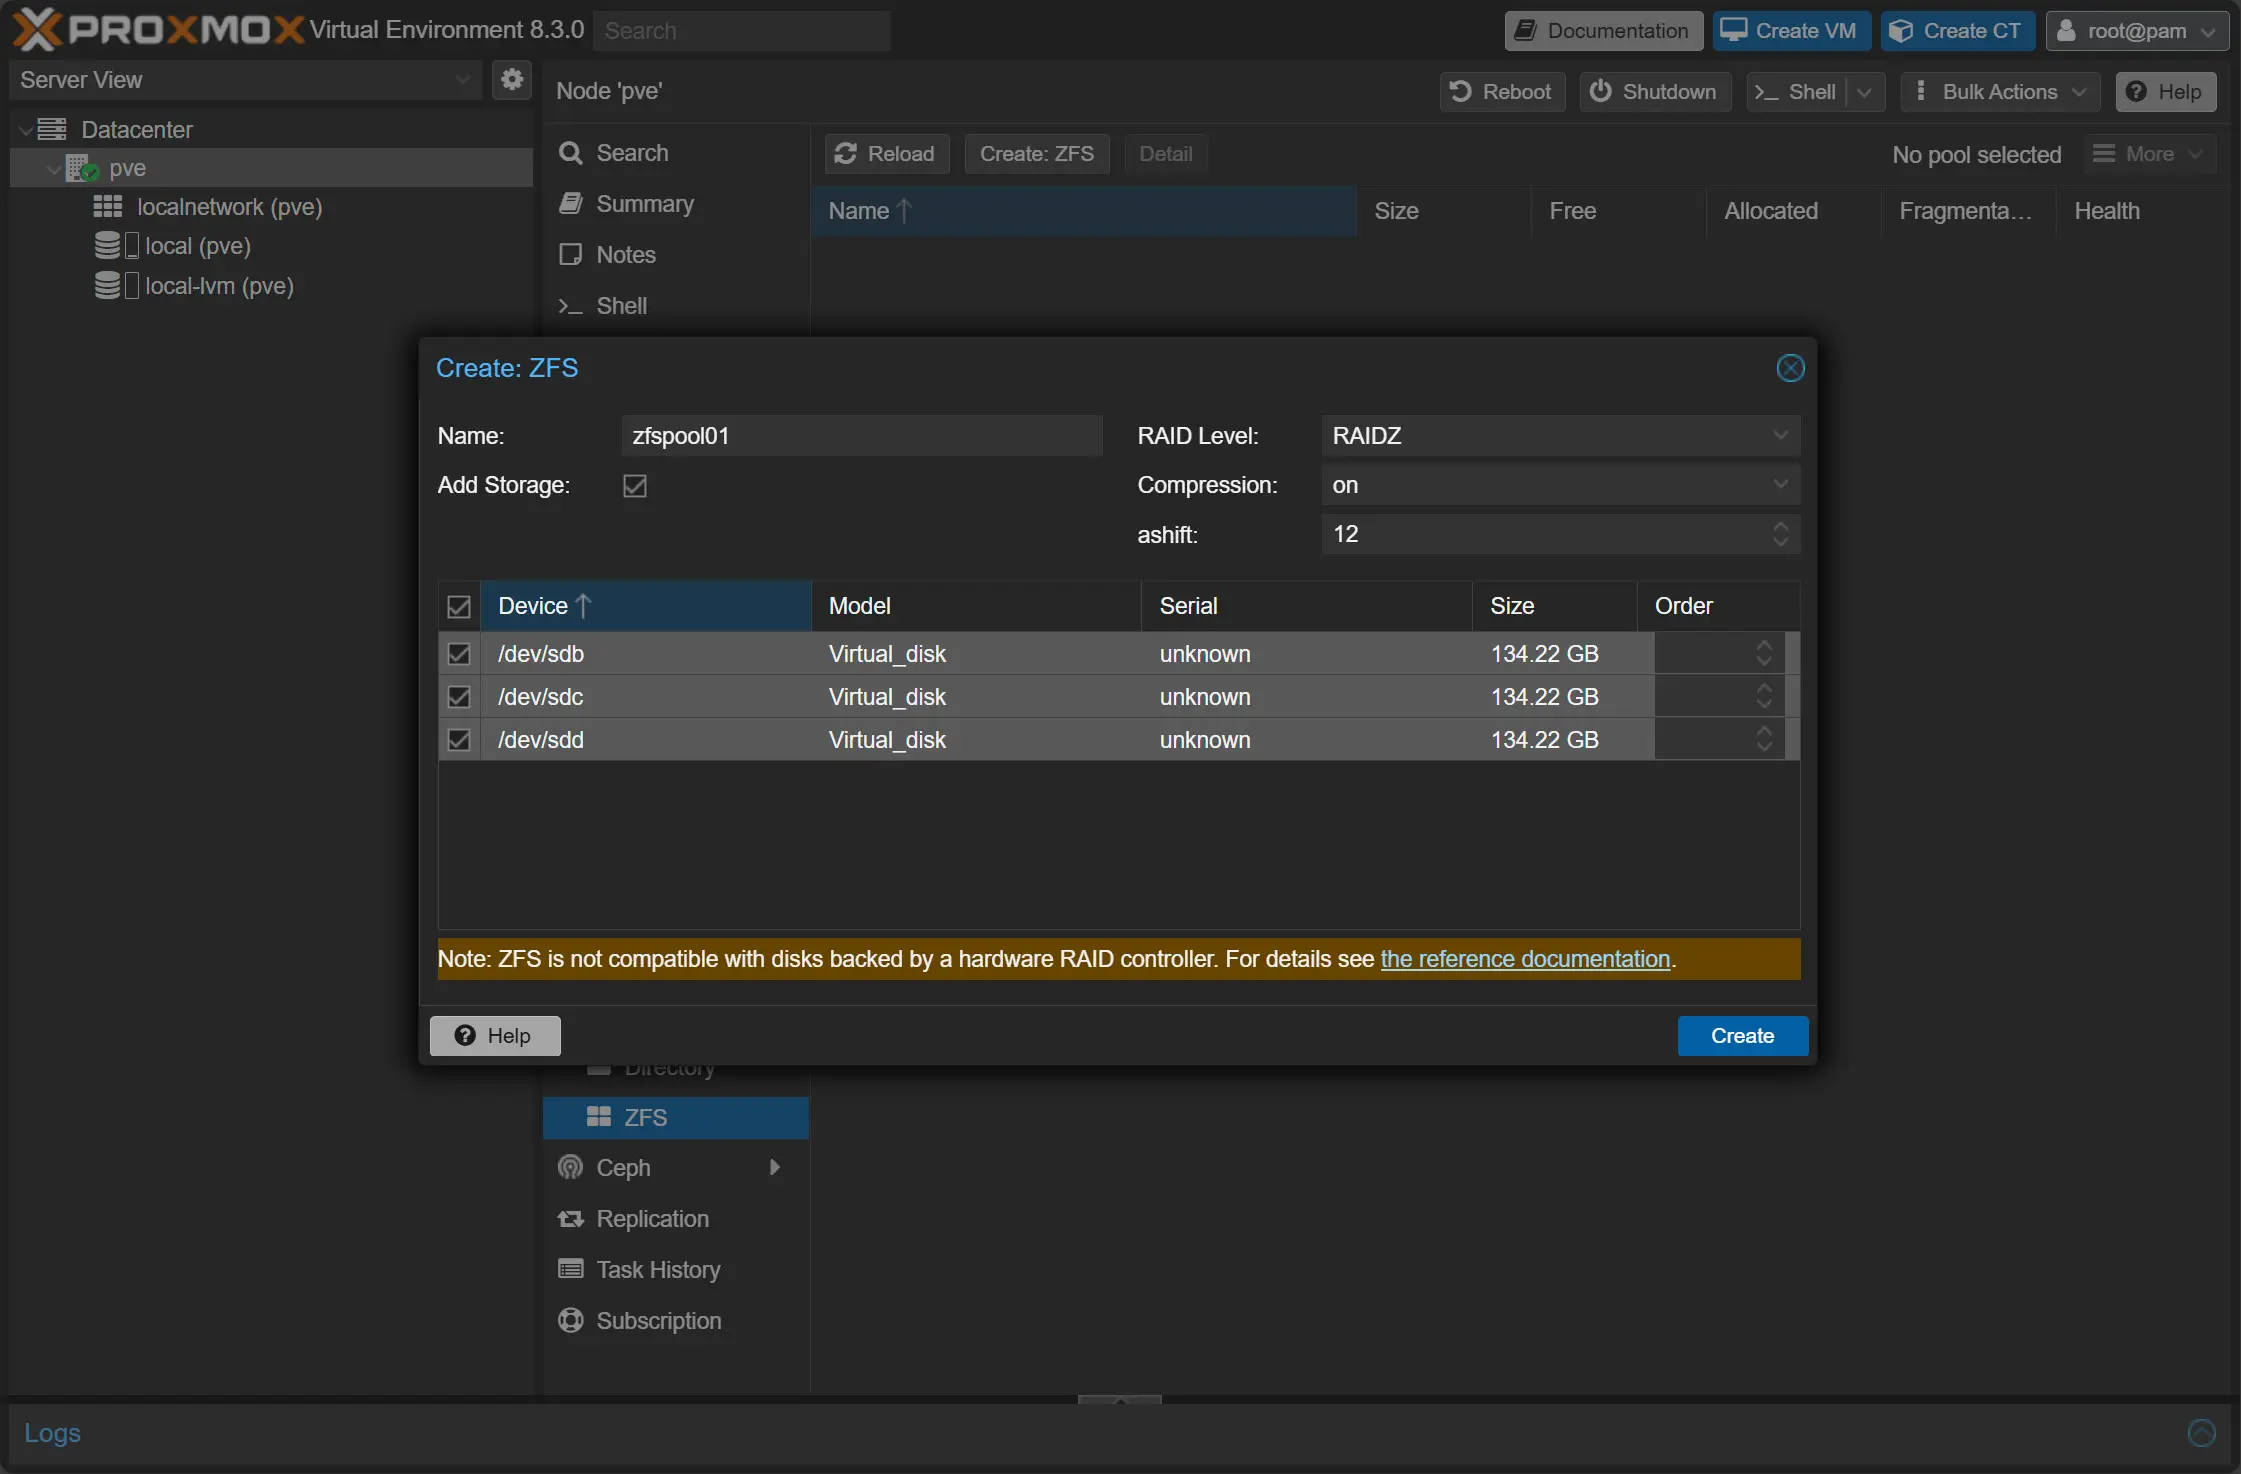
After you log into the Proxmox GUI, navigate to Disks > ZFS > Create: ZFS.
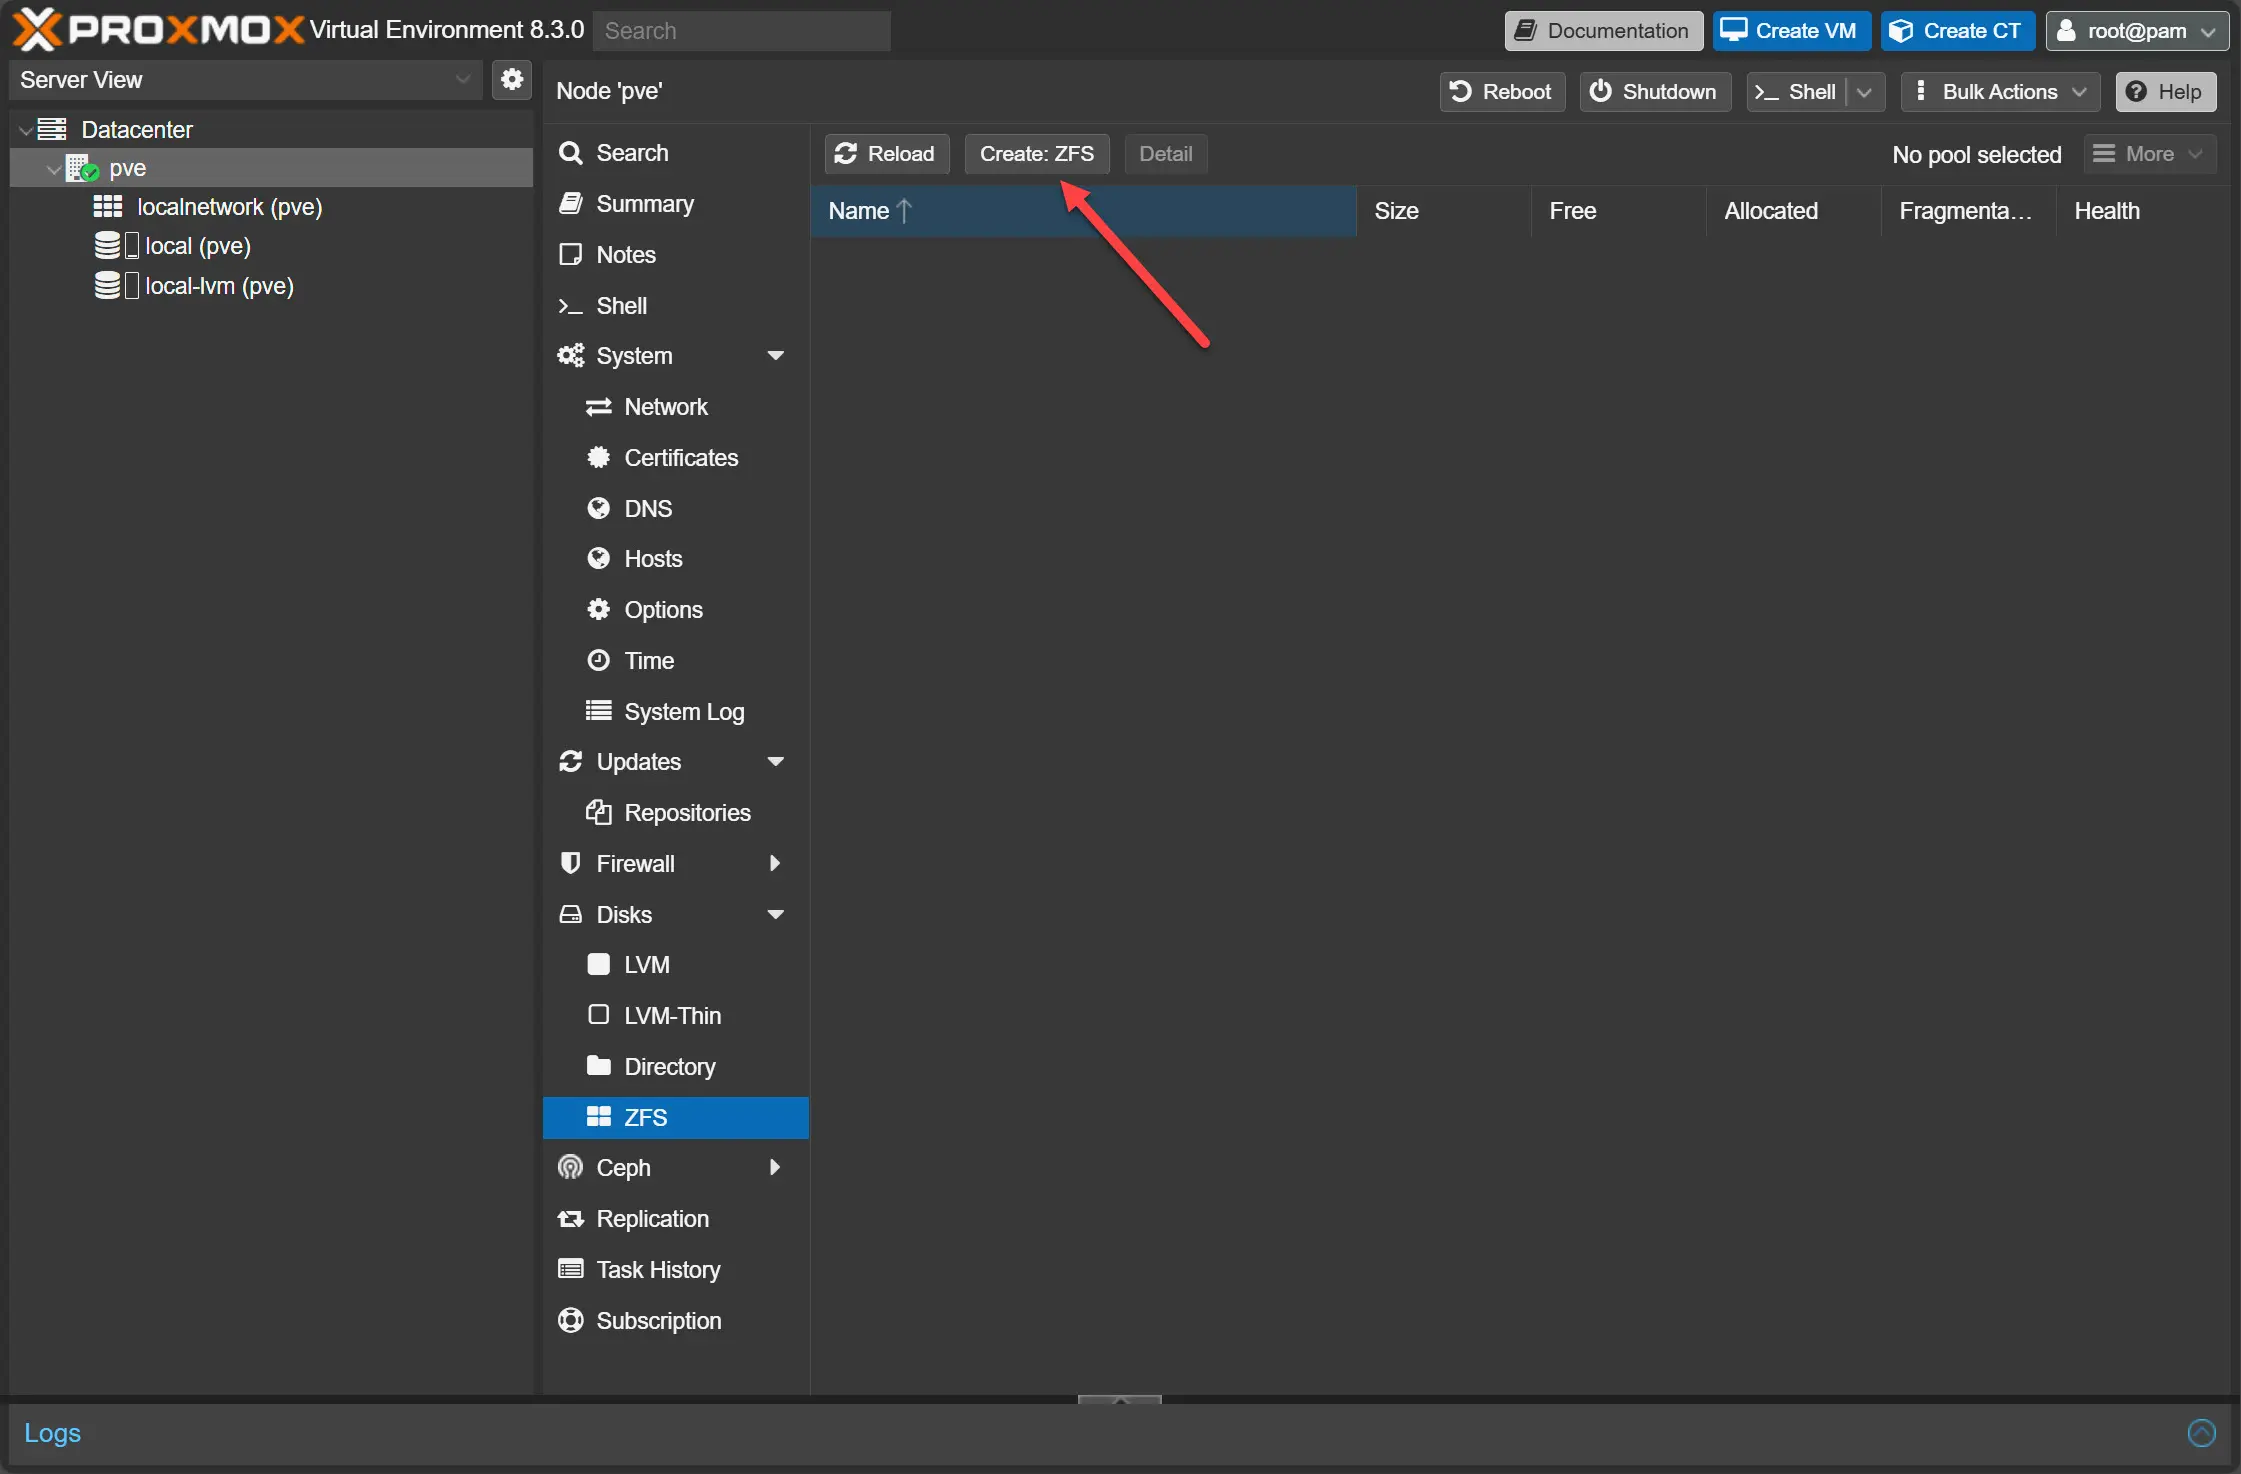
It will display all available drives that you have attached that are available for adding to your ZFS storage pool.
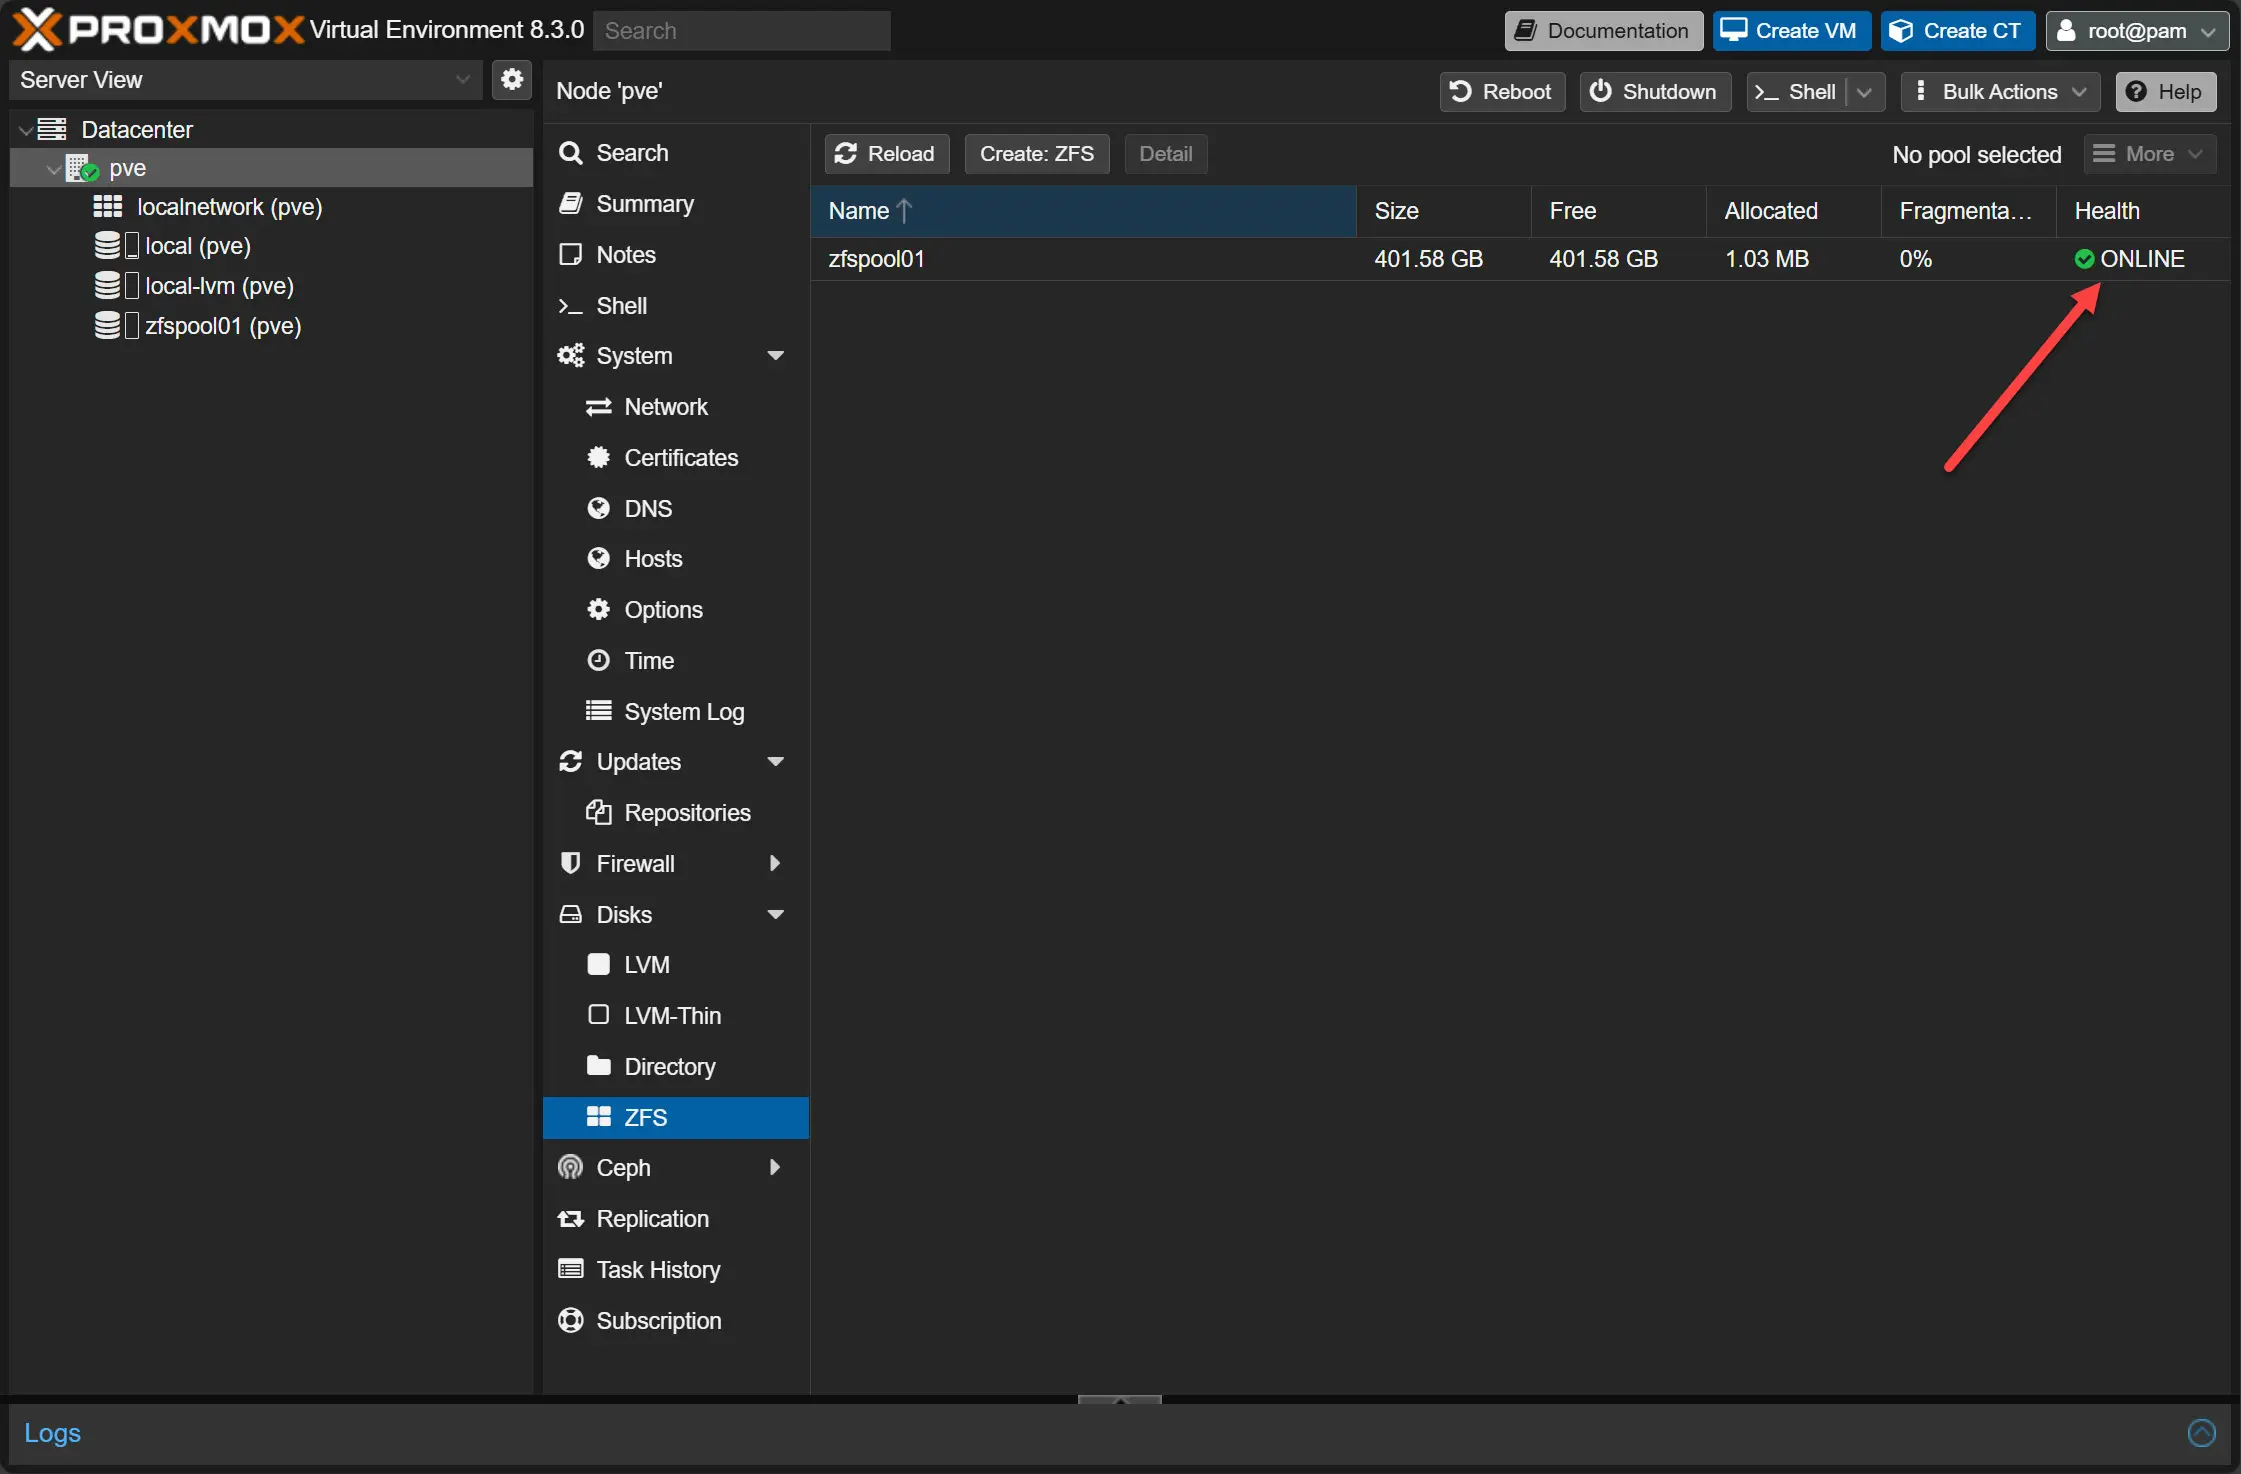
The ZFS storage pool is online after creating.
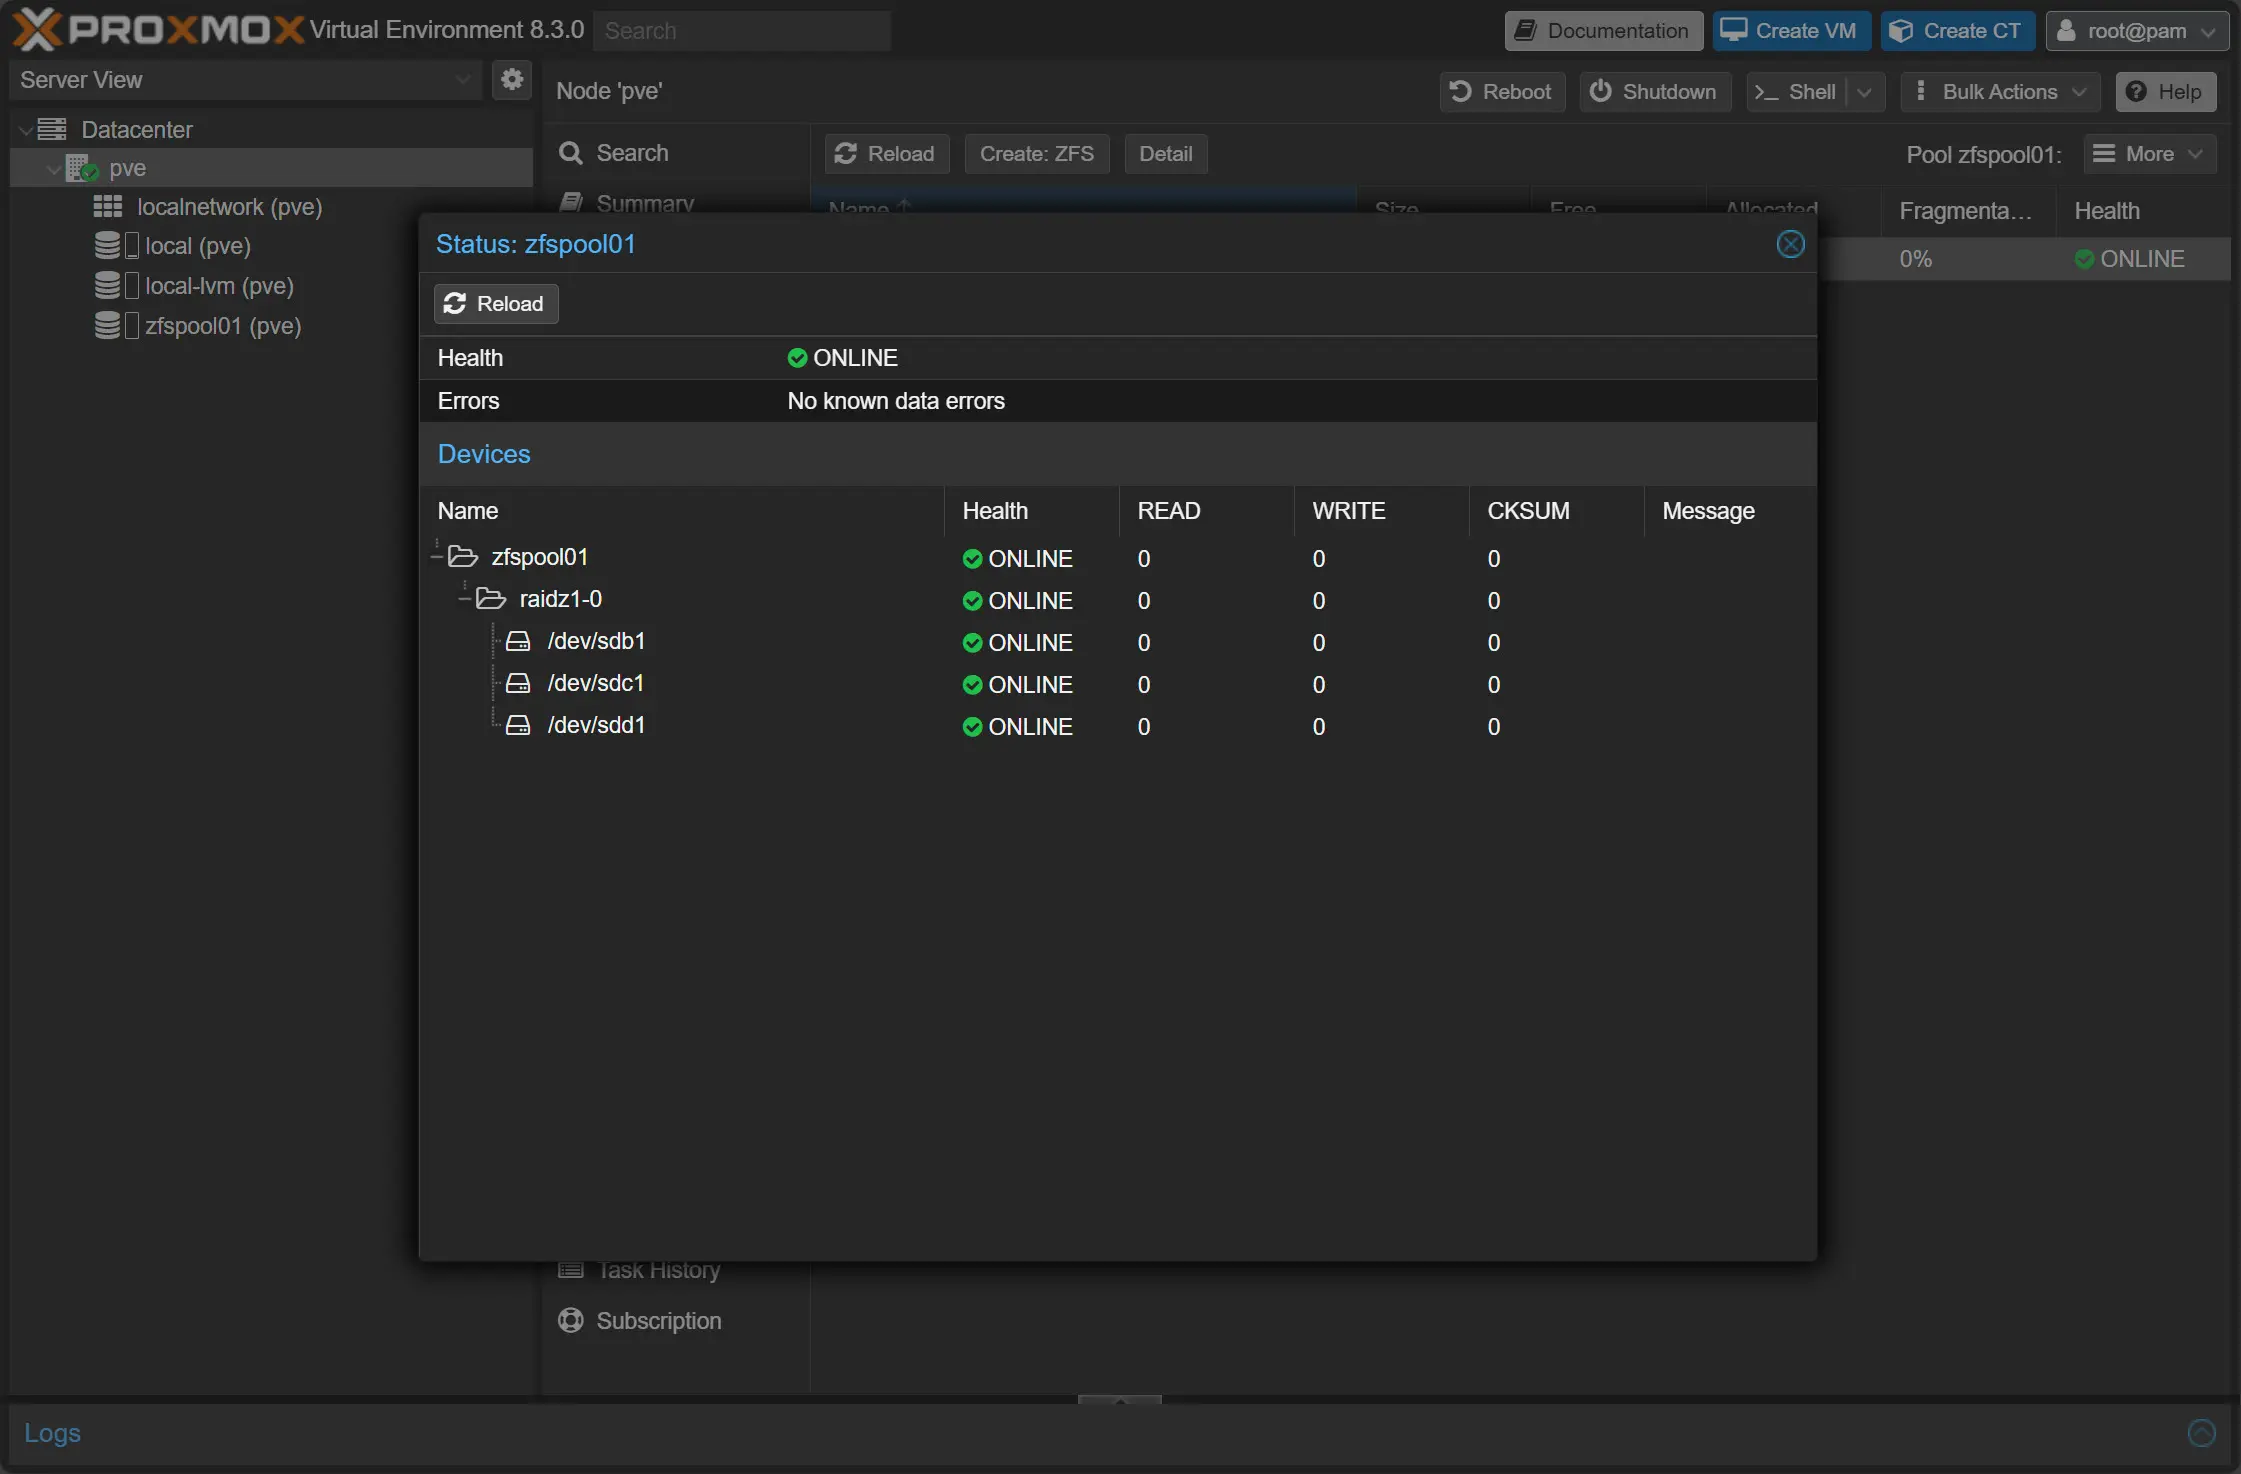
If you view the properties of the ZFS storage pool, you will get a look at the details of the pool, including drives that are members and their health.
Steps to configure from the command line
Note the following steps to install and configure ZFS storage pools. Install ZFS if not already available:
apt update && apt install zfsutils-linux -yTo create a mirror pool (RAID 1 equivalent):
zpool create mypool mirror /dev/sda /dev/sdbTo create a RAID-Z1 pool:
zpool create mypool raidz1 /dev/sda /dev/sdb /dev/sdcAdd the pool to Proxmox storage configuration:
echo -e "mypool\tzfs\t/mypool\t\t" >> /etc/pve/storage.cfgVerify the pool:
zpool listPros and cons
ZFS is great, but note the pros and cons below.
Pros:
- It is easy to setup in the Proxmox GUI
- It is extremely resilient for your data
- It can self-heal
- Uses copy on write where metadata points to new data
Cons:
- It can be a RAM hog
- There is a performance overhead to the copy on write feature
- It can’t use hardware RAID controllers, these must operate in RAID 0 or JBOD mode
2. LVM thin pooling
LVM thin pooling is another way to provision Proxmox pooled storage in your PVE environment. It allows efficiently using your space and dynamic storage assignment. It helps to prevent wasting space and you can overprovision your storage.
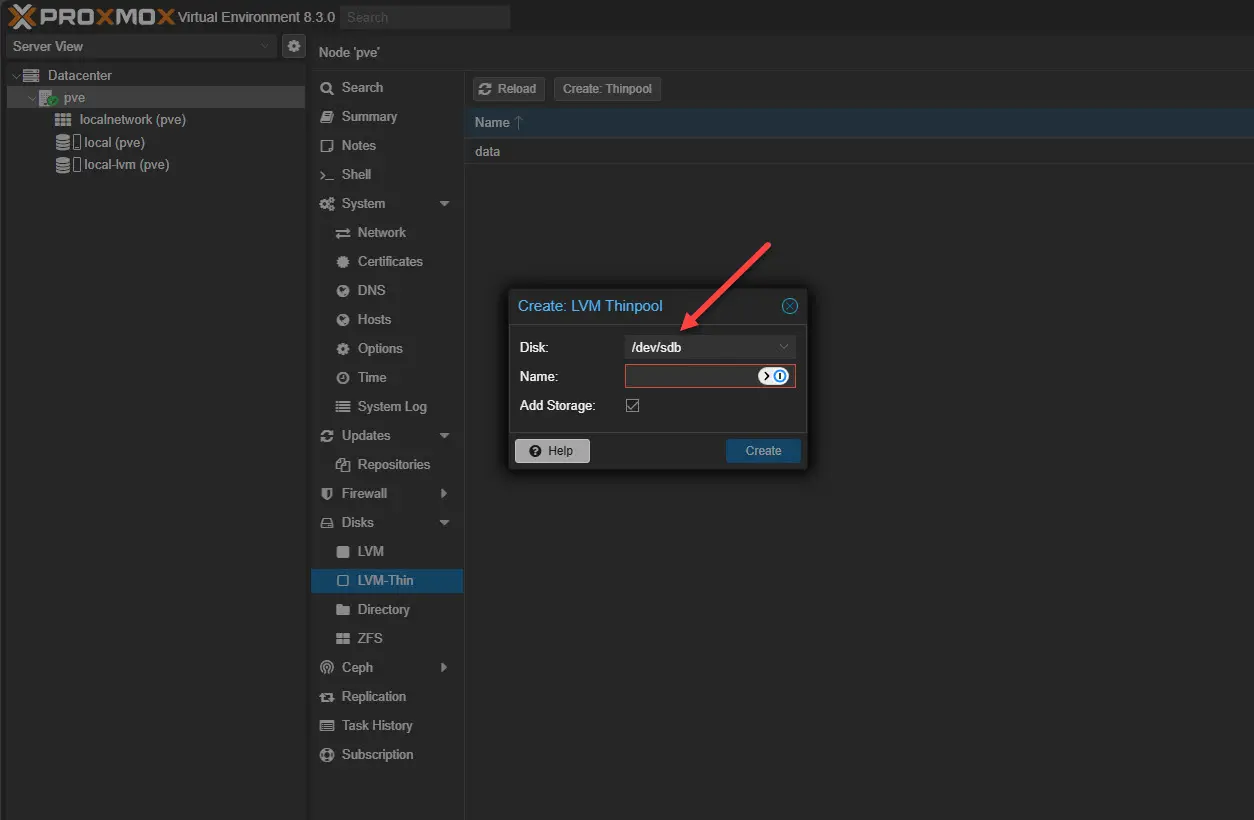
In the GUI, you can’t create a multi-disk volume group. It means if you want to have multiple disks backing your LVM thin pool, you can’t do that through the GUI, but only from the command line.
You can setup multi-disk volume groups from the command line:
#create the volume group with multiple disks
vgcreate my-vg /dev/sdb /dev/sdc /dev/sdd

#check that it was created
vgs
Create an LVM thin pool using the volume group:
#create a new thin pool
lvcreate -l 100%FREE -T my-vg/thinpool

#check that it was created
lvs
Manually add this to your /etc/pve/storage.cfg file:
lvmthin: multi-thin
    thinpool thinpool
    vgname my-vg
    content images,rootdir
Restart your PVE storage services:
systemctl restart pvedaemon pvestatdDoes this protect you from a drive failure?
No. If a single drive fails in a Volume Group (VG) that spans multiple drives, the entire LVM Thin Pool is lost. All data stored in the thin pool is lost.
But, we can create a volume group with RAID enabled. For this, we create LVM Raid.
vgcreate my-vg /dev/sdb /dev/sdc /dev/sdd
lvcreate -l 100%FREE --type raid5 -n thinpool my-vg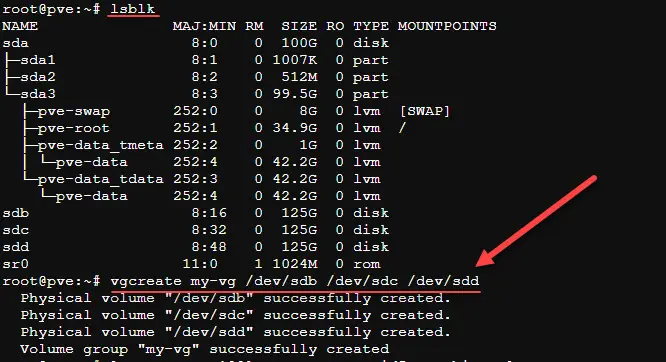
Below we create the thinpool with RAID5 using all available space.

3. Ceph Storage Pool
Ceph is a really powerful distributed storage technology built into Proxmox. It allows you to aggregate local disks in each Proxmox server into a single logical volume that all hosts have access to. Copies of your data are spread across each of the nodes for data protection. This allows withstanding a failure and still having access to your data.
How to Configure Ceph Storage in Proxmox
apt update && apt install ceph ceph-common -yCreate a Ceph Pool
ceph osd pool create mypool 128Enable Ceph RADOS Block Device (RBD) in Proxmox
echo -e "my_ceph\tceph\t\tpool=mypool\t" >> /etc/pve/storage.cfgVerify the pool
ceph osd pool lsMore detailed walkthrough of Ceph configuration in Proxmox
Check out my detailed blog post on configuring this in Proxmox
Also, I created a video of the process:
4. Directory-Based Storage Pool
You can take LVM-Thin pool or ZFS pool and mount this as a directory. When you do this Proxmox can treat it like a regular folder-based storage technology.
LVM as a directory
Let’s note the steps to add an LVM Thin pool as a directory. First we need to Find the LVM Logical Volume Name:
lvdisplayIt might be something like /dev/pve/data.
Create a Mount Point
mkdir -p /mnt/lvm_storageFormat the LVM Volume (Only if it’s empty)
mkfs.ext4 /dev/pve/dataMount the LVM Volume
mount /dev/pve/data /mnt/lvm_storageMake the Mount Persistent by adding the below or similar to FSTAB:
/dev/pve/data /mnt/lvm_storage ext4 defaults 0 2Add Storage to Proxmox by editing the Proxmox storage config
echo -e "lvm_dir_storage\tdir\t/mnt/lvm_storage\t" >> /etc/pve/storage.cfgZFS as a directory
ZFS pools can be mounted as directories by setting a mountpoint.
Create a ZFS Pool (if not already created)
zpool create mypool mirror /dev/sda /dev/sdbSet the Mount Point
zfs set mountpoint=/mnt/zfs_storage mypoolEnsure the ZFS Pool is Mounted
zfs mount mypoolMake the Mount Persistent ZFS automatically persists mounts, but you can verify with:
zfs listAdd Storage to Proxmox
echo -e "zfs_dir_storage\tdir\t/mnt/zfs_storage\t" >> /etc/pve/storage.cfgPoints to note when mounting LVM and ZFS to a directory
you lose the benefits of LVM-Thin and ZFS snapshots because Proxmox will treat it as standard storage instead of using Proxmox’s built-in LVM Thin or ZFS storage management.
5. Network-Based Storage Pool (NFS, iSCSI, GlusterFS, etc.)
Network storage solutions allow multiple Proxmox nodes to access the same pooled storage, ensuring redundancy and flexibility.
How to Configure NFS Storage in Proxmox
Install NFS client
apt update && apt install nfs-common -yMount the NFS Share
mount -t nfs 192.168.1.100:/exported/path /mnt/nfs_poolAdd Storage to Proxmox
echo -e "my_nfs\tnfs\t192.168.1.100:/exported/path\t" >> /etc/pve/storage.cfgHow to Configure iSCSI Storage in Proxmox
Install Open-iSCSI
apt update && apt install open-iscsi -yDiscover available iSCSI targets
iscsiadm -m discovery -t st -p 192.168.1.200Login to iSCSI target
iscsiadm -m node -T iqn.2023-10.com.storage.target -p 192.168.1.200 -lAdd Storage to Proxmox
echo -e "my_iscsi\tiscsi\t192.168.1.200\t\t" >> /etc/pve/storage.cfgBuild your own Proxmox server
See my bill of materials for my Proxmox Server Build 2025 below:
- Minisforum BD795M – https://amzn.to/3PQXFa8
- RackChoice 2U Micro ATX Compact – https://amzn.to/3CeIW5H
- Cooler Master MWE Gold 850 V2 – https://amzn.to/4aFXhET
- Noctua NH-L9i-17xx, Premium Low-Profile CPU Cooler – https://amzn.to/4hAKIwG
- Crucial 96GB kit of DDR5 SODIMM memory kit – https://amzn.to/40w3ONQ
- Intel X520-DA2 10 GbE network adapter – https://amzn.to/4jv05ZA
- Kingston 240 GB drive for boot – https://amzn.to/4hv6sKG
- Samsung EVO 990 Pro 2TB – https://amzn.to/40OwtiA
Wrapping up
Setting up multiple devies in a pooled storage configuration in Proxmox can be a great way to have high performance storage that is efficient and resilient against failure. We have discussed 5 options in the blog post that you may want to try out in your home lab environment or production infrastructure. Let me know in the comments if you have used the storage pool technologies we have discussed or if you are using something else you are happy with.
Google is updating how articles are shown. Don’t miss our leading home lab and tech content, written by humans, by setting Virtualization Howto as a preferred source.
About The Author