I really like Nginx Proxy Manager to secure my Docker containers running on Docker hosts with SSL certificates. I find it to be extremely intuitive and it is absolutely one of those “must have” tools in the home lab environment that you need to have. However, have you wondered how you can secure Nginx Proxy Manager admin interface with SSL? Let’s see the simple steps needed to do this.
Table of contents
- Brief overview of Nginx Proxy Manager
- Why secure the Nginx Proxy Manager admin interface with SSL?
- You can use self-signed certificates or LetsEncrypt
- Add a proxy host for the Nginx Proxy Manager host itself
- Closing off access to NPM on HTTP port 81
- Reconfigure your Nginx Proxy Manager container
- Downide of Nginx Proxy Manager: Not as DevOps friendly
- Wrapping up
Brief overview of Nginx Proxy Manager
The Nginx Proxy Manager (NPM) is a well-known reverse proxy solution that is actually easy. Many reverse proxy solutions are fairly intimidating to get a feel for, such as Traefik. I love Traefik, but the learning curve is very steep and it can be extremely difficult to do what you would think would be simple things or find the right documentation to do what you need it to do.
Nginx Proxy Manager is a true point and click solution that allows easily setting up reverse proxy hosts and terminate SSL certificates, either with your own certificate (providing the issued certificate from your certificate authority and the private key) or using Lets Encrypt certificates.
Be sure to learn more about Nginx Proxy Manager on the official site here: Nginx Proxy Manager.
Why secure the Nginx Proxy Manager admin interface with SSL?
Like many containerized solutions, NPM comes default exposing plain text port 81 as the default admin interface.. This means that any passwords you are typing into your Nginx Proxy Manager web admin interface are sent across the network in clear text. If you are a security nerd and like to take a look, you can set up a port mirror on a port and look at the traffic coming across and you will literally see clear text passwords in the traffic captures…pretty cool and scary at the same time.
Never put a clear text website into production that doesn’t use an SSL connection as all passwords are sent in this insecure way. It’s ok to test with port 81 in a home lab but even there, I try to get things secured once you have everything configured and up and running.
You can use self-signed certificates or LetsEncrypt
Let’s Encrypt certificates require a little more configuration to setup. However, really not that much more. I will show you how to create a self-signed certificate to secure your hostname.
Generate a self-signed certificate
To generate a self-signed certificate, use a Linux machine or a Windows Subsystem for Linux instance and run the command below. You can replace “selfsigned” in the names with anything you want. There is nothing significant about that in the name.
openssl req -newkey rsa:2048 -new -nodes -x509 -days 3650 -keyout selfsigned.pem -out selfsigned.crtAdd a custom certificate in NPM
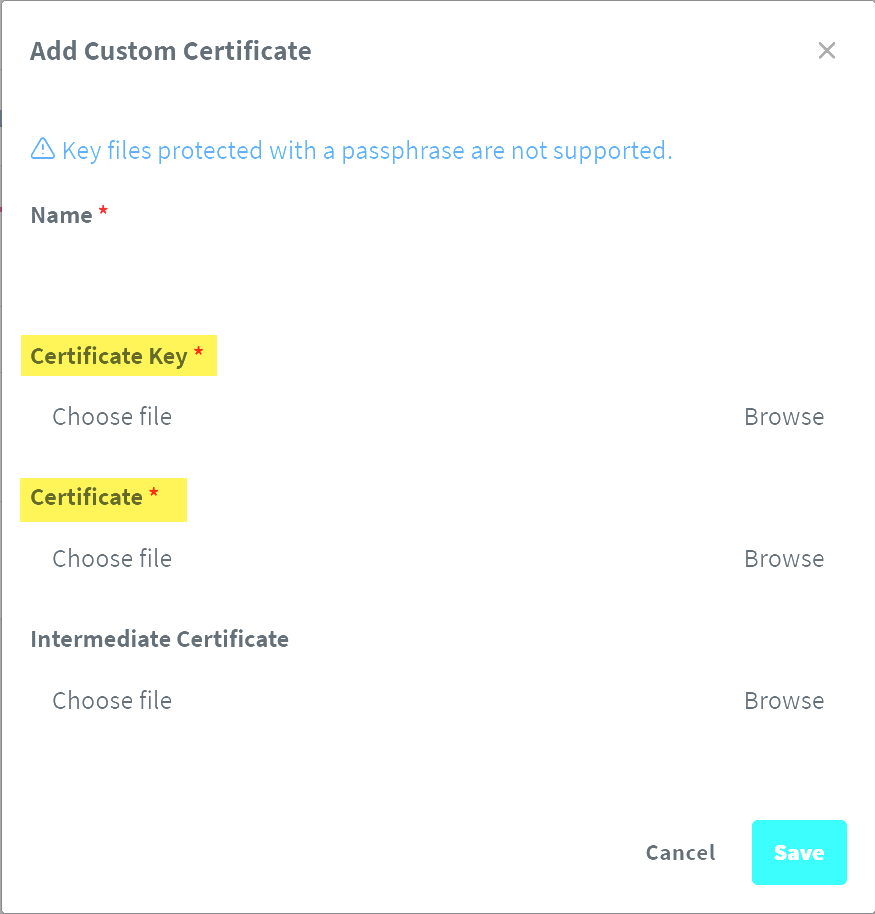
Once you have the .pem file and the .crt file, you will use these to add a new SSL certificate in NPM. Navigate to SSL certificates and click the Add SSL Certificate button.
Browse and find the pem file and crt file you created with the openssl command.
If you want to see how you can add a Let’s Encrypt certificate to your NPM instance, check out my full blog post walkthrough on that topic here: Setting Up Nginx Proxy Manager on Docker with Easy LetsEncrypt SSL.
Add a proxy host for the Nginx Proxy Manager host itself
Now that we have a self-signed certificate, or a Let’s Encrypt certificate in place, we can now add a proxy host for the NPM host itself. Let’s see how we can add this proxy host.
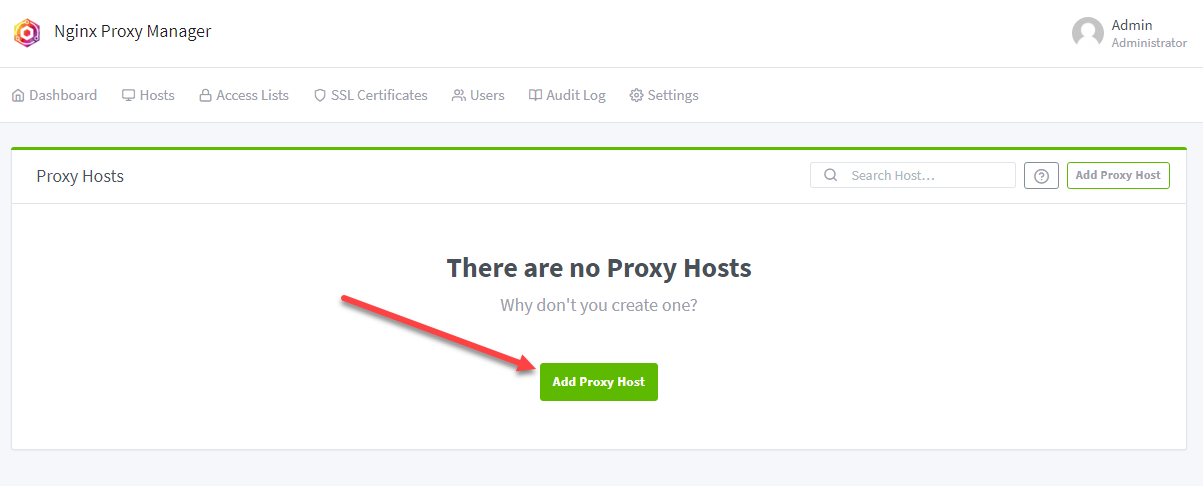
Navigate to Hosts > Proxy Hosts > Add Proxy Host.
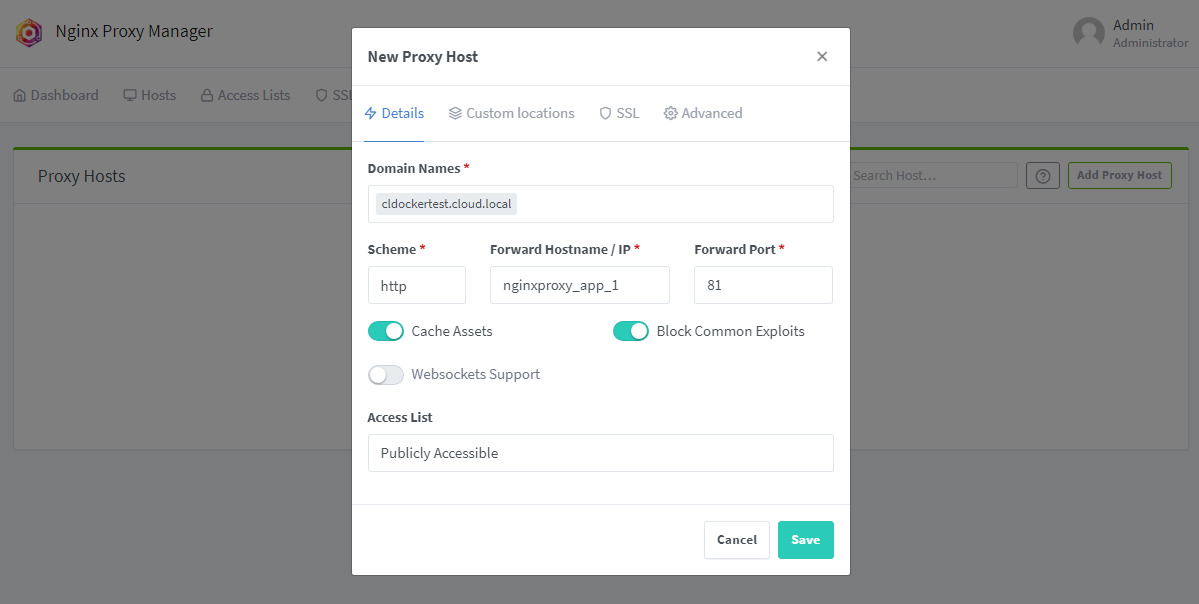
Enter your domain name that you used in creating the SSL certificate. Note in the scheme we are selecting HTTP. The reason for this is that we are telling Nginx Proxy Manager how it needs to connect to the container which is itself in the Forward Hostname /IP. We are telling it to proxy traffic coming in for the name on the certificate and redirect it on the backend to port 81 of the container.
Also, I am flagging on Cache Assets and Block Common Exploits.
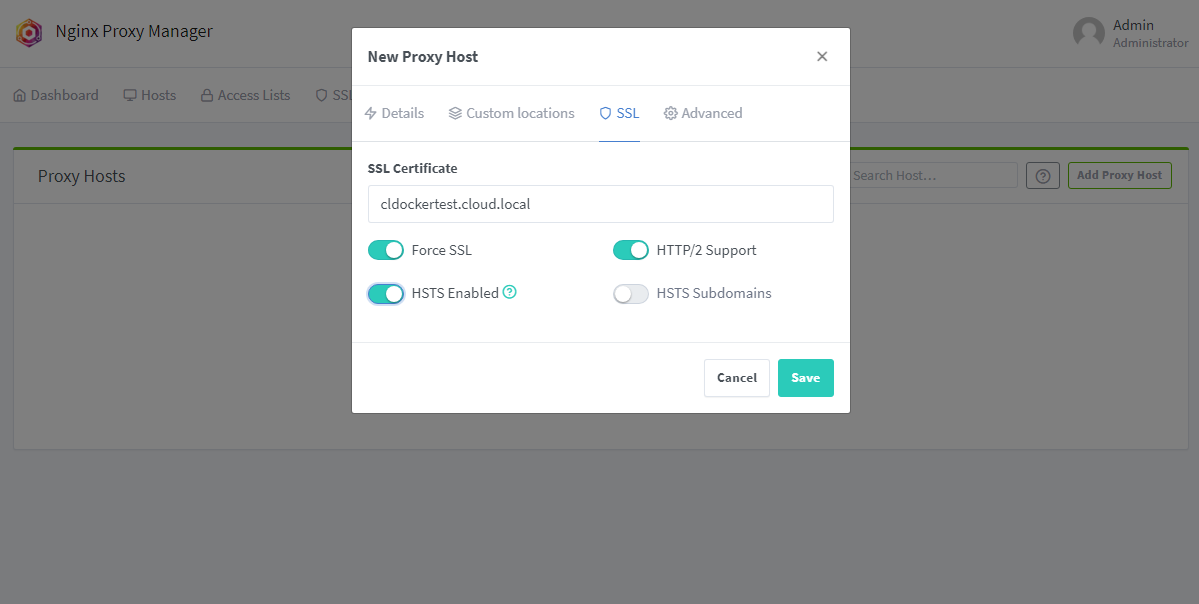
Under the SSL tab, we select the custom SSL certificate and then flag on Force SSL, HTTP/2 Support, and HSTS Enabled.
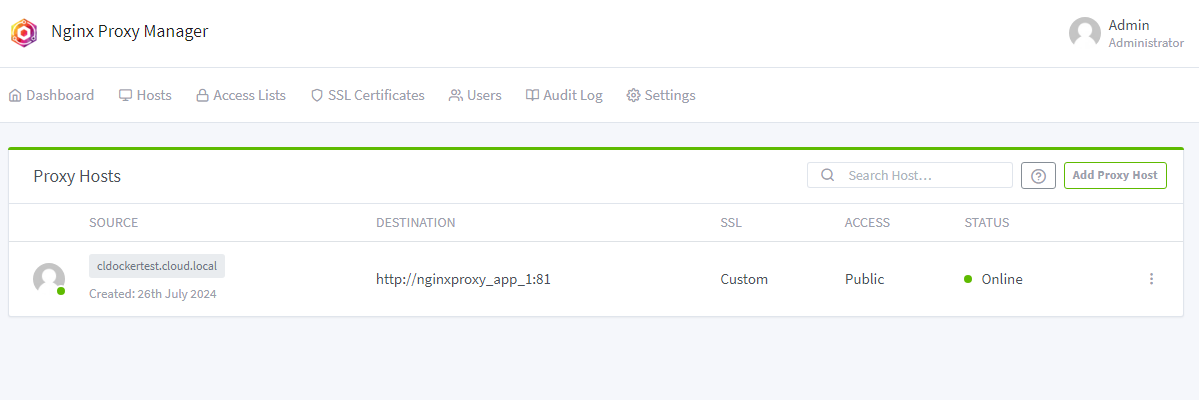
The proxy host is added successfully. We see the destination and the status is online.
Closing off access to NPM on HTTP port 81
Now that we have the proxy host configuration in place, we need to close off access to the NPM configuration for HTTP port 81.
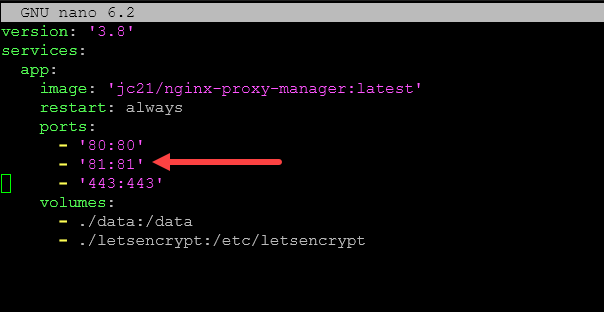
Below, is the default configuration. It forwards port 80, 81, and 443.
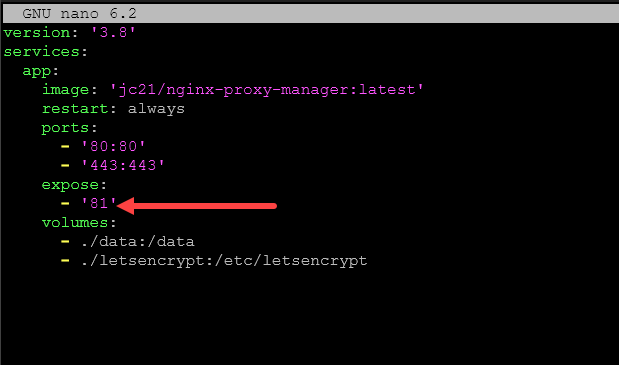
Now, we need to take the port configuration ’81:81′ out and then place it in the expose section as we have done below.
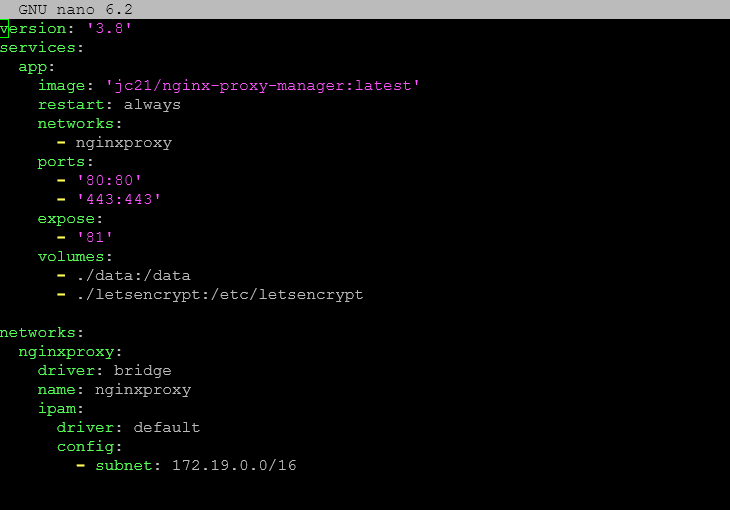
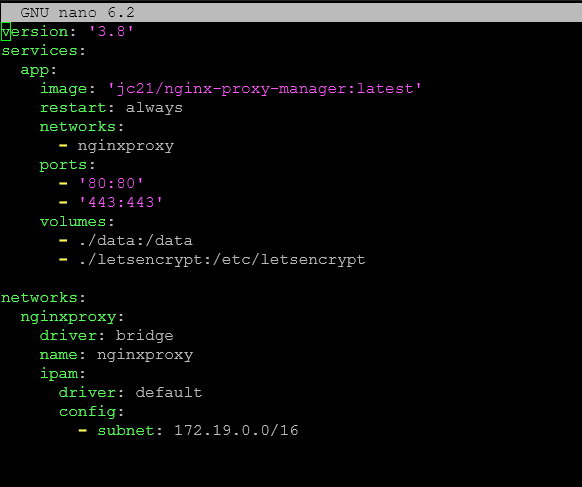
Below is the entire configuration, showing the networks configuration. This will ensure the only way traffic coming in can get to port 81 is through the NPM proxy host.
As an alternative way, which is easier, we can just take out the port configuration for port 81 altogether and not place it in either the ports configuration or expose configuration. The reason we can do it this way is the container image itself exposes port 81.
So, port 81 will be open to the Docker network, but not coming in from outside the Docker container host running NPM.
Reconfigure your Nginx Proxy Manager container
Now that we have changed the Docker Compose configuration, you need to restart your NPM container, building it with the new config found in the docker-compose.yml file. You can do that with this command. Be sure to replace “nginxproxy” with the name of your NPM container in your docker-compose.yml file.
docker-compose -f docker-compose.yml up -d --build nginxproxyDownide of Nginx Proxy Manager: Not as DevOps friendly
There are so many upsides to the solution and the ease of terminating SSL that it provides. However, there is one downside of the solution that stands out when compared to other solutions like Traefik. NPM doesn’t give you an easy way to have your certificates and configurations in code like Traefik does.
With Traefik, one of the downsides of the solution is all your configuration is in YAML files that can be difficult to create. But the downside is also the upside. All your configurations are in YAML. It means you can easily check in your configuration as code and automate things more easily.
Wrapping up
Nginx Proxy Manager is a great proxy for your Docker containers running on your Docker container host. Securing the admin interface for Nginx Proxy Manager is a must in order to keep your passwords and other communication from being transmitted over clear text on the HTTP port 81 default website. If you have any issues working through getting this configured, hit me up on the VHT forums (click the forums link in the secondary menu at the top).
Google is updating how articles are shown. Don’t miss our leading home lab and tech content, written by humans, by setting Virtualization Howto as a preferred source.


