As you guys know, I have been a huge proponent of Docker Swarm. I think it is still a very viable option as a middle ground between standalone Docker hosts and Kubernetes when you need more availability than a single host can provide but you don’t want the complexity of Kubernetes. One extremely popular solution to run in the home lab is Pi-Hole. Pihole is a network-wide ad-blocker that also does DNS resolution. While it is fairly easy to get up and running on a standalone Docker host, there are a few nuances to be aware of with Docker Swarm. Let’s look at Pihole Docker Swarm configuration with Nginx Proxy Manager.
Table of contents
Brief overview of Pihole
Pi-hole is a network wide ad-blocker. It uses DNS sinkholing technology to blacklist traffic to known telemetry, ad related, and even malware domains. When a client requests a resource from a domain on a blocklist, it simply “sinkholes” the request and it isn’t returned.
This not only is a great security solution to add, it also saves on network bandwidth since your clients aren’t having to pull down resources that you don’t knowingly request, like ads.
Brief overview of Docker Swarm
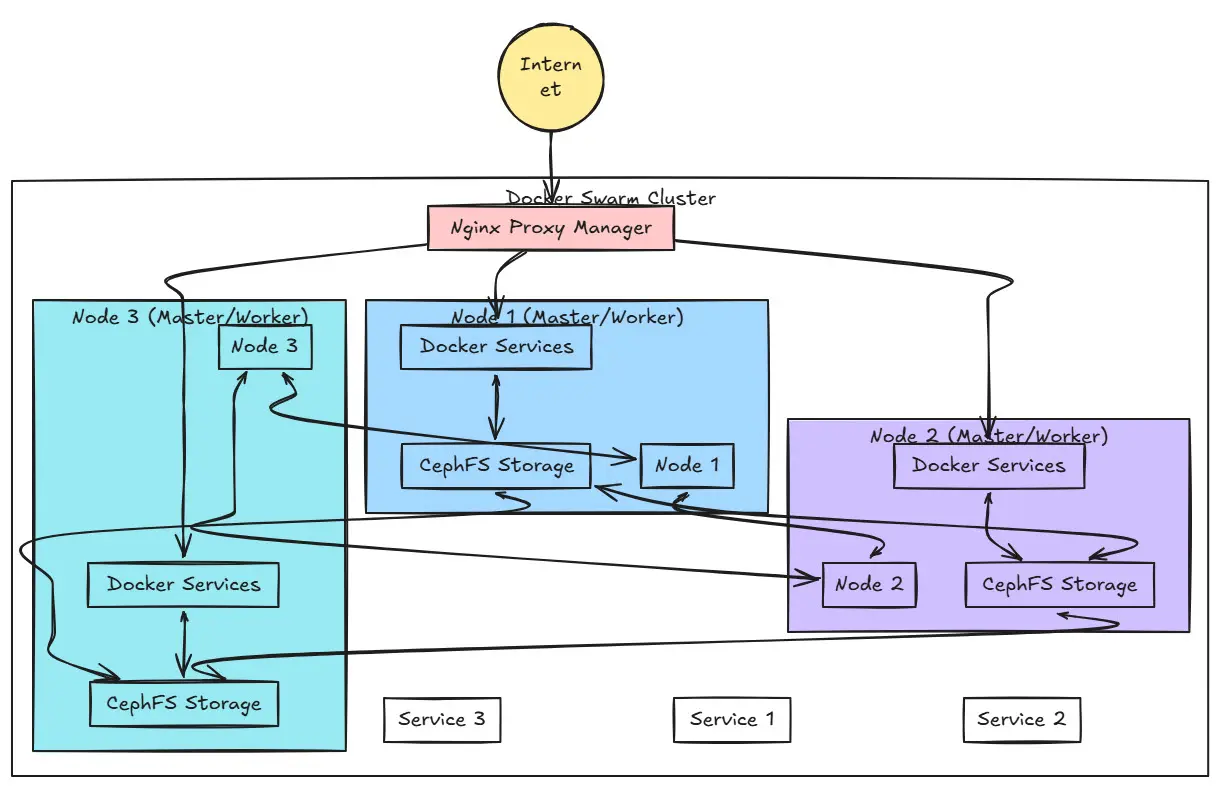
Docker Swarm is Docker on steroids. In other words, think of it like adding multiple docker hosts together to host your containers as a single entity rather than multiple standalone hosts. Once you add them to the Docker Swarm cluster, they are managed as a cluster and your containers are managed as services.
You need to have shared storage to pull this off. But using the open source solution Ceph, you can easily do this. Read my tutorial here on how to use Microceph to spin up a shared storage environment for docker swarm: Try Microceph for an Easy Ceph Install.
For a video walkthrough, take a look at my complete walkthrough on the best Docker setup using Docker Swarm here:
Pihole Docker Swarm configuration
Take a look at the Pihole Docker swarm configuration below. In this config, we tell Docker Swarm how we want to publish the ports for DNS and DHCP on the “host” interface. Usually you will have issues when trying to use a locally-scoped network in Swarm. It squawks and wants you to use a network that is Swarm compliant like the overlay network type.
Host networking is an exception to Swarm’s restriction on local-scoped networks. Docker Swarm allows network_mode: host because it bypasses Docker’s networking stack entirely and uses the host’s networking interface connection directly.
Considerations: When you use host networking, you run the chance of having ports conflict with one another. So, with publishing the ports that we are going to do for Pihole this way, make sure you have port 53 and 67 open on the host and you don’t already have another solution listening on these.
Why are we doing this? Well, it has to do with how Pihole behaves when you just place it on the normal overlay network that Docker Swarm creates. This causes Pihole to only show only the service ip on the connected clients list. This in turn leads to problems in Pihole. For instance, if you have exceptions for specific IPs on your network, these will no longer work as the clients won’t be appearing to Pi-hole as the IP they are on the network.
We are using the long-form method of publishing the ports. When we publish ports using the long format port mapping, we can set DNS ports 53 and DHCP port 67 bound directly to the host network. Again, this bypasses the ingress/overlay network.
Below is the Docker Compose code for the Pihole service running in Docker Swarm. I have pasted in my configuration and bolded the items you likely want to change, including the volume bind mounts.
Note: The cool thing with the below is that we are actually using a mix of networking connections. Publishing the ports on host networking for ports 53 and 67 uses the host connection, but then as you notice we are still including the network at the bottom of the code for our Nginx Proxy manager network. This means that the other ports (web admin) will be available on this network. This makes for the perfect combination of having things work for Pihole DNS and showing clients correctly and still having the ability to terminal SSL using Nginx Proxy Manager.
services:
  pihole:
    image: pihole/pihole:latest
    ports:
      - target: 53
        published: 53
        protocol: tcp
        mode: host
      - target: 53
        published: 53
        protocol: udp
        mode: host
      - target: 67
        published: 67
        protocol: udp
        mode: host
    environment:
      TZ: 'America/Chicago'
      WEBPASSWORD: 'password'
      PIHOLE_DNS_: 1.1.1.1;9.9.9.9
      DNSSEC: 'false'
      WEBTHEME: default-dark
      PIHOLE_DOMAIN: lan
      DNSMASQ_LISTENING: all
    volumes:
      - /mnt/cephfs/pihole/pihole:/etc/pihole
      - /mnt/cephfs/pihole/dnsmasq.d:/etc/dnsmasq.d
    networks:
      - npm-stack_nginxproxy
    deploy:
      replicas: 1
      restart_policy:
        condition: any
        delay: 5s
        max_attempts: 3

networks:
  npm-stack_nginxproxy:
    external: true
Save this as docker-compose.yml. Once you have the file saved, then run:
docker-compose up -dVerifying the Pihole container and troubleshooting if needed
Make sure the container is up and running, which you can see with the output of:
docker psIf you don’t see it running, see if it is stopped:
docker ps -aIf it is not running and exited, you can check the logs:
docker logs piholeNginx Proxy Manager configuration
Now, we can look at the Nginx Proxy Manager configuration. Nginx Proxy Manager as you may already know is an easy way to have SSL termination, a GUI interface for Nginx config and automated SSL certificate renewal all in one.
The installation and configuration of Nginx Proxy manager is outside the scope of this blog. However, I have written about this in detail here:
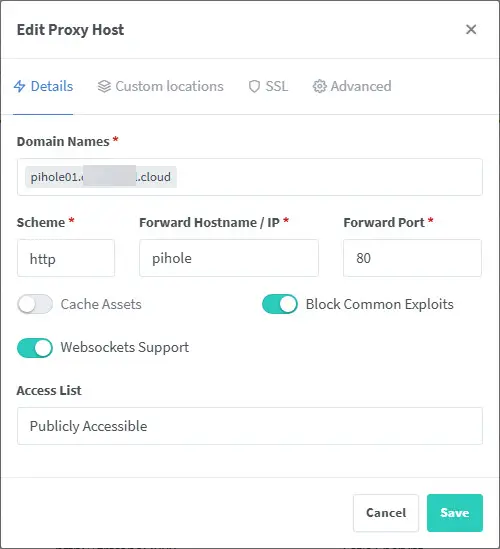
Once you have Nginx Proxy Manager configured, you can simply setup a new proxy host for your Pi-hole instance like the following:
- Set your domain name (needs to match your public domain if you are doing proper Let’s Encrypt certs)
- Set the scheme to http
- Hostname or IP set to pihole
- Forward port set to 80
- I normally flag on block common exploits and websockets support
Viewing clients in Pihole
Now that you have the pihole container running and have Nginx Proxy Manager configuration set, as long as you have your DNS configured correctly, you should be able to browse out to the DNS name and not see a certificate error (if using Let’s Encrypt).
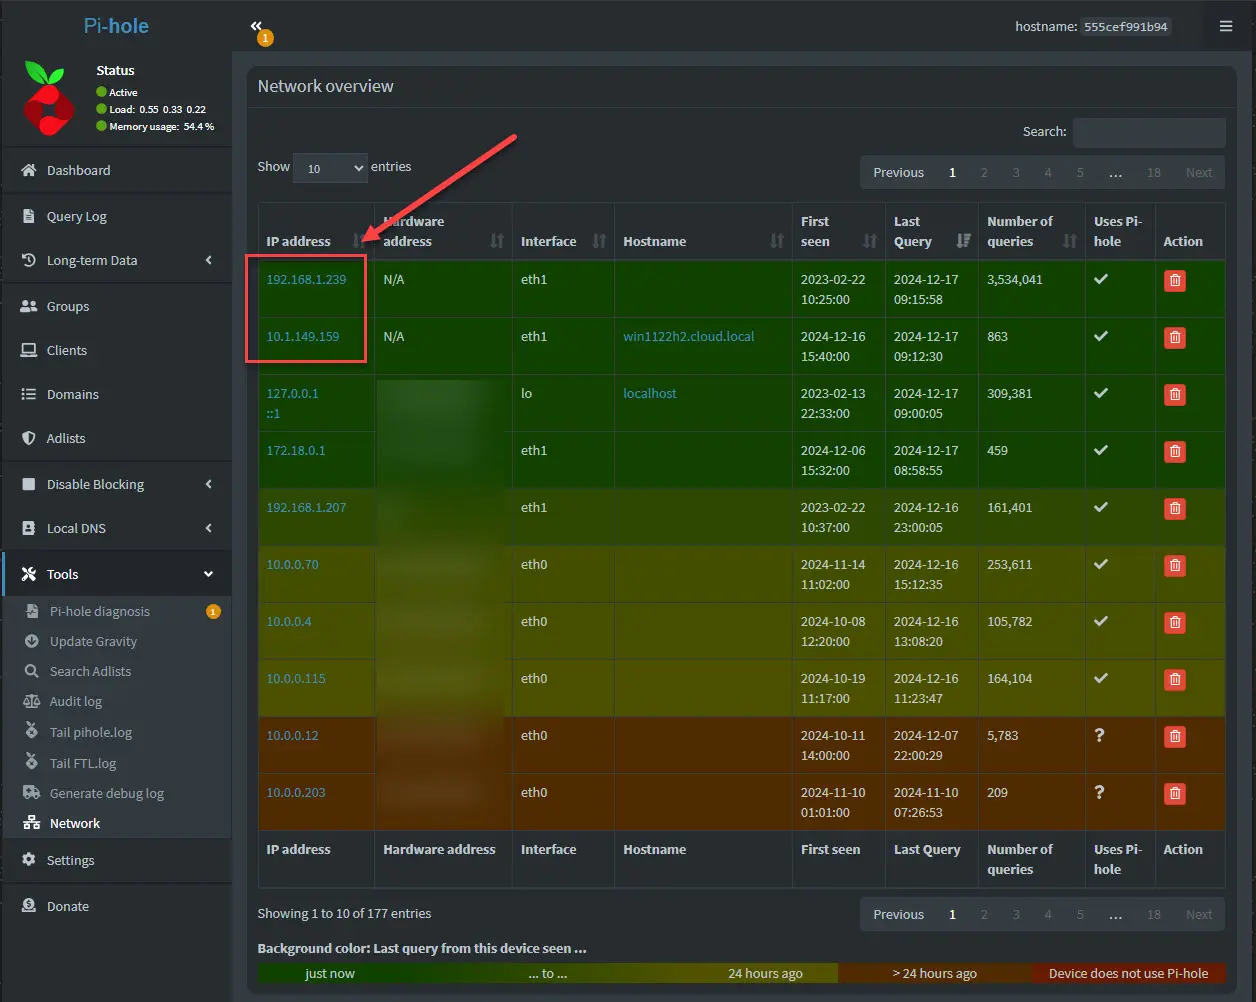
Now we see clients that are on my home lab networks, and not the internal services IP of the service in Docker Swarm. The subnets 192.168.1.0/24 and 10.1.149.0/24 are subnets outside of the cluster which is what I want to see.
One challenge with host port and virtual IP config
After running this for a while, in thinking through how this works, I am using Keepalived for instituting a virtual IP address between my three Swarm nodes. With that said, the VIP is the IP address that I am handing out to DHCP clients for DNS values.
This means that only one host will own this IP address at a time. You will need to have the host that owns the VIP be the host where PiHole runs. With that said, a hacky solution I came up with was to pin the PiHole container to the Docker Swarm host that owns the VIP which in my case is the 01 host which I have the highest weight number assigned to in the Keepalived config.
Then, in the stack code, I add the constraint for the pinning of the container to the first host. If you are taking down a host for maintenance, you can quickly update your stack code to the second host in the Keepalived configuration via weight and so forth.
deploy:
  replicas: 1
  restart_policy:
    condition: any
    delay: 5s
    max_attempts: 3
  placement:
    constraints:
      - node.hostname == clswarm01
Wrapping up
Running Pihole in Docker Swarm is not too difficult. It does require the little tweak of publishing ports using the host network instead of simply allowing these to come up on the overlay network that is internal to Docker Swarm. Pihole will work without doing this in Docker Swarm, but you will lose all visibility to which client is doing what and your whitelists based on clients won’t work. Let me know in the comments if you are running this config in your home lab.
Google is updating how articles are shown. Don’t miss our leading home lab and tech content, written by humans, by setting Virtualization Howto as a preferred source.





Hi Brandon!
Do you actually use the DHCP server with this setup ? Last time I tried publishing the DHCP port this way in swarm mode, the DHCP server wasn’t answering clients IP requests.
Currently I’m using a macvlan network that I have to create by running a bash script before deploying the container which is clearly not ideal.
Thanks
fl4shback, thanks for the comment! No, actually I don’t use DHCP with my Pi-Hole configuration, DNS only. My DHCP lives with my firewall/router. Interesting on DHCP, but I can see that though especially if connected to the overlay network. I have seen similar issues with Pi-Hole even with the adblocking correctly detecting clients in swarm mode.
Brandon
Hi Brandon,
I appreciate the time and effort you’ve put into documenting the setup you use.
I do have a question:
–> with the ports (53 specifically) exposed at the host level, your replica count of 1, and, if understand your diagram correctly, 3 separate nodes in your docker swarm, how do your client IDs connect to your docker swarm to get DNS lookups, especially if the pihole container, for whatever reason, jumps to a different host?
I ask, because I’ve been playing around with a very similar setup this weekend, (albeit with an NFS server exposed via my NAS instead of cephfs), and I find that when I expose port 53 (DNS) at the host level, only one of my hosts is responding to dns requests. And if I redeploy the stack, it jumps around between hosts, resulting in a different host having DNS services, and the others just timing out.
I’m curious how you’ve solved this problem.
TIA.
Karpana
karpana,
Thank you for the comment. I have run into this same issue. I use Keepalived for a virtual IP between my 3 hosts. So, what I do is essentially pin the container to my first host which is the preferred host for the VIP of Keepalived, with this additional code in my configuration which places a constraint to tell it only to run on the single Swarm host. If I am going to take down the first host for maintenance, you can quickly modify the stack to deploy on another host with the constraint, perhaps on the next “weighted” keepalived host. Let me know if this helps.
deploy:

  replicas: 1

  restart_policy:

    condition: any

    delay: 5s

    max_attempts: 3

  placement:

    constraints:

      - node.hostname == clswarm01