FluxCD How to Modify Kustomize Image Tag

One of the coolest things that you can do with FluxCD and using Flux for GitOps is modifying your Kustomize image tag so that you can keep your pods updated with the latest releases. Let’s take a look at FluxCD how to modify kustomize image tag with Flux and see the steps to do this.
Table of contents
- Prerequisites
- 1. Kubernetes cluster
- 2. Create a Git repo
- 3. Install Flux CLI
- 4. Flux Bootstrap Process
- 5. Create an image update repository
- 6. Create an image update policy
- 7. Create an ImageUpdateAutomation manifest
- 8. Modify your deployments for image automation
- 9. Add, commit, and push your changes to git
- 10. Reconcile your Flux source from git
- 11. Check the image update objects
- 12. Check your deployments
- 13. Run a Git Pull
- Wrapping up
Prerequisites
You will need the following prerequisites:
- A kubernetes cluster
- A git repository
- Install Flux CLI
- Flux boostrap process
- Create an image update repository
- Create an image update policy
- Create an ImageUpdateAutomation manifest
- Modify your deployments for image automation
- Add, commit, and push your changes to git
- Reconcile your Flux source from git
- Check the image update objects
- Check your deployments
- Run a git pull
1. Kubernetes cluster
There are so many options for installing a Kubernetes cluster. However, I think Microk8s is one of the easiest and it is built for production and works with other solutions like Microceph seamlessly. Check out my full write up on how to get this up and running here:
2. Create a Git repo
One of the first steps you want to do is to create a Git repo that will house your Gitops code. Flux will need this as everything has a source of truth with the git repo you define during the bootstrap of the Flux cluster.
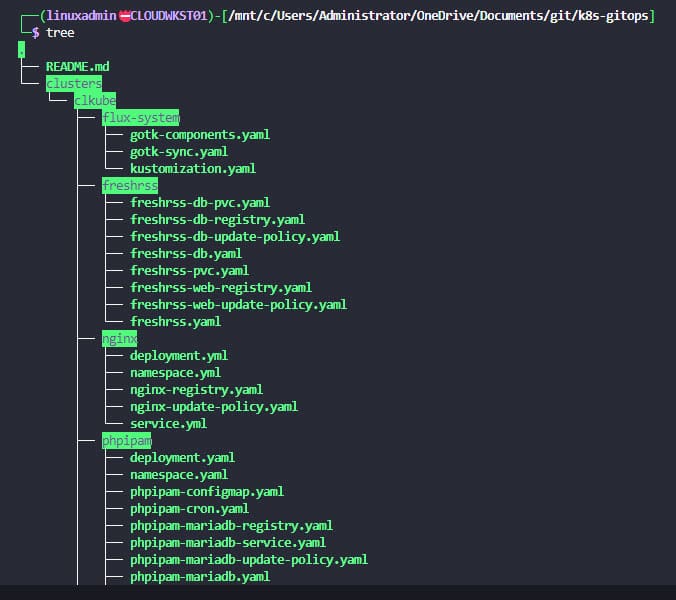
You can see the layout of my repo below. I have a top level folder called “clusters’ and then “clkube”. This will allow me to have multiple clusters underneath the top level clusters folder where I can point gitops workflows.
The subfolders are where you house your Kubernetes manifests which are applied by Flux.
3. Install Flux CLI
To install the Flux CLI in Linux, you can run the following command:
curl -s https://fluxcd.io/install.sh | sudo bashTo get more details on other operating systems and installing Flux CLI, check the link here:
4. Flux Bootstrap Process
By default, when you bootstrap your Flux installation in the Kubernetes cluster, it doesn’t add the Image Controller, which is needed in order to do image updates and implement this automation into your Kubernetes cluster.
Don’t worry, even if you have already bootstrapped your cluster with Flux, you can re-bootstrap the cluster again with the same command, except adding the extra parameters to add the image controller. I have bolded the parameters that you need to add to a normal bootstrap.
I am pointed to a self-hosted Git repository in GitLab in the home lab environment. You can see how to boostrap pointed to other environments here:
flux bootstrap git \
--url=https://<git server>/devops/k8s-gitops.git \
--branch=main \
--path=clusters/clkube \
--token-auth --components-extra="image-reflector-controller,image-automation-controller"
5. Create an image update repository
Now that we have our Flux installation bootstrapped, we can start creating our image update objects. There are Flux commands to do this.
flux create image repository nginx-update-registry \
--image=nginx \
--interval=1m \
--export > ./clusters/clkube/nginx/nginx-registry.yaml
This will create a yaml file in the nginx subfolder that has the following contents:
apiVersion: image.toolkit.fluxcd.io/v1beta2
kind: ImageRepository
metadata:
  name: nginx-update-registry
  namespace: flux-system
spec:
  image: nginx
  interval: 1m0s
6. Create an image update policy
Next, we create an image update policy. Use the following command for that. Note how we are referencing the update repository for the image-ref configuration:
flux create image policy nginx-update-policy \
--image-ref=nginx-update-registry \
--select-semver=1.27.x \
--export > ./clusters/clkube/nginx/nginx-update-policy.yamlThis creates the file nginx-update-policy.yaml with the following yaml code:
apiVersion: image.toolkit.fluxcd.io/v1beta2
kind: ImagePolicy
metadata:
  name: nginx-update-policy
  namespace: flux-system
spec:
  imageRepositoryRef:
    name: nginx-update-registry
  policy:
    semver:
      range: '1.27.x'
7. Create an ImageUpdateAutomation manifest
Finally to actually tell Flux that we want it to perform image update automation, we create a manifest using the following command which creates a file in the top level ./clusters/clkube folder
flux create image update flux-system \
--git-repo-ref=flux-system \
--git-repo-path="./clusters/clkube" \
--checkout-branch=main \
--push-branch=main \
--author-name=fluxcdbot \
[email protected] \
--commit-template="" \
--export > ./clusters/clkube/update-automation.yaml
This creates the update-automation file with the following contents:
apiVersion: image.toolkit.fluxcd.io/v1beta2
kind: ImageUpdateAutomation
metadata:
  name: updateautomation
  namespace: flux-system
spec:
  git:
    checkout:
      ref:
        branch: main
    commit:
      author:
        email: [email protected]
        name: fluxcdbot
    push:
      branch: main
  interval: 1m0s
  sourceRef:
    kind: GitRepository
    name: flux-system
  update:
    path: ./clusters/clkube
    strategy: Setters
8. Modify your deployments for image automation
But, how does Flux modify our deployment manifest for nginx as we are configuring in the example? Well, we need to slightly modify our deployment with a comment that tells Flux which image policy we want it to apply for the application:
Note the deployment.yaml file contents below. We are adding the comment in this format next to the image and version used. Flux will automatically replace the version with the latest version available.
apiVersion: apps/v1
kind: Deployment
metadata:
  name: nginx
  namespace: nginx
  labels:
    app: nginx
spec:
  replicas: 2
  selector:
    matchLabels:
      app: nginx
  template:
    metadata:
      labels:
        app: nginx
    spec:
      containers:
        - name: nginx
          image: nginx:1.27.3 # {"$imagepolicy": "flux-system:nginx-update-registry"}
          ports:
            - containerPort: 80
9. Add, commit, and push your changes to git
Now that we have everything in place, we just need to add, commit, and push our changes to the git repository:
git add . -A
git commit -m "your commit message"
git push
10. Reconcile your Flux source from git
Now that we have pushed changes up to git, we can reconcile our Flux deployment:
flux reconcile kustomization flux-system --with-source11. Check the image update objects
Check the Flux image update objects using the command:
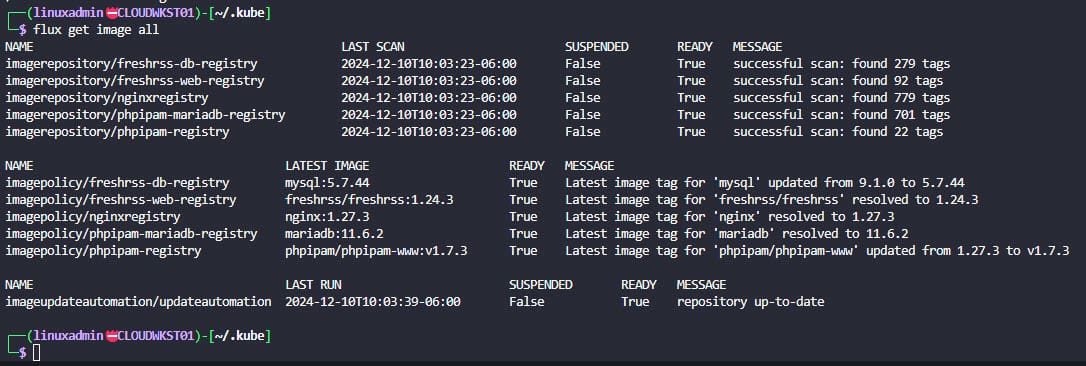
flux get image allWe can see below, there are 3 sections:
- Imagerepositories
- Imagepolicy
- imageupdateautomation
Note how in the imagerepository section, the Message shows successful scan: found x tags. Flux is actually speaking to the repos where the images are pulled and scanning the tags and finding the most recent tag.
12. Check your deployments
You should be able to check your deployments and see they have been updated. We can look at the pods and flux as well.
First flux:
flux get kustomizationsThis will tell you the hash of kustomizations that have been deployed. You can check this hash compared to the Git repo and see if these are in sync:
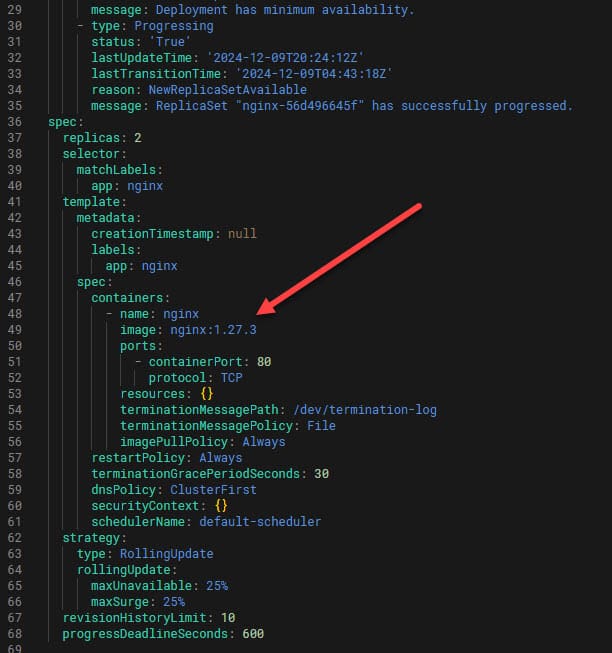
Also, we can edit the deployment in kubernetes:
kubectl edit deployment -n nginx13. Run a Git Pull
Also, you should be able to run a git pull locally and see the deployment file has been automatically updated by Flux.
git pullYou should see changes pulled down which are the changes to your deployment file in the git repo.
Wrapping up
Hopefully, this tutorial will help any who might be struggling with learning Flux and GitOps to see with FluxCD how to modify kustomize image tag so your pods are always up to date with the latest releases. This is a great way to use automation to keep the latest and greatest code running in your Kubernetes clusters.


