Docker Minecraft Server Home Lab Project
Often learning is more fun when you have something “fun” to learn for. If you are like me, you may enjoy spinning up new projects to learn various Docker skills and disciplines. However, having a home lab project that is fun in itself makes this process even more enjoyable. Take for instance, learning Docker containers by spinning up a docker Minecraft server as a home lab project. This project will give your kids hours of fun, but will also help you understand docker better. Let’s take a look at how to do this.
Table of contents
Minecraft Server project
Minecraft Server can run as a full server project as I have ran it this way before. Or, better yet, you can run it as a Docker container. There are a couple of images that are maintained that allow you to run either a Minecraft Bedrock server or Minecraft Java Edition server easily.
Note the following two repos:
Bedrock Server – itzg/minecraft-bedrock-server – Docker Image | Docker Hub
Java Edition – itzg/minecraft-server – Docker Image | Docker Hub
Since Bedrock and Java Edition operate on different server ports, you can run both on the same Docker host if you want.
What will this project teach you?
Even though we are spinning up a game server, you will learn a lot of fundamental things about Docker in the process. Note the following concepts that you will uncover:
- How to work with Docker images and tags
- Docker volumes and bind mounts
- Docker networking
- Docker Swarm mode (if using)
- Docker compose code and tooling
Docker Minecraft Server Standalone host
If you are running a Docker standalone host, you can easily spin up a Minecraft Server using the following Docker Compose code for each. Keep in mind that you will need to save each as a docker-compose.yml file and then run the command docker-compose up -d to use the docker-compose file.
Bedrock Server
Here is the code for a standalone Docker host for running a Bedrock server. Note the comments by the environment parameters for some context and explanation on these:
version: '3.8'

services:
  minecraft-bedrock-server:
    image: itzg/minecraft-bedrock-server:latest
    environment:
      EULA: "true"  # Accept EULA
      GAMEMODE: survival  # Options: survival, creative, adventure
      DIFFICULTY: normal  # Options: peaceful, easy, normal, hard
      SERVER_NAME: "My Minecraft Server"  # Name displayed to players
      MAX_PLAYERS: 10  # Adjust to your preferred max players
      ONLINE_MODE: "true"  # Enforce player authentication with Xbox Live
      LEVEL_SEED: ""  # Add a custom seed if desired
      ALLOW_CHEATS: "false"  # Disable cheats
      SERVER_PORT: 19132  # Default Bedrock server port
    networks:
      - my_network
    restart: always  # Always restart
    volumes:
      - /mnt/<your volume path>:/data  # Bind mount for server data
    ports:
      - "19132:19132/udp"  # Expose Bedrock server port

networks:
  my_network:
    external: true
Java edition
Java edition has a wide range of options to choose from. Here is example code for Docker compose on a standalone Docker host:
version: '3.8'

services:
  minecraft-java-server:
    image: itzg/minecraft-server:latest
    environment:
      EULA: "true" #Accept the EULA
      MAX_PLAYERS: 20 # Set the maximum number of players
      DIFFICULTY: "normal" # Difficulty level
      GAMEMODE: "survival" #game mode
      MOTD: "Welcome to My Minecraft Server!" # message of the day banner text
      OPS: "Player1,Player2" #set who are operators
      WHITELIST: "Player3,Player4" # whitelisting players
      MEMORY: "2G" # JAVA memory configuration
      LEVEL: "MyWorld" # Set the level
      SEED: "123456789" # Seed number
      ENABLE_RCON: "true" # Enable or disable RCON
      RCON_PASSWORD: "your_rcon_password" # setting the RCON password
      RCON_PORT: 25575 # set the RCON port
    networks:
      - my_network
    ports:
      - "25565:25565"
      - "25575:25575"
    volumes:
      - /mnt/<your volume path>:/data
    restart: always

networks:
  my_network:
    external: true
Docker Minecraft Server Swarm Cluster
Now, if you want to run these images using Docker Swarm configuration with high availability, you can do this with some tweaks to the network configuration which we will run in the host networking mode. You will note that in the Swarm compose code, the network config is using a host configuration that publishes the ports to the Swarm host. Swarm also uses the deploy stanza in the code to specify thing like replicas and fail conditions.
Creating a Docker Swarm cluster: docker swarm init --advertise-addr <master address>
Joining nodes to a Docker Swarm cluster: docker swarm join --token <your token> <manager node IP address>:2377
Bedrock Server
version: '3.8'

services:
  minecraft-bedrock-server:
    image: itzg/minecraft-bedrock-server:latest
    environment:
      EULA: "true"
      GAMEMODE: survival
      DIFFICULTY: normal
      SERVER_NAME: "My Minecraft Server"
      MAX_PLAYERS: 10
      ONLINE_MODE: "true"
      LEVEL_SEED: ""
      ALLOW_CHEATS: "false"
      SERVER_PORT: 19132
    deploy:
      replicas: 1
      restart_policy:
        condition: any
        delay: 5s
        max_attempts: 3
    volumes:
      - /mnt/<your volume path>:/data
    ports:
      - "19132:19132/udp"
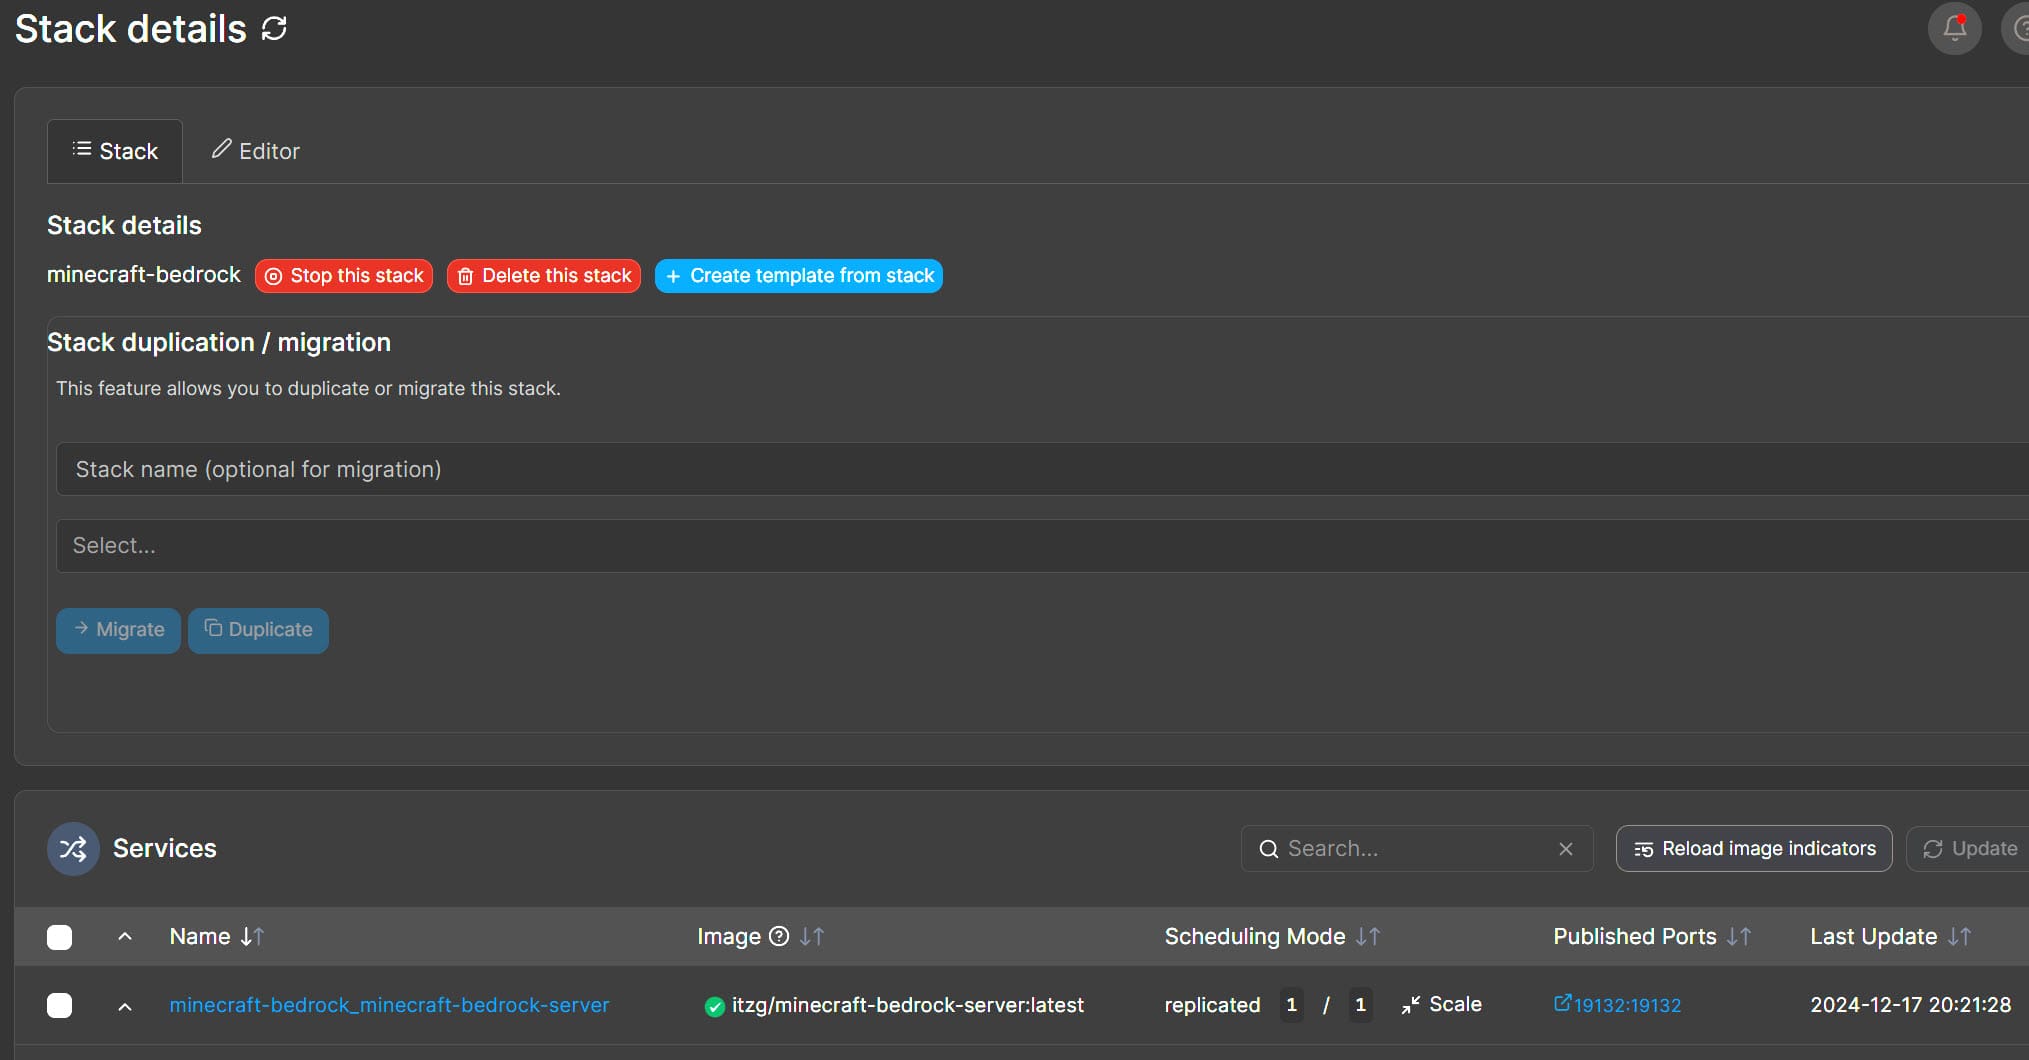
Below is viewing the Minecraft Bedrock server in Portainer.
Java Edition
version: '3.8'

services:
  minecraft-java-server:
    image: itzg/minecraft-server:latest
    environment:
      EULA: "true"  # Accept EULA
      MAX_PLAYERS: 20  # Maximum players allowed on the server
      DIFFICULTY: "normal"  # Options: peaceful, easy, normal, hard
      GAMEMODE: "survival"  # Options: survival, creative, adventure, spectator
      SERVER_NAME: "My Java Minecraft Server"  # Displayed server name
      MOTD: "Welcome to My Minecraft Server!"  # Message of the day
      ENABLE_COMMAND_BLOCK: "true"  # Enable command blocks
      SPAWN_ANIMALS: "true"  # Enable spawning of animals
      SPAWN_MONSTERS: "true"  # Enable spawning of monsters
      ONLINE_MODE: "true"  # Enforce player authentication with Mojang accounts
      OPS: "Player1,Player2"  # List of player usernames as server operators
      LEVEL_SEED: ""  # Specify a custom seed for world generation
      ALLOW_NETHER: "true"  # Allow players to access the Nether
      PVP: "true"  # Enable player versus player combat
    ports:
      - "25565:25565"  # Expose Minecraft server port
    volumes:
      - /mnt/<your volume path>:/data  # Persist server data
    deploy:
      replicas: 1  # Single instance of the server
      restart_policy:
        condition: any
        delay: 5s
        max_attempts: 3
Adding the Docker Minecraft server in Minecraft
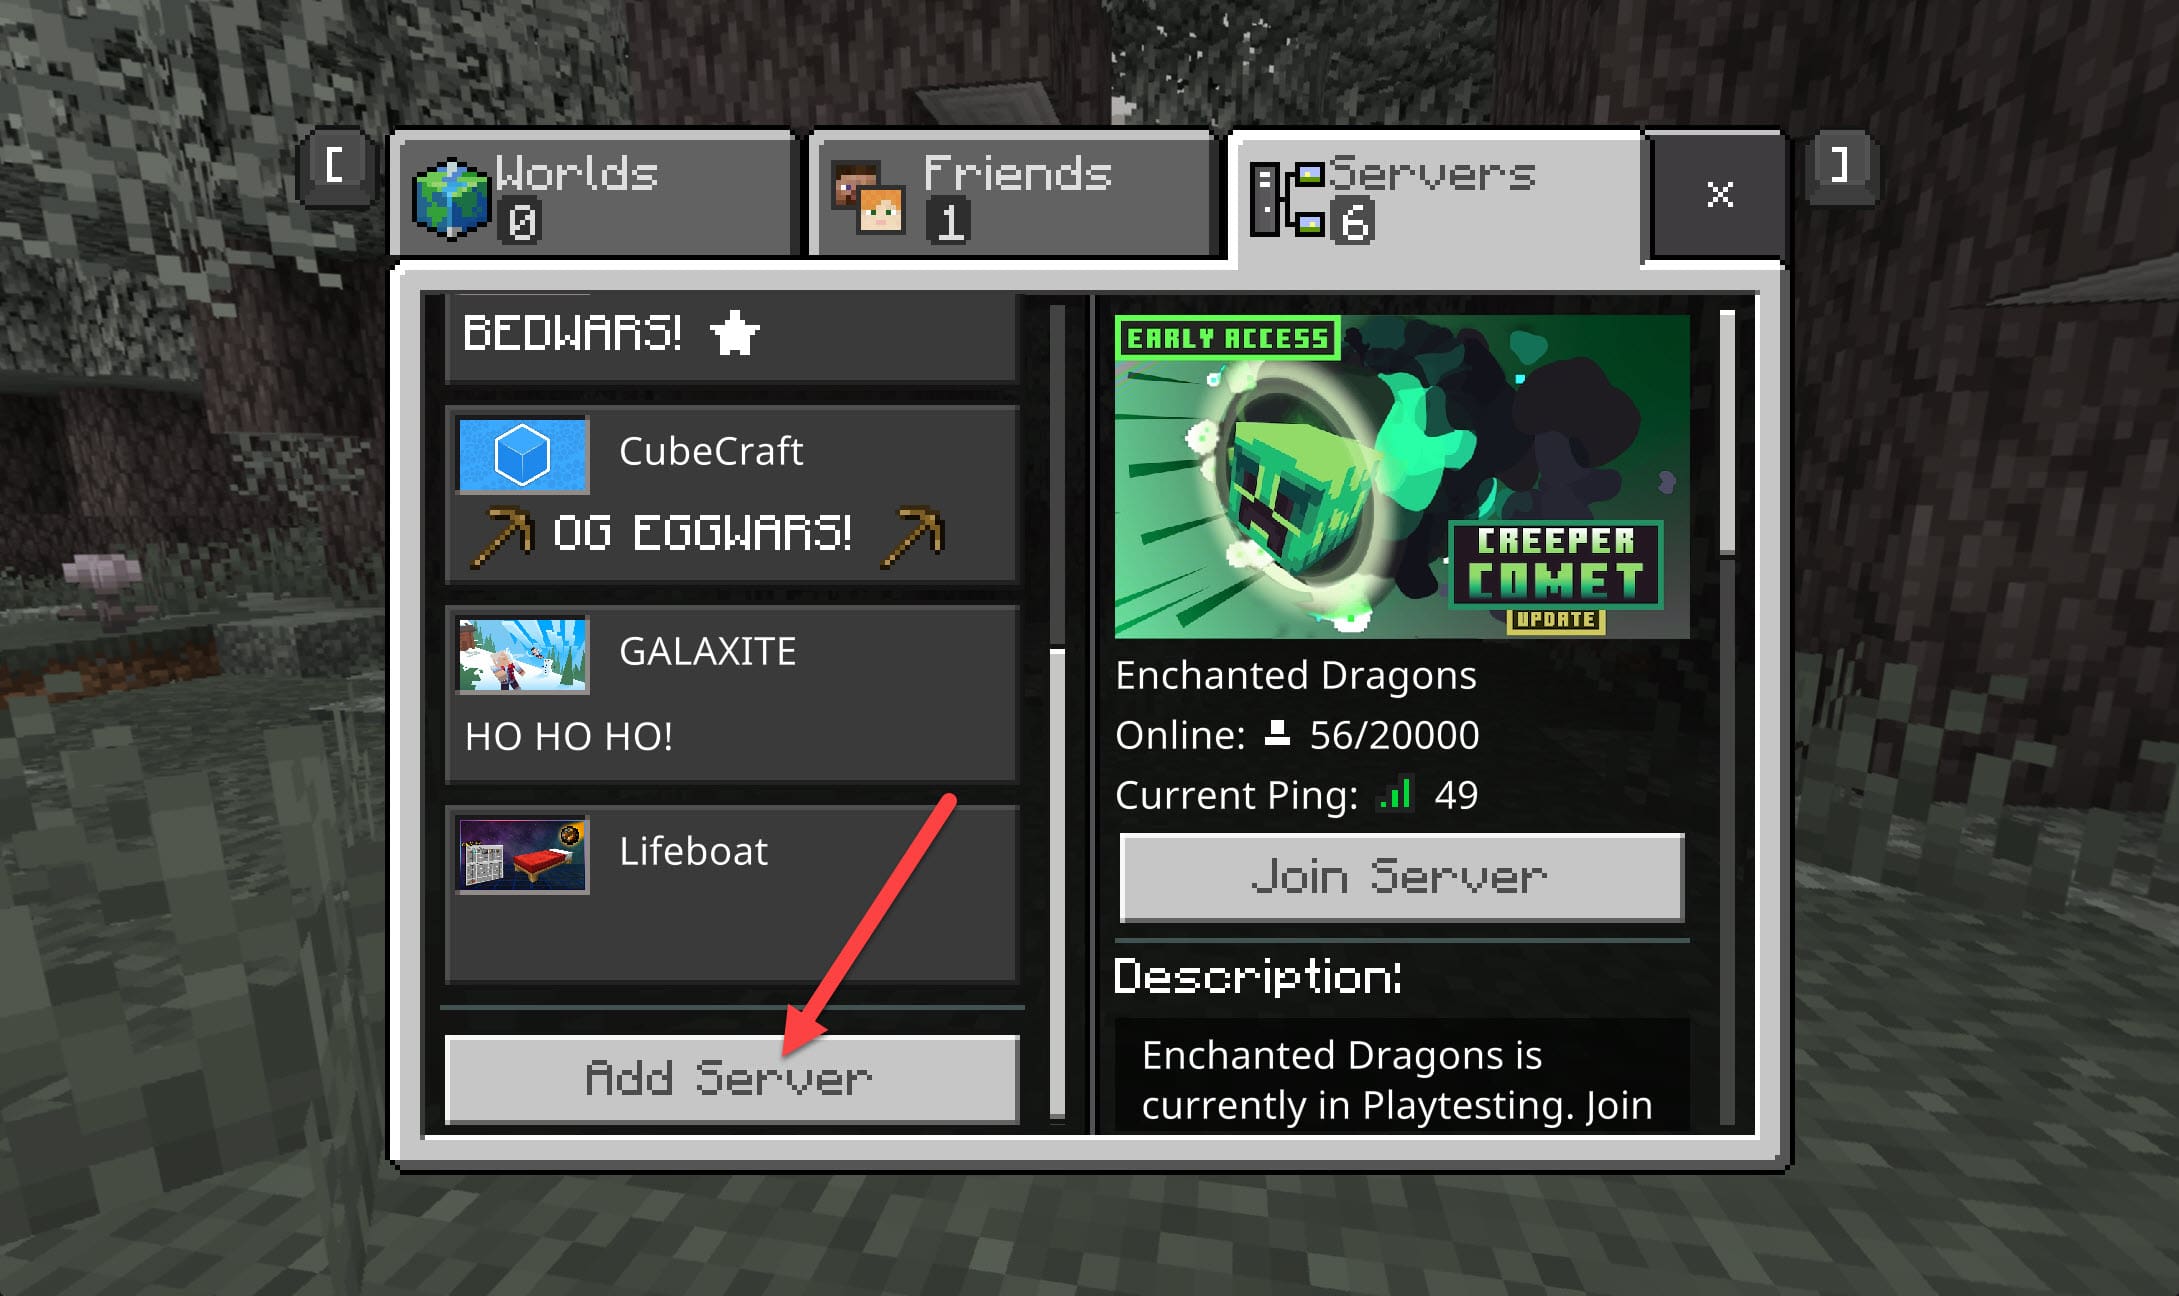
Now that we have the server running in docker, how do you join your self-hosted server? This part is easy. In Minecraft select Play and then select the Servers tab.
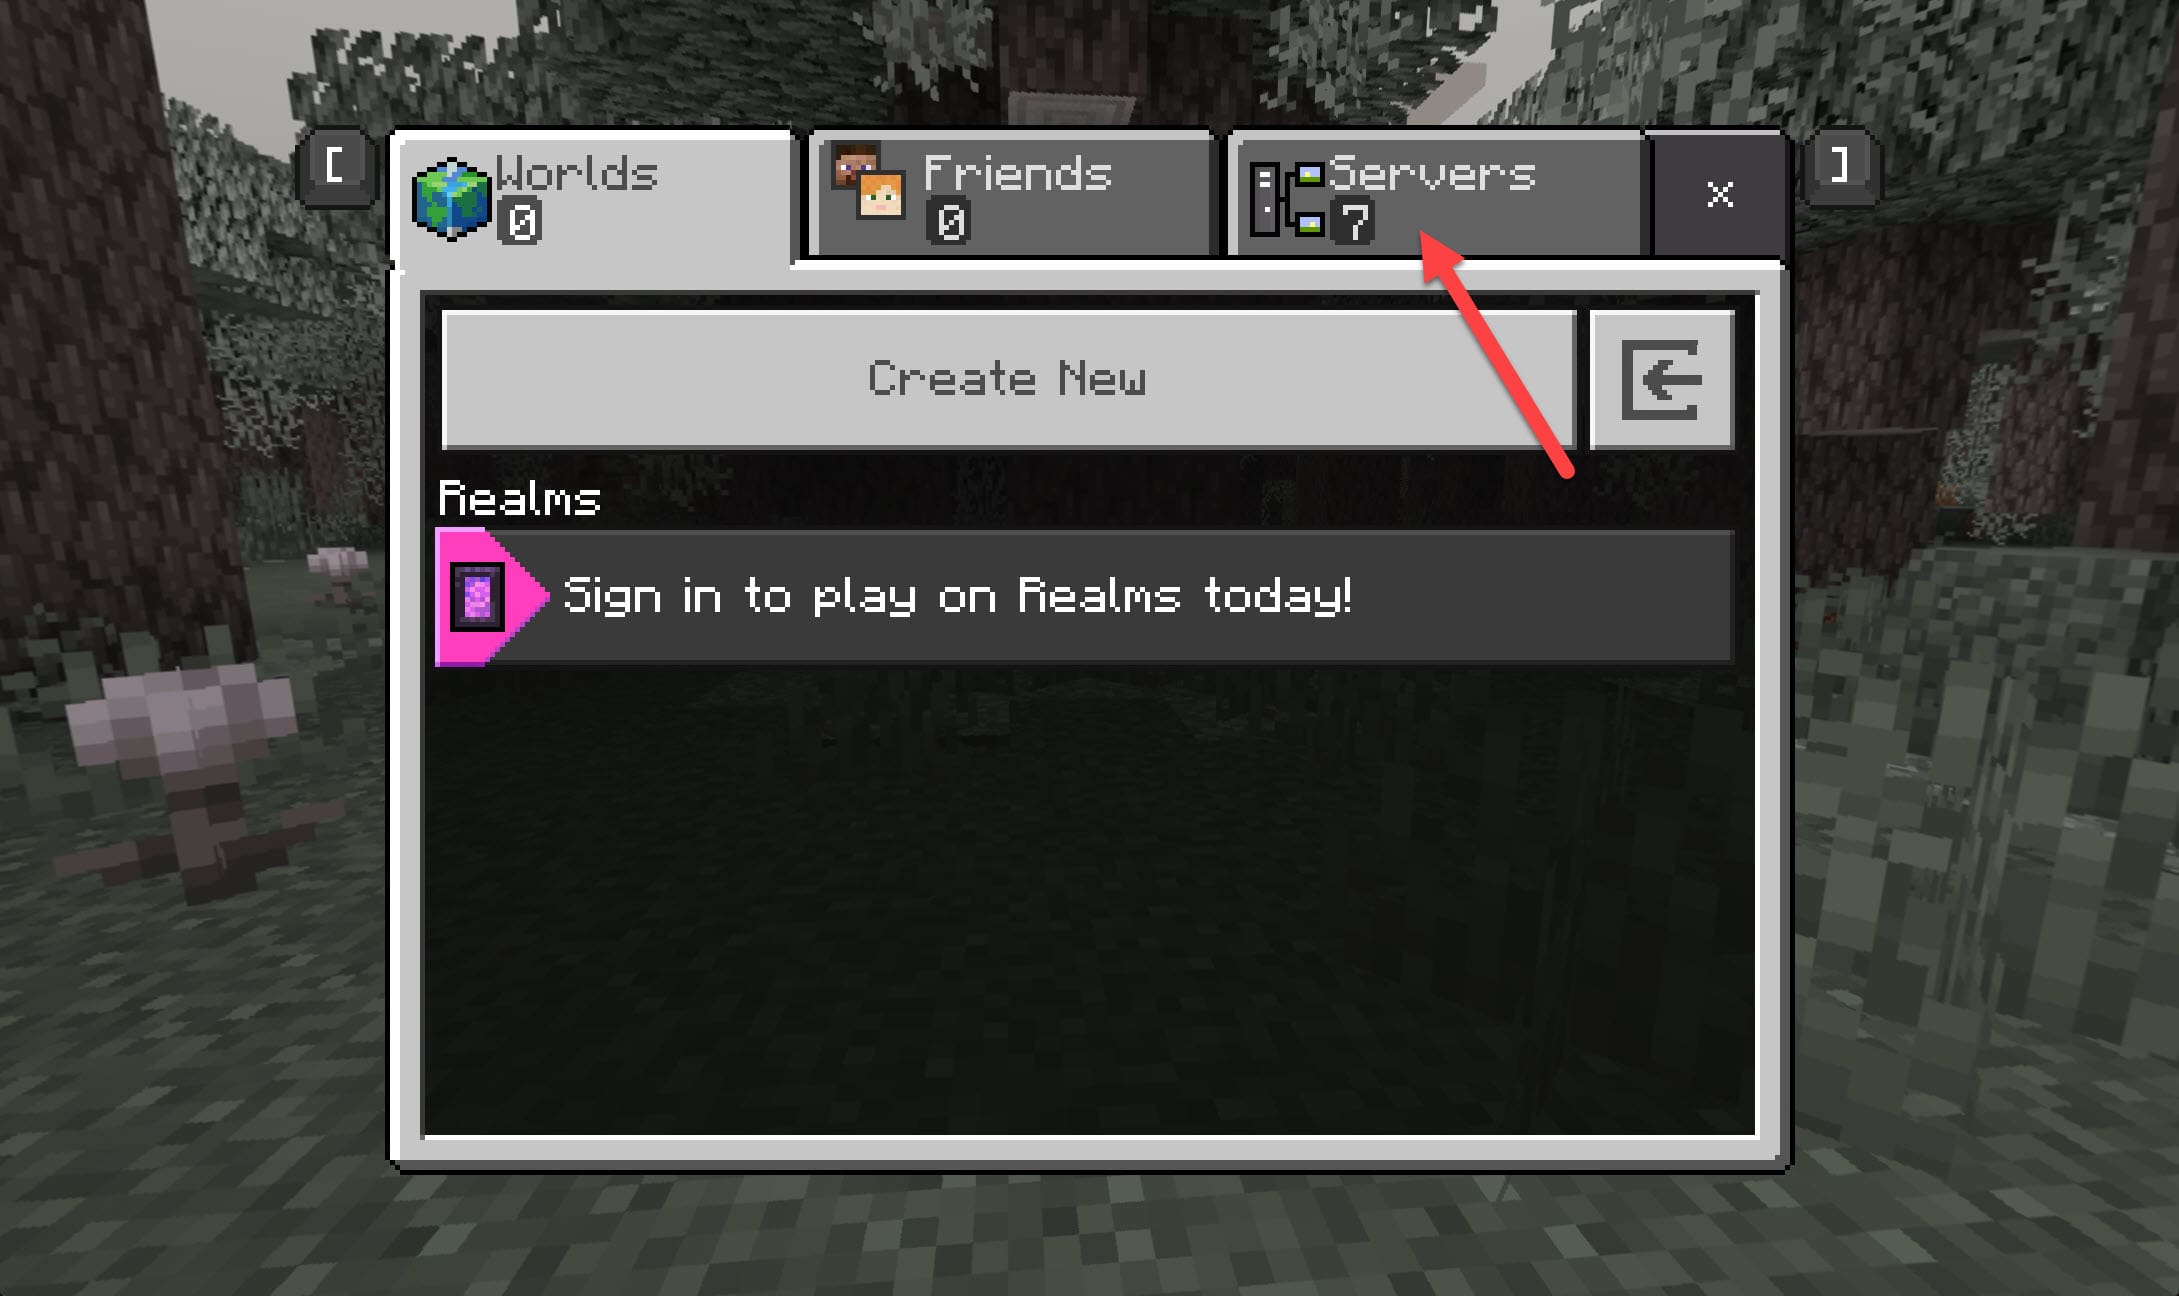
Scroll down on the left until you see the Add Server button.
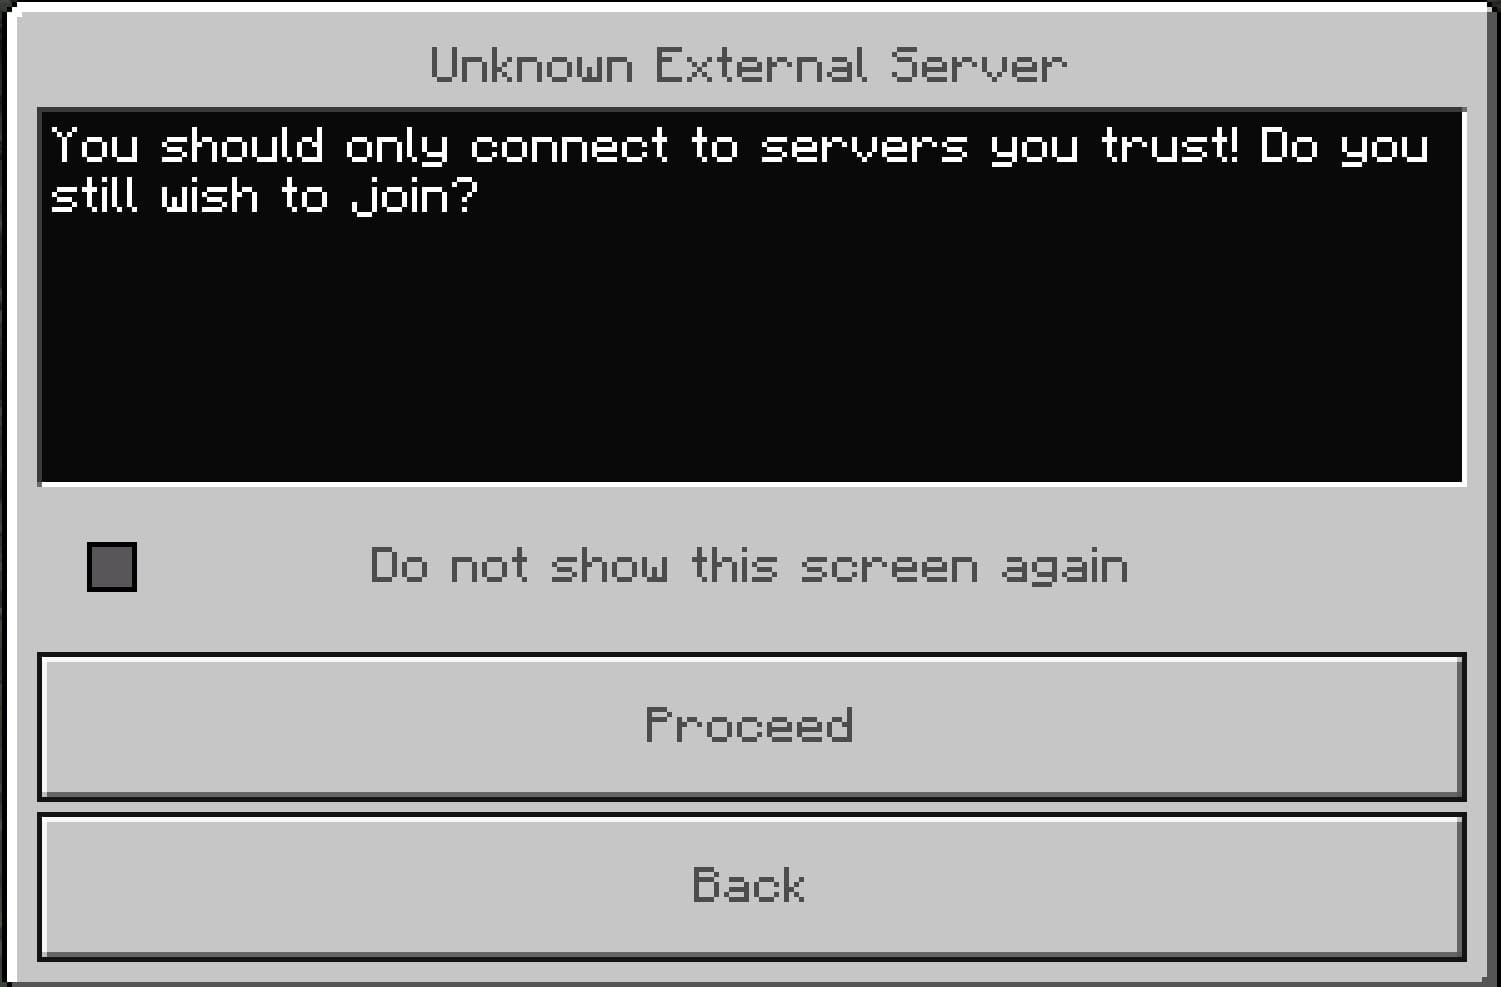
You will see a warning about adding unknown external servers. Click Proceed.
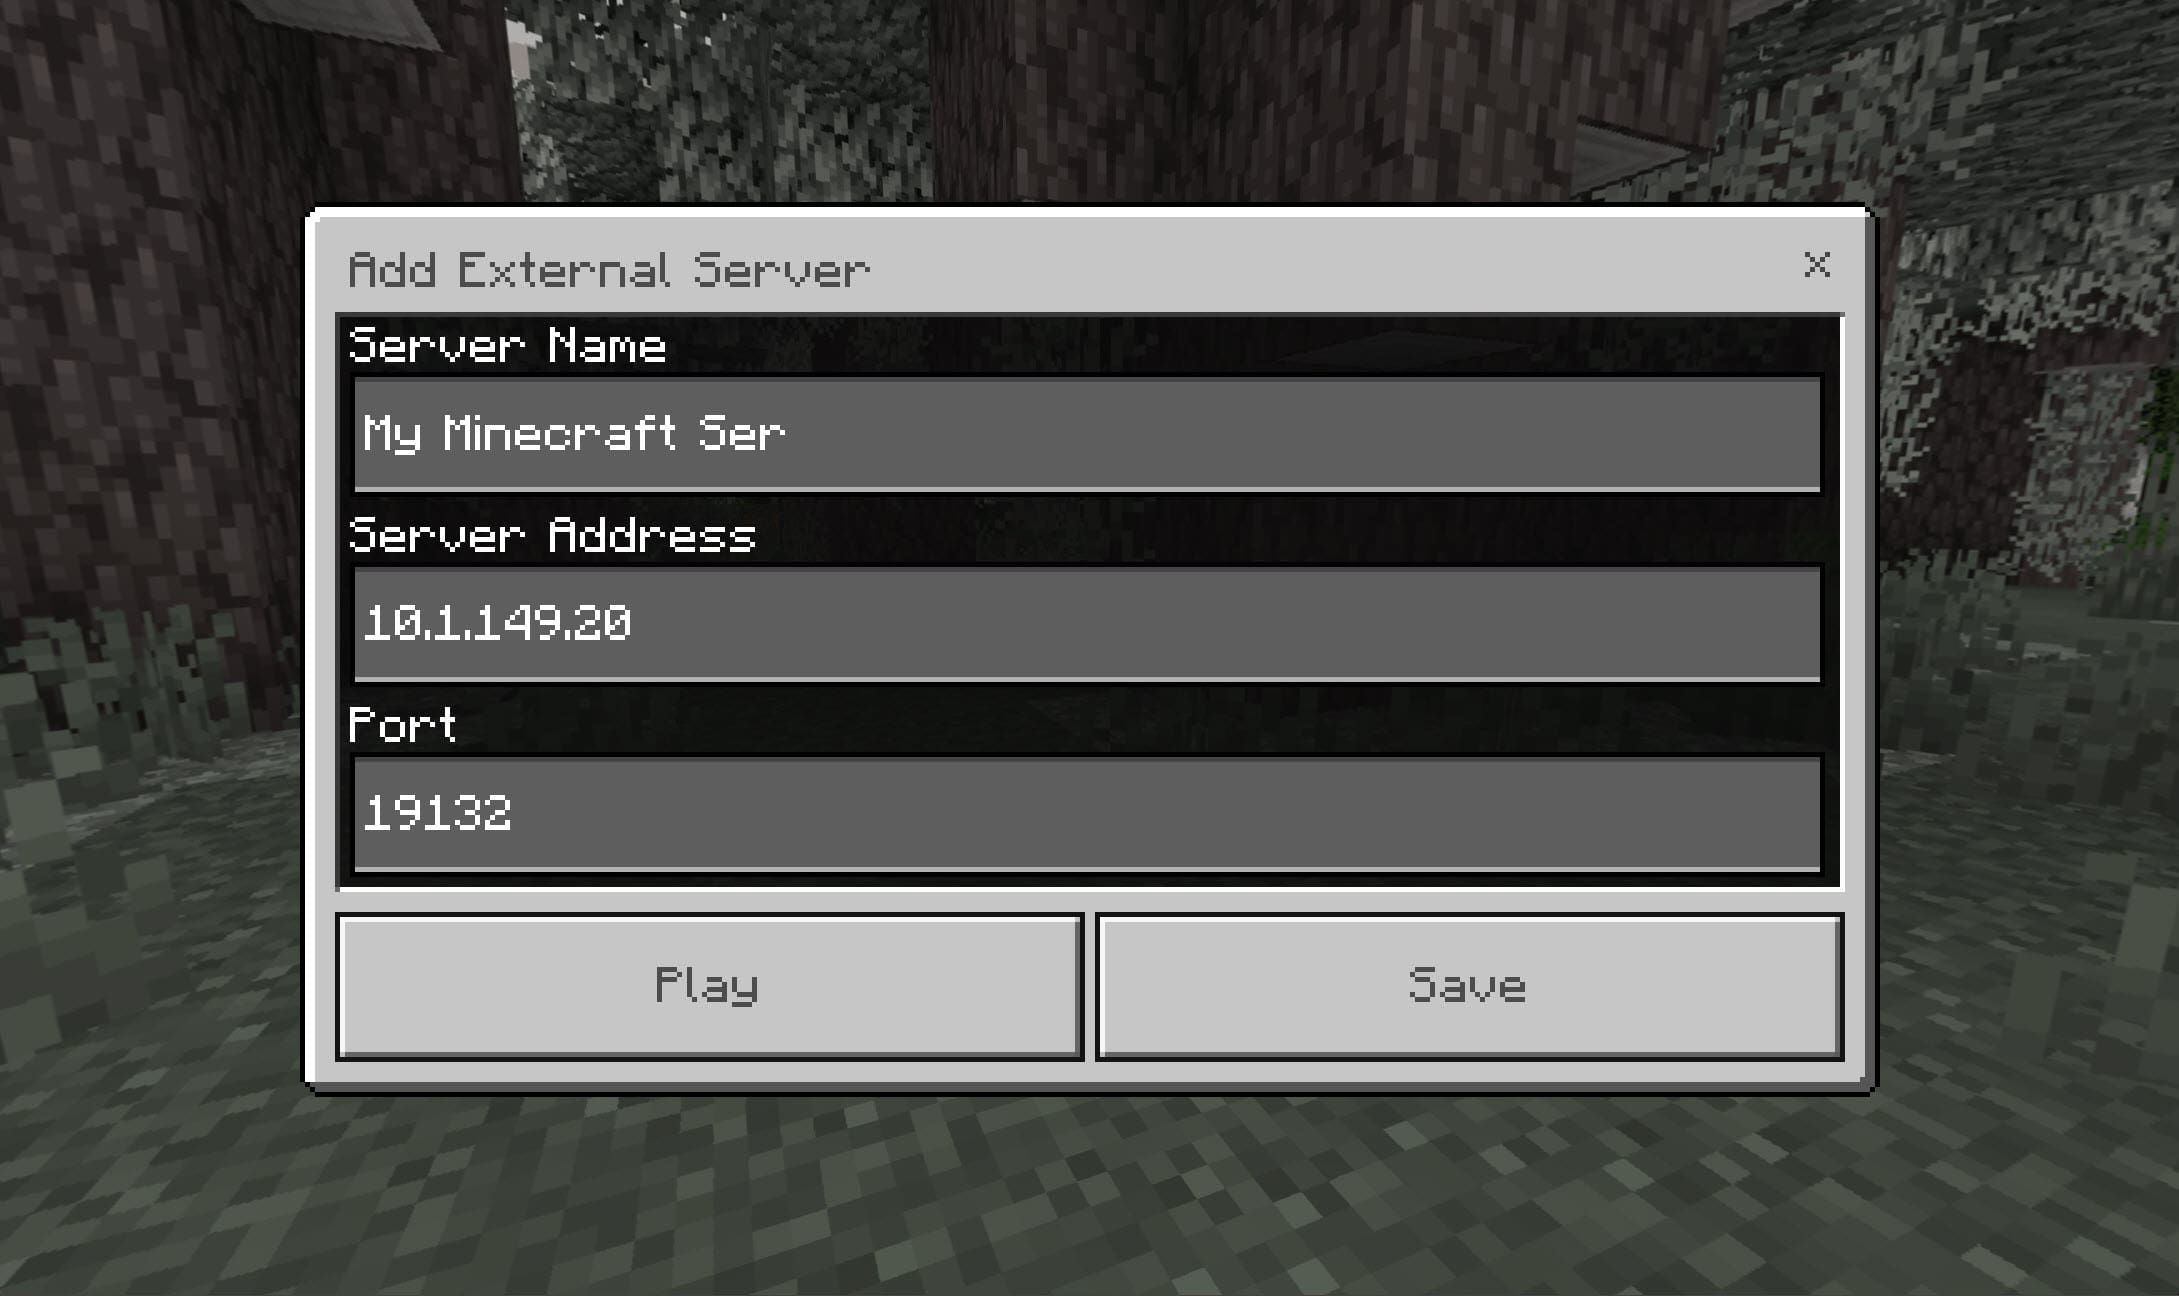
Next, simply enter a friendly name, server address, and the Bedrock port (which will be familiar as this is in our docker compose code) of 19132. Click Save.
Keeping your minecraft server updated
Another thing about using Docker for apps and servers like this is that updates are essentially made a breeze. This is due to the way you can easily update Docker containers by pulling new images and respinning your containers.
There are two solutions that will work well to automate this process – Watchtower for standalone docker hosts, and Shepherd for Docker Swarm clusters. Check out my blogs below on both showing how to use them for updates:
- Watchtower – Watchtower Docker Compose – Auto Update Docker containers
- Shepherd and others – 5 Docker Update Image Tools to Keep Images Up to Date
Troubleshooting
Another thing that I like about Docker containers is that they are fairly easy to troubleshoot if you have issues with whatever application you are hosting with them. Using the docker logs command, you can easily see errors and other issues at the application layer with them:
docker logs <container nameWrapping up
Hopefully, this little Docker project to spin up a docker Minecraft Server will spur your interest in “gamifying” your Docker learning with some projects that your kids or others will love. Even though you are spinning up a game server, you will be surprised at just how much you will learn along the way about some of the fundamental Docker elements, like volumes, networking, images, tags, docker-compose, etc.


