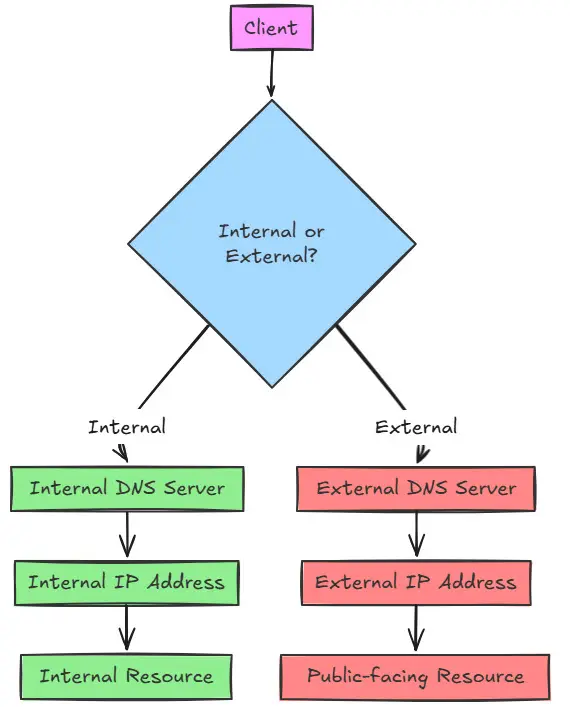
One of the core aspects of any network, whether it be your home lab network or an enterprise network is DNS. It’s always DNS right? DNS has been described as the phone book of the Internet and of computer networks as it is what allows us to have name resolution instead of typing in IP addresses. If you are hosting DNS internally and you want to resolve a subset of DNS records locally to internal IP addresses and then you want to resolve another set of records for the same domain externally, you probably want to setup something called split horizon DNS. Let’s look at split horizon DNS and see what it is and also a way that works to allow you to resolve a subset of DNS records locally and the rest from your public DNS zone.
Table of contents
What is Split Horizon DNS?
First of all, what is split horizon DNS and what can it do for you? Split horizon DNS (sometimes called split brain DNS) allows you to have different DNS responses based on the source of the query from a client. Usually it is so that you can have the same records answered with different IP addresses depending on whether a client is on the internal network or external network. It is very common with applications like Microsoft Exchange.
If a user is inside the company on the local LAN, it may give them a private IP address of a server, like 192.168.1.100. If outside, it will give them a public IP address. Split horizon DNS is very useful for security, load-balancing, servers that live in DMZs, WANs, etc.
The problem with most implementations of split horizon DNS
In my home lab environment, I wanted to have a DNS resolution configuration where I didn’t have to expose internal records in a public DNS zone for resolution. However, I had some public DNS records that I needed to be public.
I was running a Windows Server DNS server for name resolution in my environment and hosted a couple of other internal DNS zones for looking up certain records. However, for my containers running in Swarm and Kubernetes clusters with a load balancer like Nginx Proxy Manager, I wanted to be able to resolve the records correctly for certificate purposes.
New versions of Windows Server are able to do DNS policies that allow you to configure zones so that clients with specific IP addresses will hit records that exist in the zone and will be able to resolve those internal records for the zone.
The DNS policies were introduced with Windows Server 2016 and they can be used for many different use cases, including geo-location of DNS queries, load balancing, split horizon DNS, intelligent answers from the server based on time of day and other configurations.
However, I found that DNS policies didn’t really do what I wanted to do. Basically, what I wanted was simple in the home lab. I wanted to have a few DNS records (what I was self-hosting) to be answered internally by DNS, but then have the rest of the records answered by the authoritative DNS zone running in my Cloudflare hosted DNS.
- internal1.mydomain.com
- internal2.mydomain.com
- internal3.mydomain.com
The rest:
- public1.mydomain.com
- public2.mydomain.com
- public3.mydomain.com
With DNS policies and Windows DNS, when you create a zone, Windows DNS views that zone as authoritative, meaning if the record doesn’t exist in the zone locally, it will time out with your clients connected to that DNS server.
Now, Windows has other DNS zone types that you can configure: stub zones, conditional forwarders, secondary zones, etc. However, if you want to do something like what I have described none of these really do what you need. Plus, if you are hosting your DNS with a public provider like Cloudflare, they won’t allow you to do things like zone transfers, at least as far as I was able to see.
I also tried BIND DNS act as a forwarder only and host a few of the records locally but the rest forward to the public provider. However, I was never able to land on a configuration that would do exactly what I described.
The solution: Unbound & Windows DNS conditional forwarder
However, I was able to do this with Unbound and using Windows DNS conditional forwarding. First, let me show you the Unbound configuration that works. I used an Unbound Docker container for this purpose since I have plenty of Docker hosts in the lab, and it makes it simple and easy to spin up and maintain.
Unbound Docker-Compose
Below, you can see the image I am pulling and the volume bind mount I am using. Since I already had a custom network configured using Nginx Proxy Manager, I connected my unbound container to this network. Unbound Docker compose code below:
version: '3.8'

services:
  unbound:
    image: mvance/unbound
    container_name: unbound
    ports:
      - "53:53/udp"
      - "53:53/tcp"
    volumes:
      - /home/linuxadmin/homelabservices/unbound:/opt/unbound/etc/unbound
    networks:
      - nginxproxy
    restart: always

networks:
  nginxproxy:
    external: true
Save this as a docker-compose.yml file.
Unbound config file
The unbound.conf file that you need to create is below. You will place this in the unbound folder location you specify in your docker-compose code above. You will configure any records that you want to be resolved locally with the local-data records as you see in the example.
server:
    verbosity: 1
    interface: 0.0.0.0
    access-control: 0.0.0.0/0 allow
    do-ip4: yes
    do-udp: yes
    do-tcp: yes
    prefetch: yes

    # Local override for mydomain.com
    local-zone: "mydomain.com." transparent

    # Override specific records
    local-data: "test.mydomain.com. IN A 10.1.149.20"
    local-data: "test2.mydomain.com. IN A 10.1.149.21"


    # Upstream DNS servers (Cloudflare)
    forward-zone:
        name: "."
        forward-addr: 1.1.1.1    # Cloudflare primary
        forward-addr: 1.0.0.1    # Cloudflare secondary
After configuring your files, you can bring up your container:
docker-compose up -dAlso, keep in mind if you add records to the server and need it to recognize these, just bring down the stack and back up again:
docker-compose down
docker-compose up -d
Windows Server DNS conditional forwarder
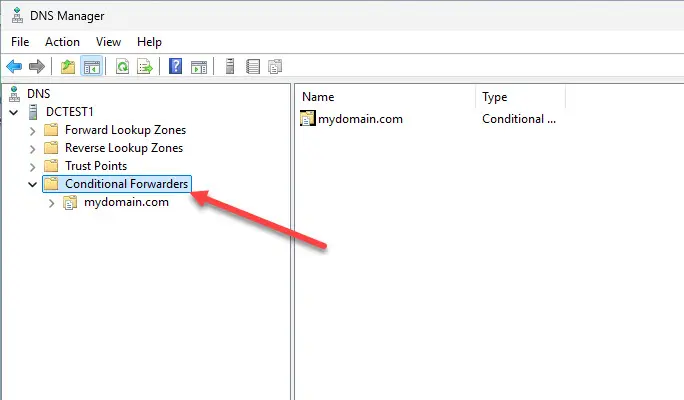
Once you have your unbound server configured, you can setup a conditional forwarder to your unbound server in Windows Server DNS if you are running it or another DNS server to conditionally forward traffic to your domain in question to the Unbound DNS server. The conditional forwarder is configured to point to the Unbound address for the specific domain.
Testing split horizon DNS
Now that we have the DNS configured in Unbound and the conditional forwarder configured in Windows, we can test by pinging a record that exists in the Unbound local-data zone and it should return. Then, we should be able to ping hosts that live in the external zone and they should return as well.
Why do it this way?
There will be some who would say that you don’t want to run external DNS zones internally. Use a subdomain. I would agree with that statement if you are able to start a greenfield deployment from the ground up. However, there are some environments and use cases where things have to be configured this way for various reasons, legacy apps, etc.
It is good to know that there are tools we can combine together to make this work as expected and resolve names as needed.
Wrapping up
Hopefully this walkthrough of how to use a split horizon DNS configuration to resolve a subset of DNS names locally and then send the rest to be resolved externally by your external provider. While this is a bit different than classic split horizon, the principle is the same. Hopefully this will help anyone who wants to accomplish the same thing.
Google is updating how articles are shown. Don’t miss our leading home lab and tech content, written by humans, by setting Virtualization Howto as a preferred source.


