GlusterFS configuration in Ubuntu Server 22.04 and 24.04

In preparing to spin up a home lab Docker Swarm cluster, I wanted to get a working GlusterFS configuration setup on my Ubuntu Server virtual machines. Let’s look at what GlusterFS is and how you can configure it in Ubuntu Server.
Table of contents
- Brief overview of GlusterFS?
- GlusterFS Architecture
- Choose how you want to deploy it
- Overview of environment
- Add the GlusterFS repo
- Install GlusterFS server and client
- Prepare your disk for GlusterFS
- Create Peer probes
- Create storage bricks
- Create and Start the GlusterFS volume
- Create a mount point and edit fstab file
- Test replicated volume
- Troubleshooting
- Wrapping up
Brief overview of GlusterFS?
Let’s first get a brief overview of what GlusterFS is exactly. When you install GlusterFS, it is a distributed file system that combines storage that you have attached to your servers into a parallel network file system comprised of those servers.
Another cool thing is that it is free and open-source and published under the GNU General Public License so there is no cost with using it. You can use it for large-scale storage servers or for simple configurations like a Docker Swarm cluster that needs shared storage between the Swarm hosts.
Distributed File Systems like GlusterFS are known as software-defined storage you can use either on bare metal servers, for container storage, on virtual machines, cloud environments and various storage servers.
Data and security features
GlusterFS contains some really good security and data features to note:
- It stores data in “bricks” (typically built on local file systems like XFS).
- It uses different kinds of replication: replicated volumes and geo-replication to protect your data
- It supports using compression and encryption
- You can also use access control lists (ACLs) and it supports POSIX compatibility
Is it deprecated?
Well, this is a mixed answer. The Red Hat Gluster Storage solution is in fact deprecated and will reach end of life at the end of 2024. You can read Red Hat’s official statement here: Red Hat Gluster Storage Life Cycle.
However, keep in mind the open-source project for GlusterFS is still alive and supported by the community.
GlusterFS Architecture
There are several components of the architecture to make note of. First just realize it is a distributed file system, meaning it is decentralized. The server side of the cluster manages data storage and replication.
The client part of the architecture is what creates the namespace that is used for apps. GlusterFS combines compute, storage, and I/O into what is referred to as a global namespace.
It is also a stackable user space design, meaning it can operate in the user space without needing to have kernel-level modifications.

Choose how you want to deploy it
With GlusterFS you have a lot of options that you can use for deployment. You can deploy it on-premises, in cloud environments, or hybrid deployments. Most will probably do as I did and install it inside virtual machines running in their virtualization stack. This can be KVM, Xen, or VMware vSphere.
Overview of environment
In my case, I am installing it on the same servers that will also be running Docker Swarm. Here is an overview of my configuration:
- (3) Virtual Machines running inside VMware vSphere
- Ubuntu 24.04 installed and updated
- I have (1) OS disk and (1) data disk that will be used for GlusterFS
- Nothing fancy on the network side of things, just a single adapter attached to my Servers VLAN.
- Make sure your nodes can communicate with each other using FQDNs and IPs either using /etc/hosts file or using DNS
- Install GlusterFS server
Add the GlusterFS repo
The process to get Gluster installed on your local file system disk is fairly straightforward. The process below will need to be completed on all of your hosts. First thing we need to do is add the GlusterFS repository:
sudo add-apt-repository ppa:gluster/glusterfs-11
Install GlusterFS server and client
Next, we install the server and client:
sudo apt update
sudo apt install glusterfs-server glusterfs-client -y
After we install GlusterFS, we can check the status of the service, if it isn’t running, we can start the service. Then we can enable it to start on boot.

Prepare your disk for GlusterFS
The next thing we will do is give attention to the disk we are going to use for our GlusterFS installation. Format the disk and then create a partition with XFS file system which is best practice for GlusterFS:
sudo fdisk /dev/sdb

sudo mkfs.xfs /dev/sdb1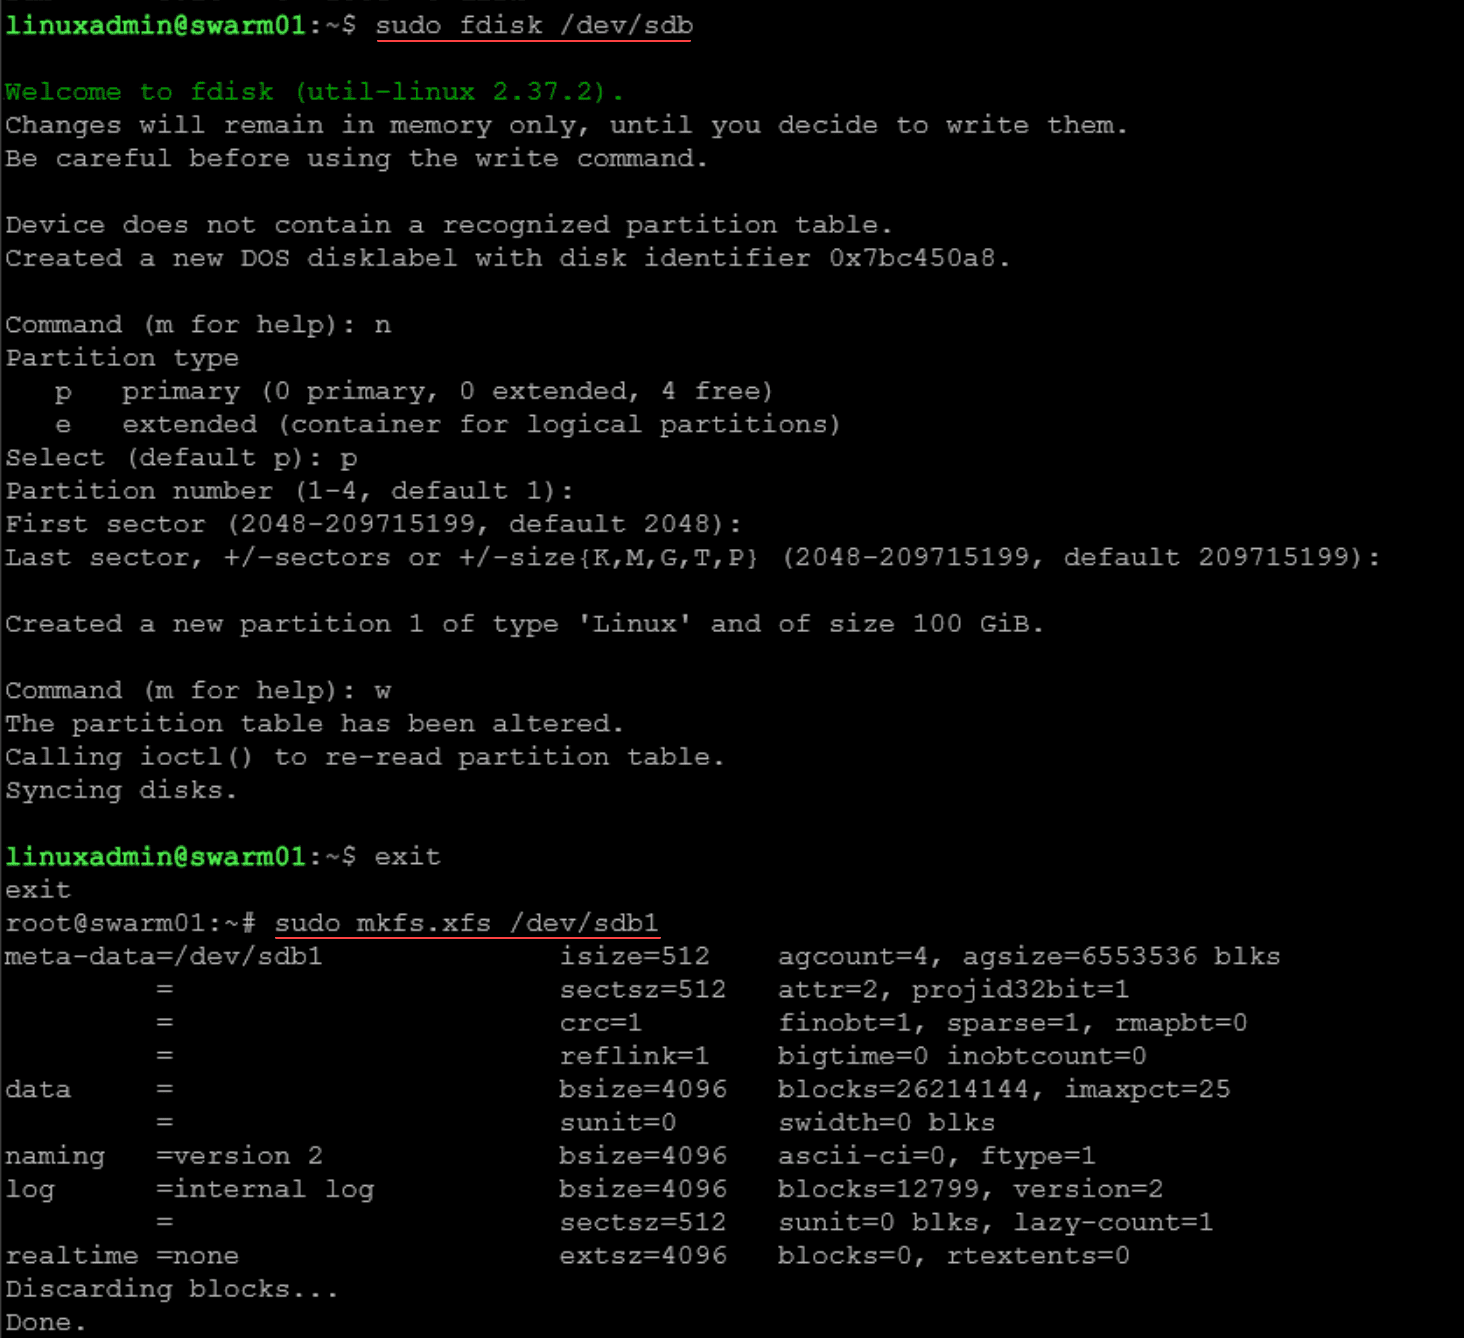
Create Peer probes
Next, we need to create and configure the Gluster peers:
sudo gluster peer probe <your 2nd node IP>
sudo gluster peer probe <your 3rd node IP>
You will need to do this for each node replacing the “other” hosts with the respective IPs.

Create storage bricks
It refers to the data points as bricks. We need to create a subdirectory for the “brick” it will use:
sudo mkdir -p /mnt/glusterfs/brick01
Create and Start the GlusterFS volume
We need to use the following command to create the volume and tell the command which hosts are contributing:
sudo gluster volume create glustervol01 replica 3 \
10.1.149.59:/mnt/glusterfs/brick01 \
10.1.149.60:/mnt/glusterfs/brick01 \
10.1.149.61:/mnt/glusterfs/brick01
Now, we can start the volume:

Create a mount point and edit fstab file
Below are the lines that I added to my fstab file:
#Create the directory for the mount point
sudo mkdir /mnt/glusterfs

#Edit the fstab file
sudo nano /etc/fstab
Then add:
#lines to add to fstab file

/dev/sdb1 /mnt/<name of your mount directory> xfs defaults 0 0

localhost:/glustervol01 /opt glusterfs defaults, netdev 0 0
We can force a mount by using the command:
mount -aTest replicated volume
We can now test that GlusterFS is replicating data, by creating test files in the /opt folder:
cd /opt
sudo touch test1 test2
You should see the files appear in the opt directory on the other two hosts if you have 3 nodes.
Troubleshooting
There are a few commands to mention that are very helpful when troubleshooting GlusterFS. These include the following commands:
sudo gluster volume info
sudo gluster volume status
sudo gluster volume heal <volume-name> info
GlusterFS Management Console (gadmin)
You can use the GlusterFS management console to have a simple web interface that will give you visibility into the health of your GlusterFS cluster.
You can install it with the command:
sudo apt install glusterfs-gadminThen, you can access the web interface and log in to monitor your Gluster volume. It will show you the status of replication and the health of your nodes.
Cockpit Plugin
You can install the GlusterFS plugin in Cockpit to have a web interface to monitor and manage your GlusterFS cluster.
sudo apt install cockpit
sudo systemctl start cockpit
sudo systemctl enable cockpit
Install the GlusterFS plugin:
sudo apt install cockpit-glusterYou can also take a look at the Gluster documentation as well for more tips and tricks: Gluster Docs.
Wrapping up
GlusterFS is a great way to have a free software-defined storage solution for your containers running in Docker Swarm. This is a great way to bolster the high-availability of your container with not much complexity, unlike Kubernetes. I really like the simplicity of Gluster as it does everything most likely you will want it to do with container storage in a highly available way.