Configuring Kubernetes High Availability with Microk8s
If you are looking for an easy way to have a Kubernetes High Availability cluster for your API server and control plane, Microk8s makes this very easy with the deploy of three or more nodes. You can just make sure you have deployed at least 3 nodes and it will automatically enable HA for the API and backend etcd database. However, if you initially deployed a single control plane and a couple of worker nodes, you can promote the workers to control plane nodes very easily. Let’s see how.
Table of contents
- Why do you need Kubernetes High Availability?
- Configuring high availability in Microk8s
- 1. Enable HA for your Microk8s cluster
- 2. Leave the Microk8s cluster on the worker node
- 3. Remove the node from the Microk8s control plane
- 4. Generate the join token for control plane nodes
- 5. Re-join the node to the cluster as a control plane node
- Once completed check for Microk8s high-availability
- Wrapping up
Why do you need Kubernetes High Availability?
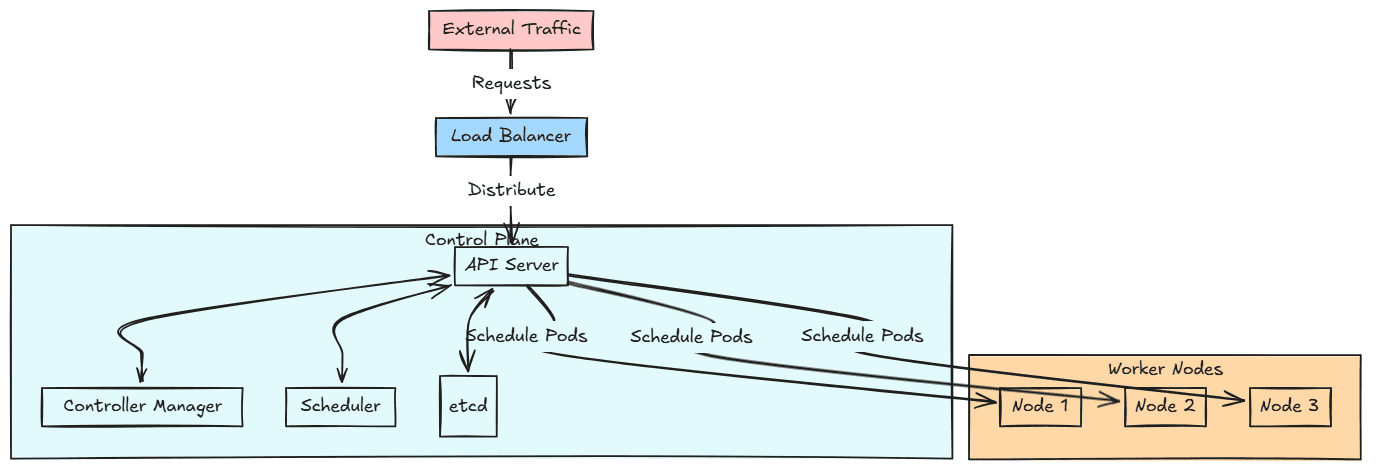
Well, HA is a good thing for many reasons. When you spin up a Kubernetes cluster, the control plane nodes are the nodes that host the API server and the etcd database where the Kubernetes configuration is stored.
As you would think, it would be a good thing to have high availability of these components in your Kubernetes cluster since you want to make sure if a control plane node goes down, you would still have a control plane node available to take over hosting the API server and etcd db for configuration purposes.
Configuring high availability in Microk8s
When you have a Microk8s cluster, the really cool thing about Microk8s is that it automatically enables HA if you spin up 3 nodes initially and join the other nodes to your cluster without the –worker flag. When you do this, it will automatically enable HA for the nodes.
However, if you have a Microk8s cluster that you initially deployed as a single control plane, you can easily promote your worker nodes to control plane nodes by removing them from the cluster and then adding them back in as control plane nodes. Let’s see using the steps:
- Enable HA for your Microk8s cluster
- Leave the Microk8s cluster on the worker node
- Remove the node from the Microk8s control plane
- Generate the join token for control plane nodes
- Re-join the node to the cluster as a control plane node
1. Enable HA for your Microk8s cluster
First, we need to make sure we have HA enabled for our Microk8s cluster. To do that you can run the following command:
sudo microk8s enable ha-clusterIn my cluster, the HA module was already enabled and I believe this may be the default. Even if you don’t have enough nodes for HA to be configured and turned on, it will enable the module. But, I think it is a good idea to check to make sure using the command above.
2. Leave the Microk8s cluster on the worker node
The next step you want to do on your worker node, after draining and cordoning, you want to leave the cluster. This will bring the node into a “NotReady” state in the cluster.
You can take a look at your Kubernetes nodes and status with the command:
sudo microk8s kubectl get node3. Remove the node from the Microk8s control plane
Now that we have left the cluster on the worker node, we can remove the node from the control plane node. You can do that with the command:
sudo microk8s remove-node clkube024. Generate the join token for control plane nodes
Once the node is removed from the cluster, we can turn right around and join it back with the join command generated from the control plane node. To generate the join command, you can issue the command on the control plane node:
sudo microk8s add-node5. Re-join the node to the cluster as a control plane node
Now, on the node that we removed, we can rejoin using the join command with the token. And, notice that we are not passing in the –worker flag to the join command. So, it will be joined as a control plane node.
sudo microk8s join <nodeip:25000/jointoken>Once completed check for Microk8s high-availability
Once you have completed this process on at least 3 nodes in your cluster, you can run the command:
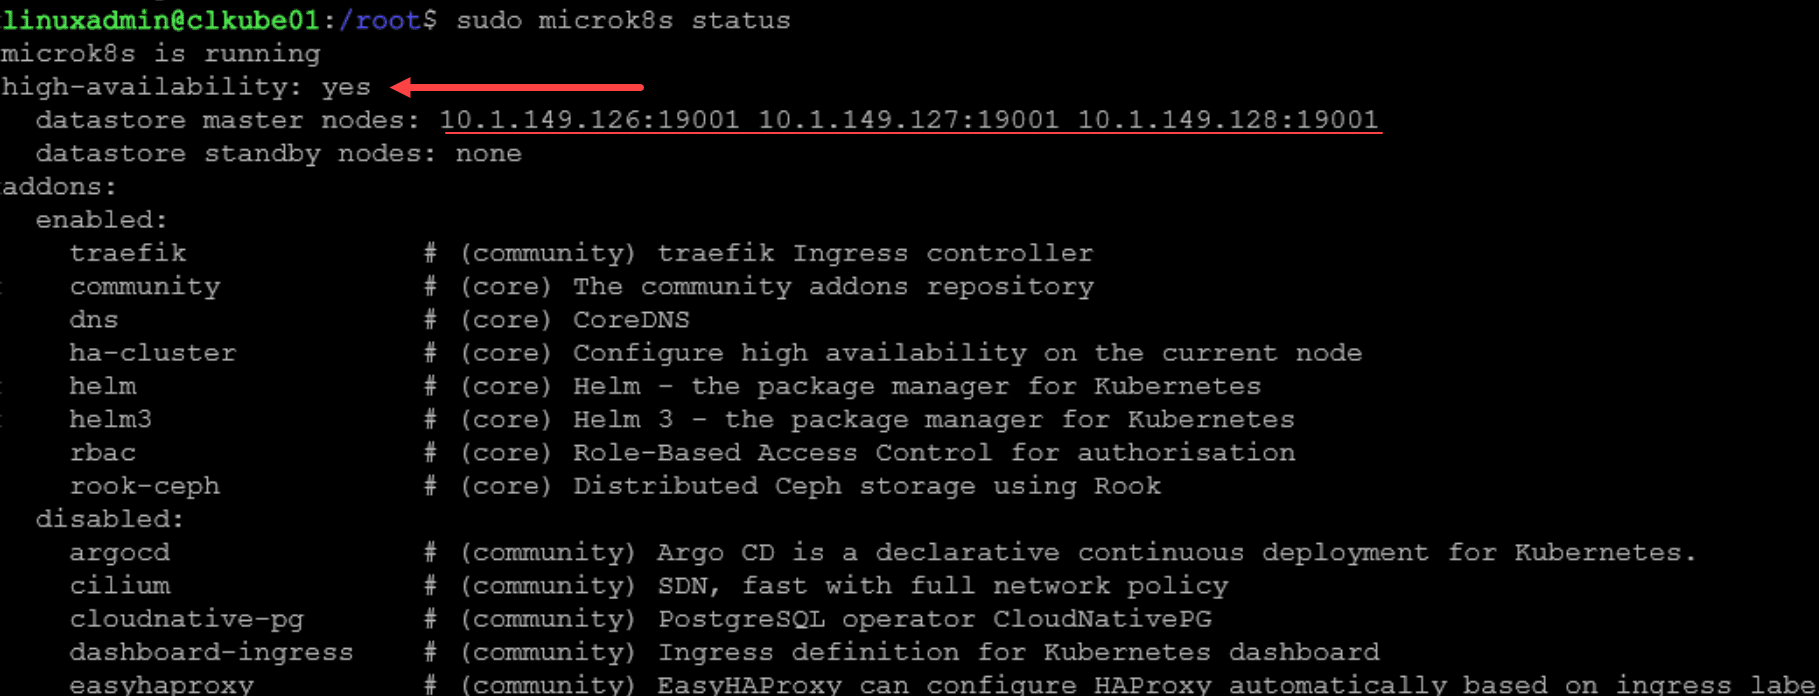
sudo microk8s statusIt will show you at the very top of the command return the status of high-availability. You should see:
high-availability: yes
datastore master nodes: <1st IP:19001 2nd IP:19001 3rd IP:19001>
This tells you that you have high-availability enabled with at least 3 nodes in the cluster. Also, if you have your Microk8s Kubernetes cluster managed by Portainer, you can navigate to Cluster > Details and see the Nodes listed.
Below, you can see that all three nodes show to have the API component.

Wrapping up
Microk8s is a great little Kubernetes distribution that is not just a single node Kubernetes cluster for learning or labbing. It is a fully production ready Kubernetes distro that you can use to run your production workloads. It is also very easy to manage and contains quick and easy modules you can enable to add various storage, networking, and other third-party tools.
Running your Kubernetes cluster in high-availability for the API server and etcd database is definitely what you want for production as this makes sure that if a node goes down, you still have a node running the API server and the backend database. In Microk8s this is easy enough to enable and manage. You can also promote workers to control plane nodes by just rejoining the cluster with the join token without the –worker flag as we have seen here.


