CephFS for Docker Container Storage

Given that I have been trying Ceph recently for Docker container storage: see my post on that topic here, I wanted to see if I could effectively use CephFS for Docker container storage. If you have been following along in my, hopefully helpful, escapades, you know that I have also tried out GlusterFS recently as well. However, with it being deprecated now, I wanted to steer towards a solution that doesn’t have as many question marks. Let’s look at CephFS for Docker container storage and see how it can be configured as the backing storage for your Docker Swarm or Kubernetes cluster.
Table of contents
What is CephFS?
First, what is CephFS? Well, CephFS (Ceph file system) is a POSIX-compliant distributed file system. It allows you to have a highly scalable storage solution that is built on top of Ceph’s object storage system (RADOS). It lets multiple clients access and share files across multiple nodes. This makes it a good choice for high throughput and fault tolerance for your data.
CephFS automatically distributes and replicates data across the cluster and this helps to make sure of redundancy and the integrity of your data. It also supports things like snapshots and fine-grained permission control.
Install Microceph
One of the easiest ways to get up and running with Ceph storage is by installing it using Microceph. It’s sole purpose is to have an easier way to install Ceph software-defined storage. You can install Microceph very easily with a simple snap command:
sudo snap install microcephIt is also best practice to hold automatic updates for microceph:
sudo snap refresh --hold microcephNext, we need to bootstrap the cluster. We can do that with this command:
sudo microceph cluster bootstrapCheck the status of the cluster:
sudo microceph statusRead my full write-up on how to install and configure Microceph here: Try Microceph for an Easy Ceph Install.
Install and configure CephFS
Now let’s take a look at the specific commands needed to create the CephFS installation on top of microceph. We can do that with the following commands.
First, we need to create the OSD pools needed:
sudo ceph osd pool create cephfs_data 64
sudo ceph osd pool create cephfs_metadata 64
Then you need to create the actual CephFS storage:
sudo ceph fs new cephfs cephfs_metadata cephfs_data
Now, if you want, you can list out the CephFS storage:
sudo ceph fs ls
Mounting our new CephFS storage
We are now to the point where we can mount the CephFS storage and also set this where it will be mounted on boot. First we need to make a directory for mounting:
sudo mkdir /mnt/cephfs
In the command to mount the CephFS storage, we need to have the “secret” token for Ceph to mount the storage. Note the command below to find the token and then we will use that in our mount command:
## Find secret
sudo ceph auth get-key client.admin
## Mount the CephFS storage
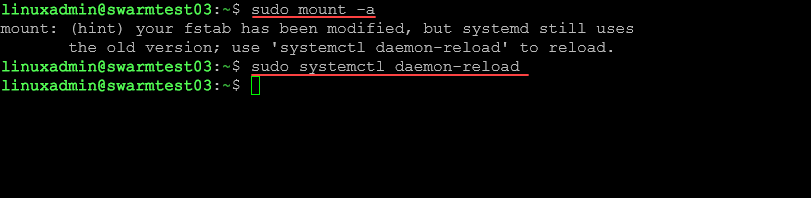
sudo mount -t ceph 10.1.149.126:6789,10.1.149.127:6789,10.1.149.128:6789:/ /mnt/cephfs -o name=admin,secret={your-secret}We can put the following line in our FSTAB file. Note that I have replaced the secret with the one retrieved using the command above:
10.1.149.130:6789,10.1.149.131:6789,10.1.149.132:6789:/ /mnt/cephfs ceph name=admin,secret=AQAmjg1nqy6WAhAAepocQ4a8dK4vDgwVKrazKg==,_netdev 0 0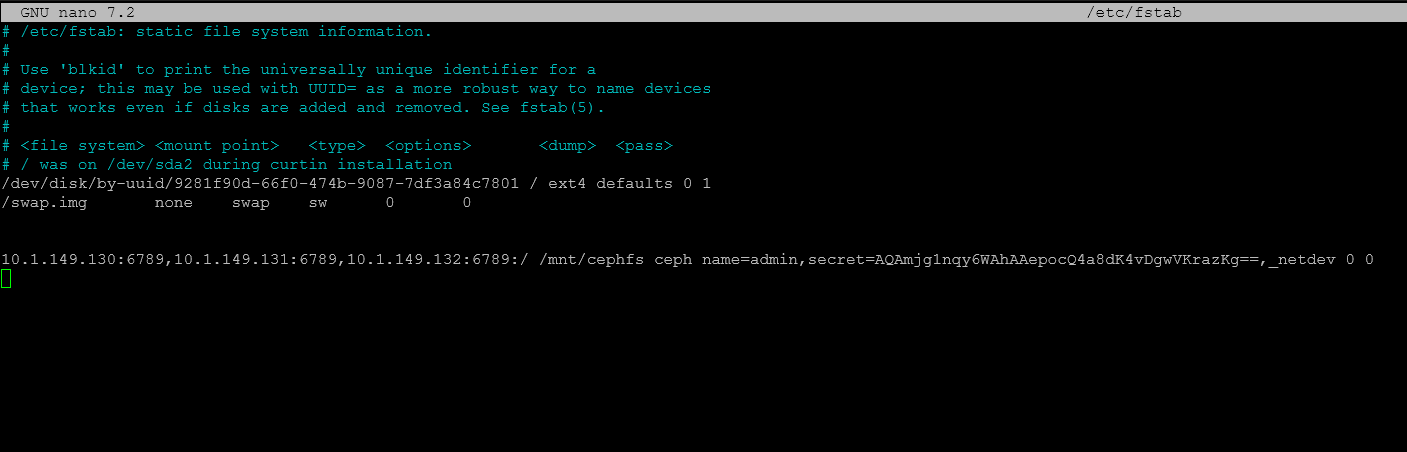
Example of Docker Compose YAML code to use CephFS
Let’s take a look at a code example on how we would reference the storage that we have created for spinning up Docker Containers in a Docker Swarm environment. As you can see below, we are referencing /mnt/cephfs/ in our volume path:
services:
  npm:
    image: 'jc21/nginx-proxy-manager:latest'
    networks:
      - nginxproxy
    ports:
      - '80:80'
      - '81:81'
      - '443:443'
    volumes:
      - "/mnt/cephfs/npm/data:/data"
      - "/mnt/cephfs/npm/letsencrypt:/etc/letsencrypt"
    deploy:
      replicas: 1
      restart_policy:
        condition: on-failure

  npmdb:
    image: 'jc21/mariadb-aria:latest'
    networks:
      - nginxproxy
    environment:
      MYSQL_ROOT_PASSWORD: 'npm'
      MYSQL_DATABASE: 'npm'
      MYSQL_USER: 'npm'
      MYSQL_PASSWORD: 'npm'
    volumes:
      - "/mnt/cephfs/npm/mysql:/var/lib/mysql"
    deploy:
      replicas: 1
      restart_policy:
        condition: on-failure

networks:
  nginxproxy:
    driver: overlay
Wrapping up
Using Microceph and CephFS are a great way to have distributed storage between your container hosts so that you can run your containers with high availability in your environment. Ceph is a strong storage solution that is actively developed and shows no signs of slowing down which makes me feel good about using it in a modern cluster. Microceph eases the installation steps by bundling a lot of the complexity with setup into the simple snap command for microceph installation. And, as you can see, the process to configure CephFS on top of this is not difficult at all.


Hello,
unfortunately, a test text file is not replicated between my nodes…
I have more less strictly copied your configuration on YouTube and here on this site. Just the names are a different.
But I cannot get it replicating.
eventually you have any starting point where I can look…
Marvin,
Thanks for the comment. That definitely sounds like you have something going on there. Hey can you create a forum topic under “Kubernetes and Containers” like “Ceph cluster storage not replicating between nodes” and we can work on it there if that sounds good. Thanks again.
Brandon