Beelink Sei14 Mini PC Review as a Home Lab Server with Intel Arc
Beelink kindly sent over a Beelink Sei14 Mini PC for me to review. Of course I do reviews a little bit differently than most when it comes to Mini PCs. The first thing I do is take out the NVMe drive with Windows 11 on it, and load up my favorite hypervisors. This is way more fun. These little mini PCs are also a great way to run a home lab as they are much more efficient and very powerful compared to used or old enterprise server gear.
Table of contents
Overview of the Beelink Sei14 Mini PC specs
The Beelink Sei14 has some impressive specs for a little Mini PC. These include the following:
- 12th Generation Intel Core Ultra 5 125H Meteor Lake processor with base clock at 3.0 GHz and turbo up to 4.5 GHz.
- 14 cores and 18threads
- 18 MB of smart cache
- Intel Arc Graphics 2.2 GHz (7 cores of graphics processing power)
- 4k UHD with support for (3) monitors
- Maximum of 96 GB of DDR5 memory
- (2) M.2 slots with a max of 8TB of NVMe storage at max 4 TB per slot (this will be great for more storage, or using the other M.2 slot for NVMe memory tiering in VMware ESXi)
- Lots of connectivity options, including:
- USB-C 10Gbps, USB 3.2 10Gbps x2, USB 2.0 480Mbps x2, RJ45 2.5GbE
- Thunderbolt 4 (40Gbps/TBT4/PD/DP1.4)x1, DP1.4a (4K144Hz)x1, HDMIx1
- Audio jack
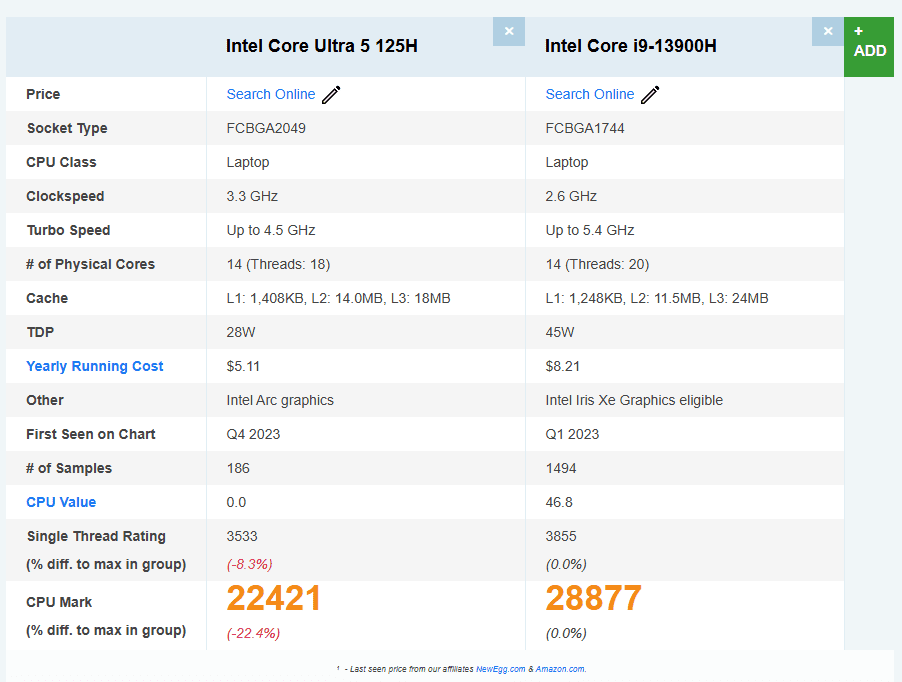
Just for comparison purposes, below is a comparison of the Intel Core Ultra 5 125H vs Intel Core i9-13900h processor (via PC mark) that is found in the Minisforum MS-01, which I think is a fantastic Home Lab Server, probably the best in 2024 so far.
With the healthy specs, this hardware should work well as a home lab server. But, does it? Let’s see as we get things unboxed.
Unboxing the Beelink Sei14 Mini PC
The Beelink Sei14 was packed really nicely and was as I expected of Beelink. Let’s look at some of the unboxing pictures.

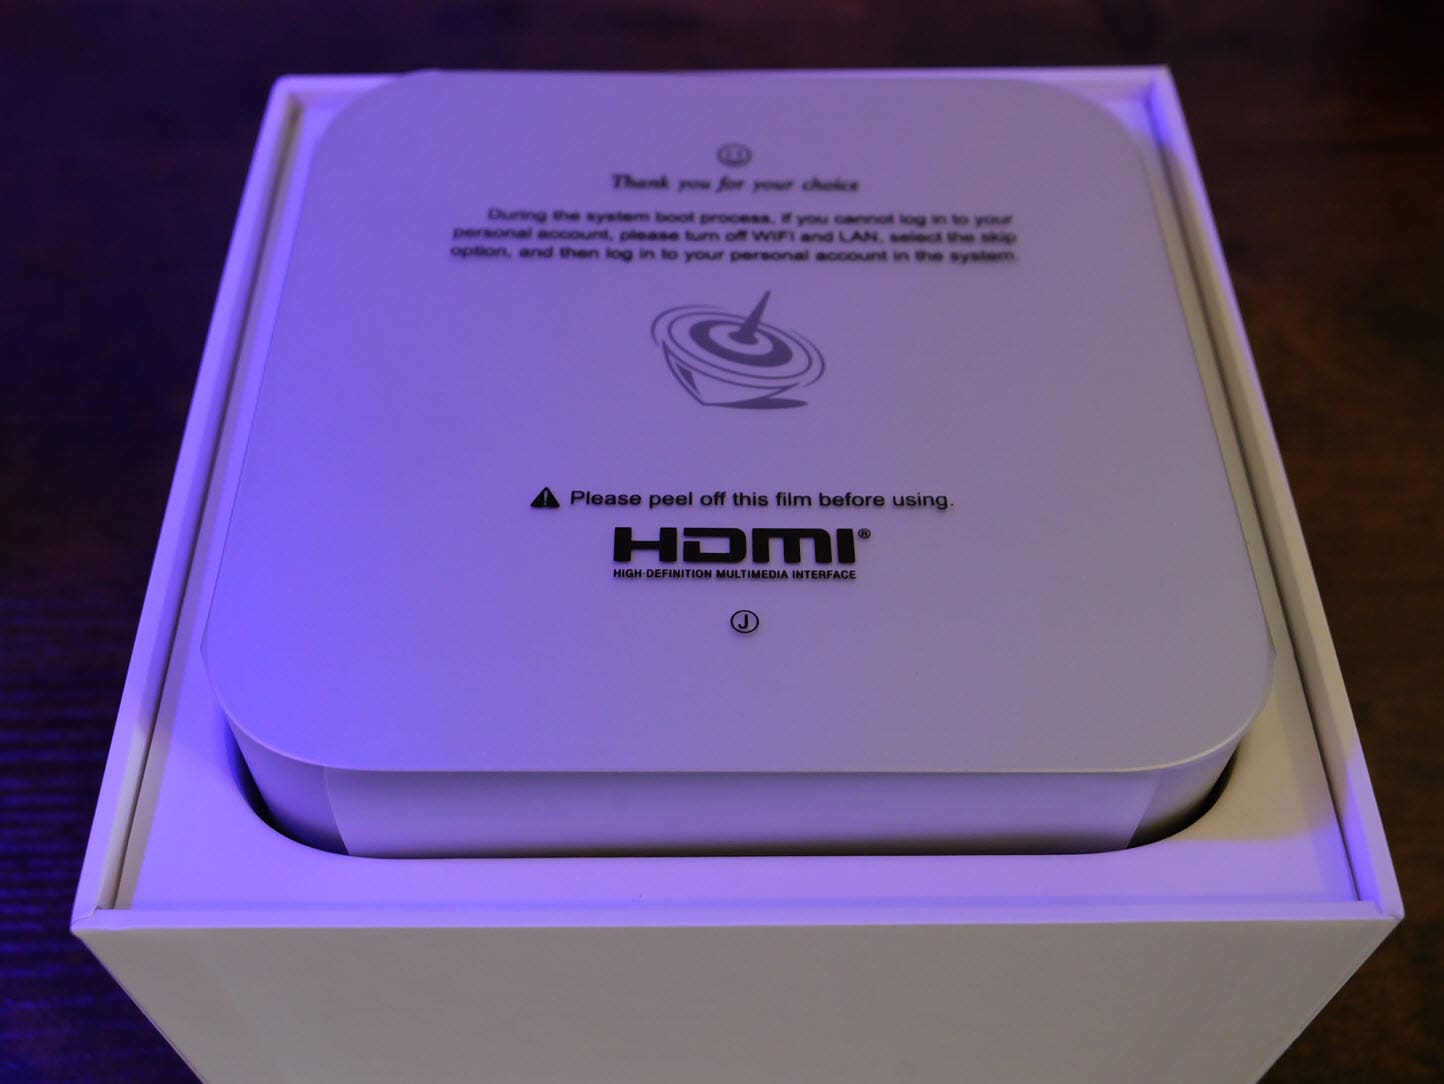
After removing the top lid of the box of the Beelink Sei14.
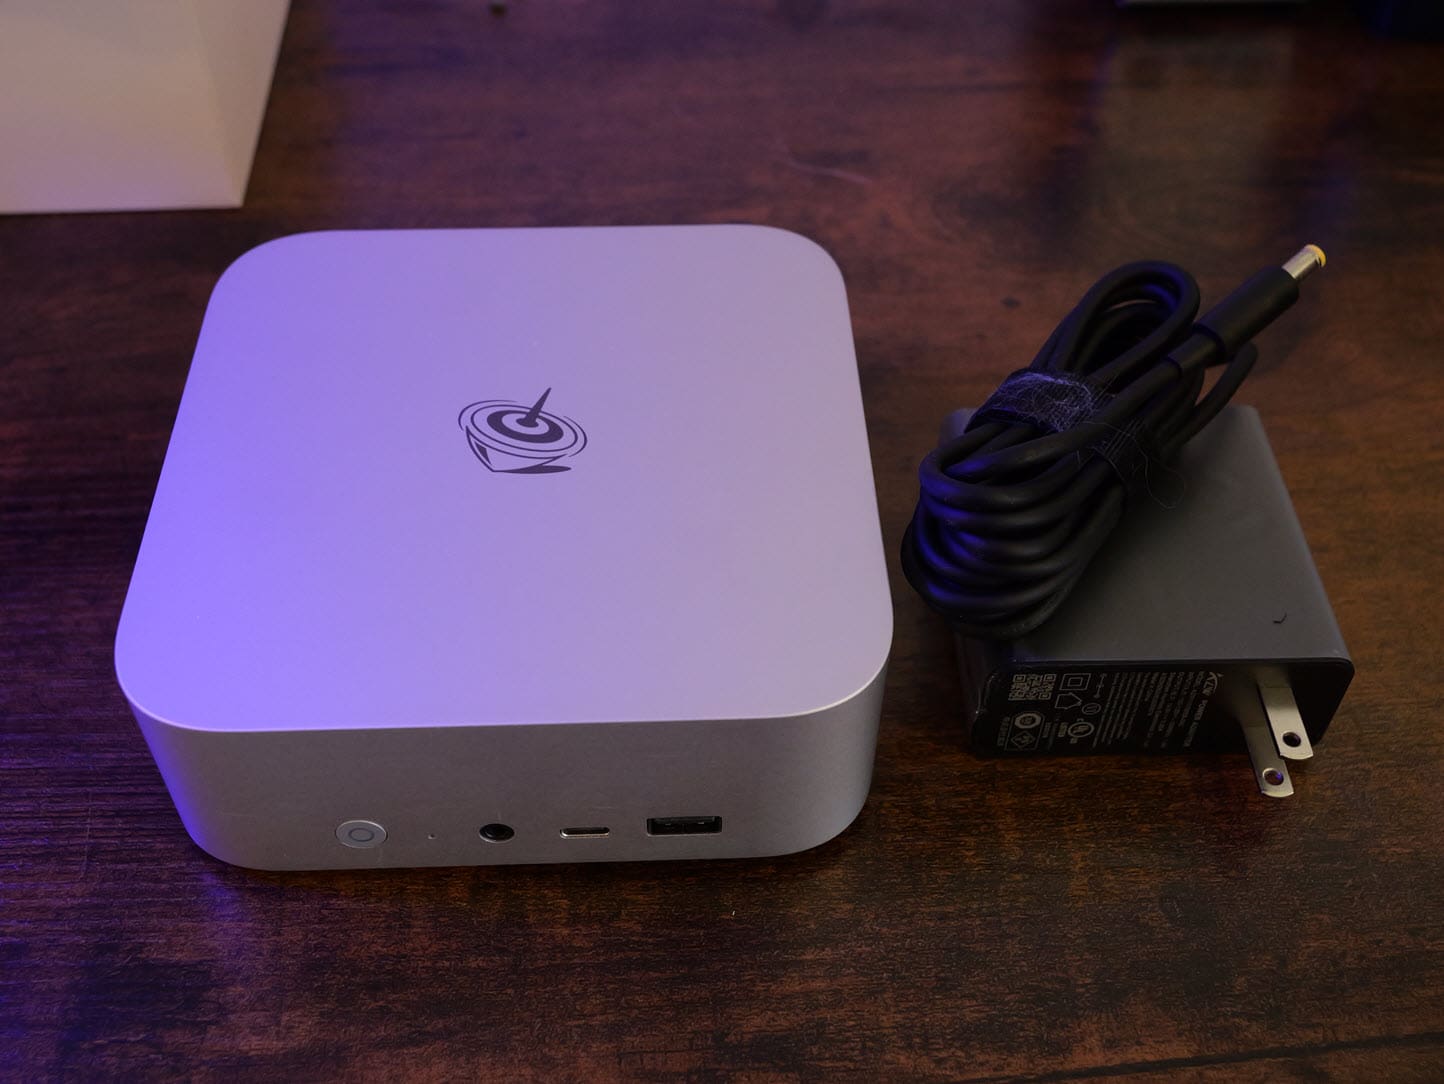
Next, after removing the plastic cover on the unit, viewing the back port configuration. You can see you have (2) USB ports, 1 2.5GbE adapter, 1 display port, 1 HDMI port, another USB A port, a USB-C port and then the axial power adapter connection.

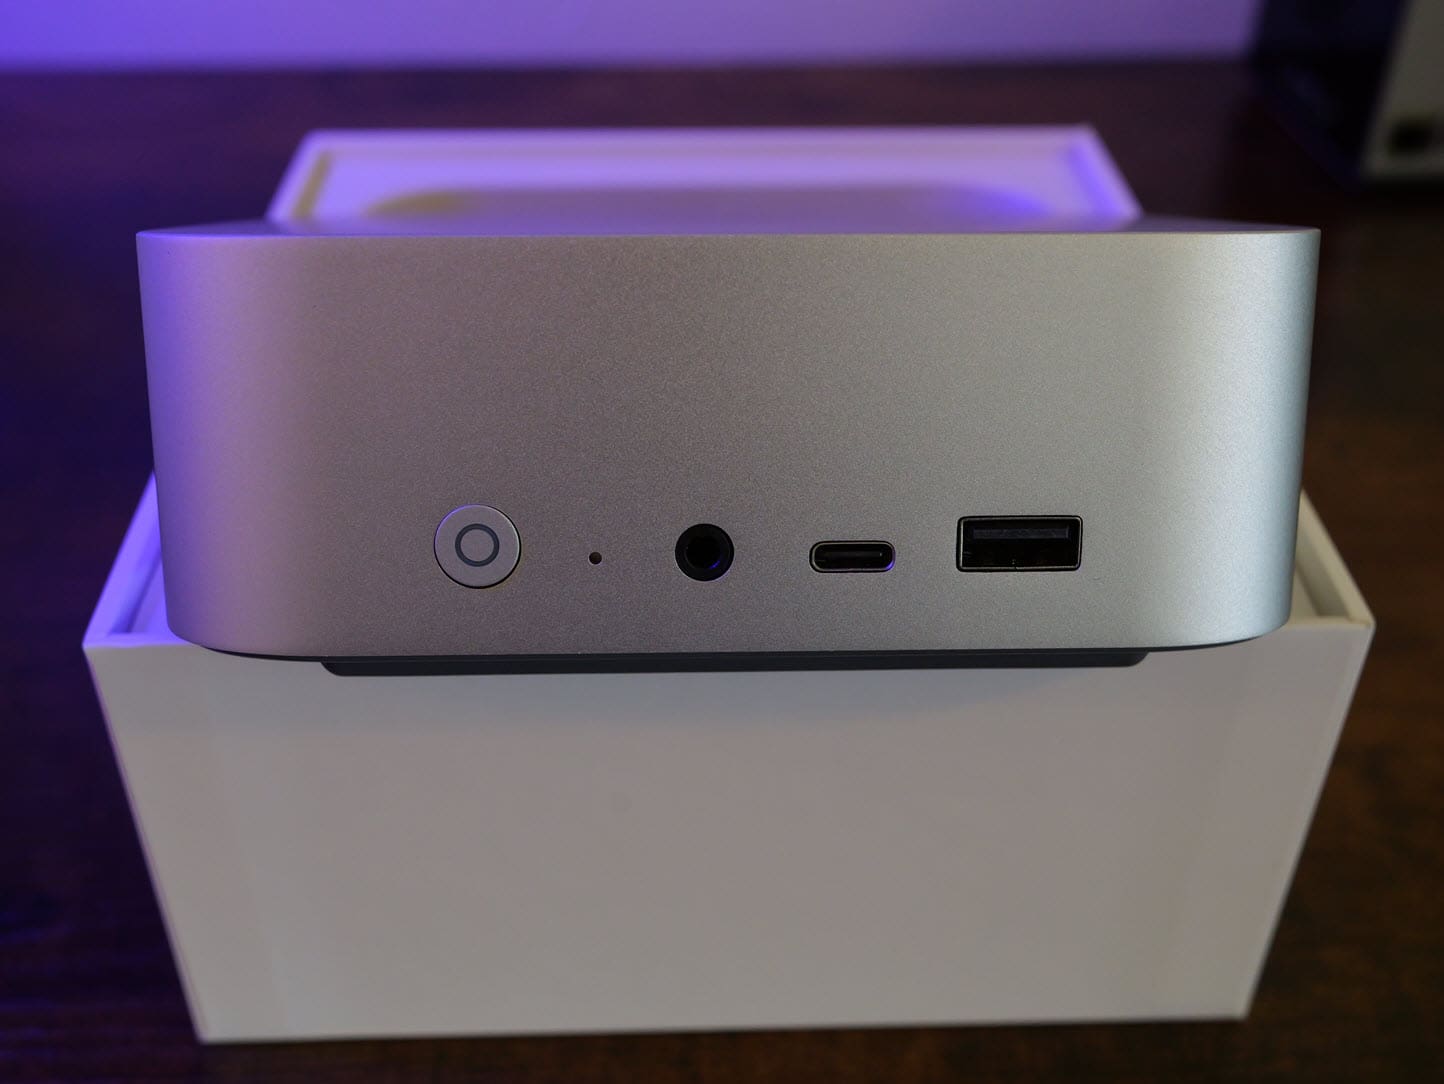
The front of the Beelink Sei14. You have the audio jack, USB-C, and USB-A ports.
On the bottom of the unit, to remove the bottom plate to get to the internals, you need to remove the little rubber covers or feet over the (4) screws. Once you have those removed, you can remove the screws and then just pull on the pull tab to remove the plate.
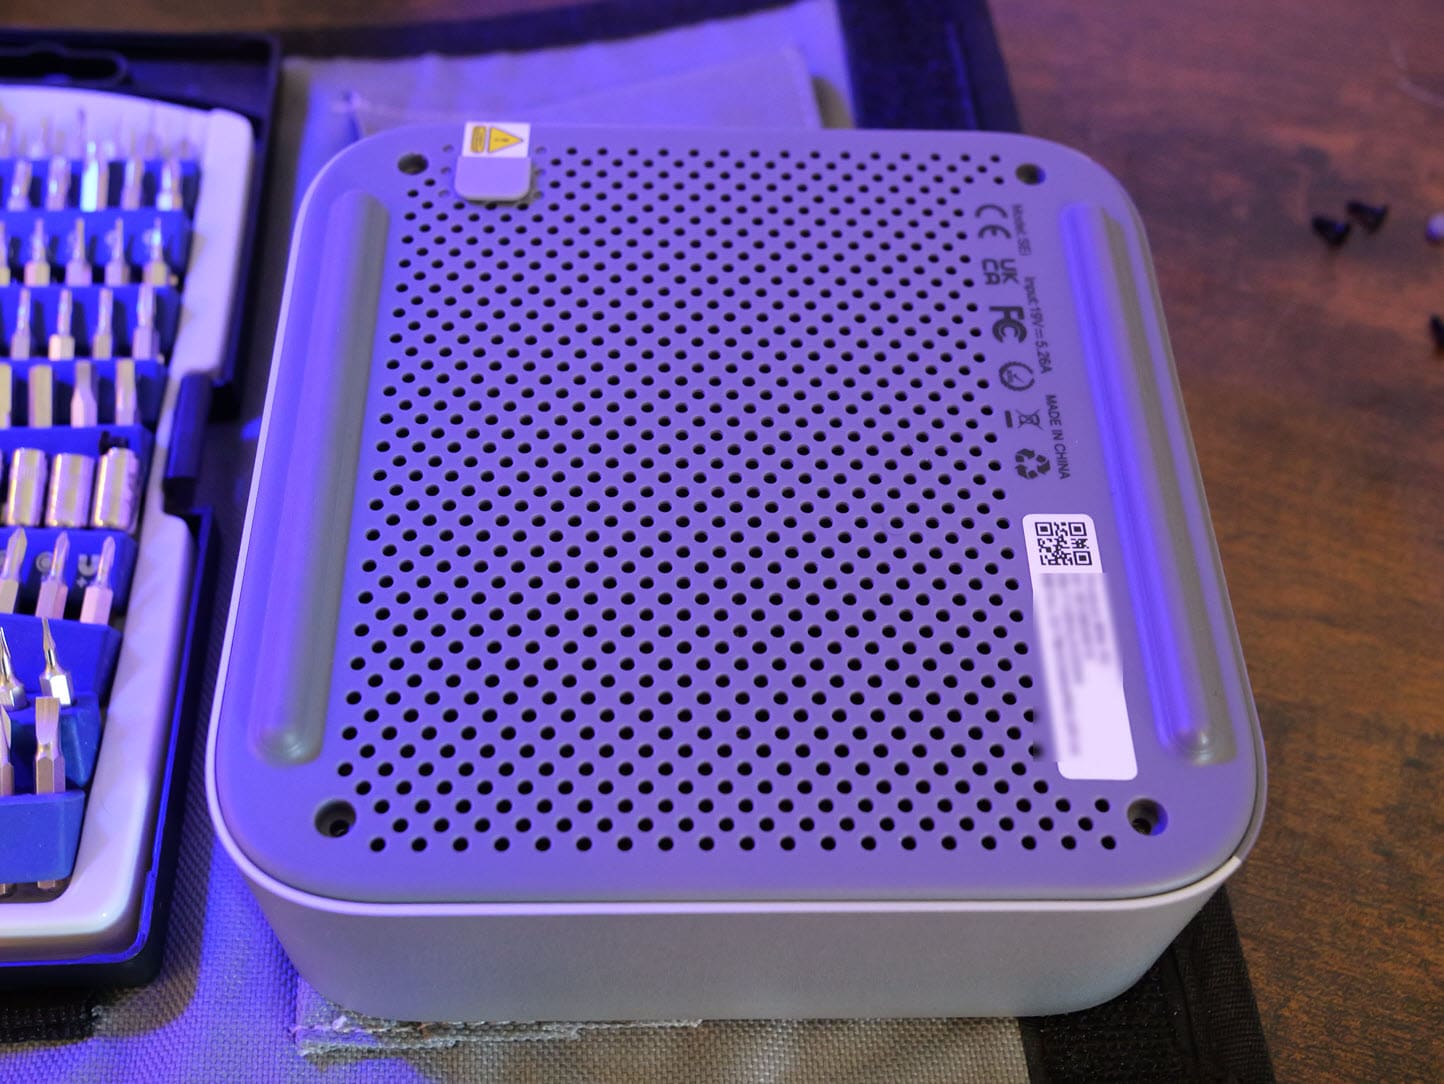
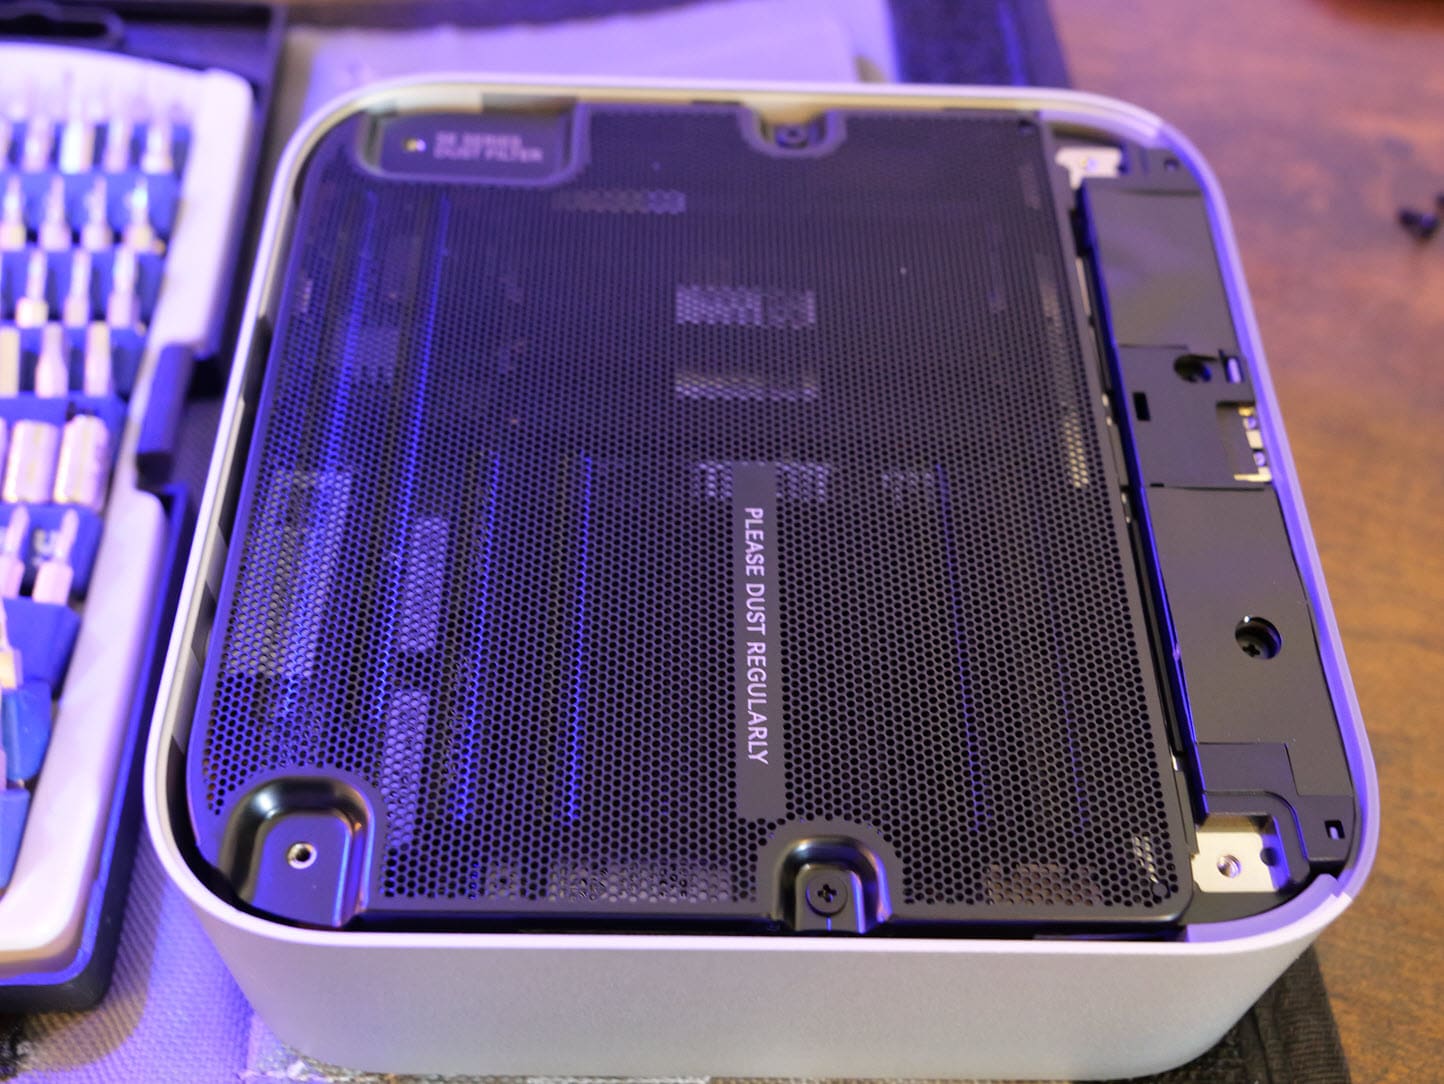
After removing the bottom plate, Beelink has a wire dust mesh plate in between the bottom plate and the internals. Remove (2) screws here to remove the dust plate.
I like the dust plate idea as it will help to keep the dust off the internal components. The only drawback is that as the little tag says, you will need to dust the screen regularly as this will get filled with dust over time and choke down the airflow coming into the components.
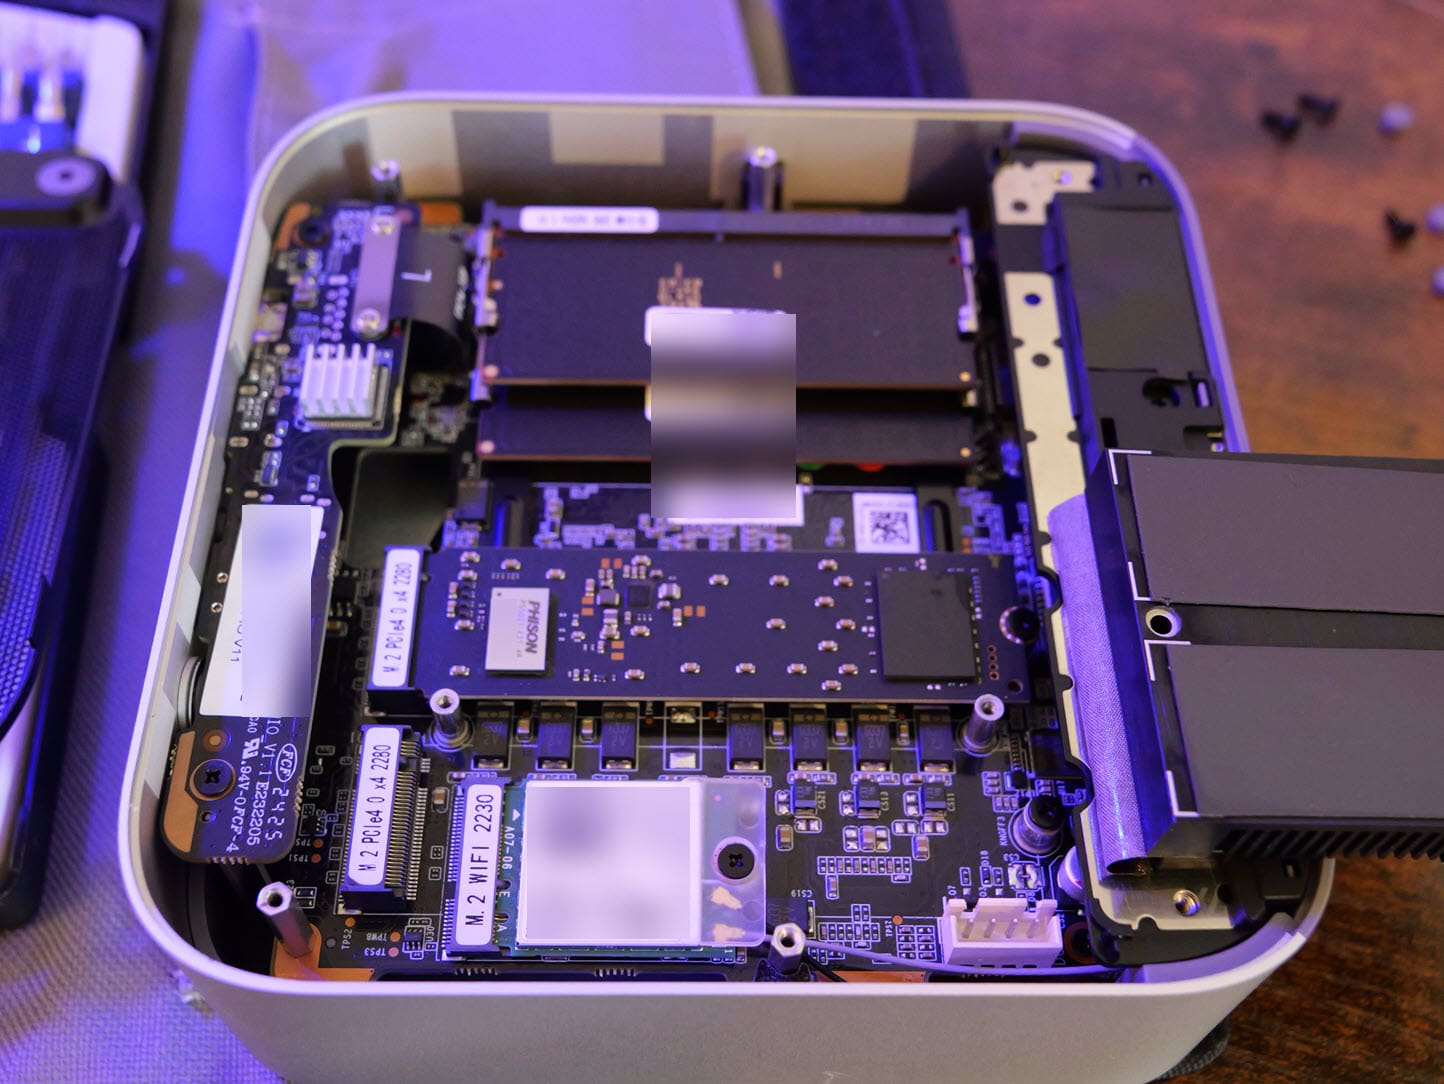
After removing the dust mesh plate, you have access to the (2) M.2 slots and RAM slots. The (2) M.2 slots are covered by the heatsink. To remove the heatsink, you remove (2) screws on each end of the heatsink.
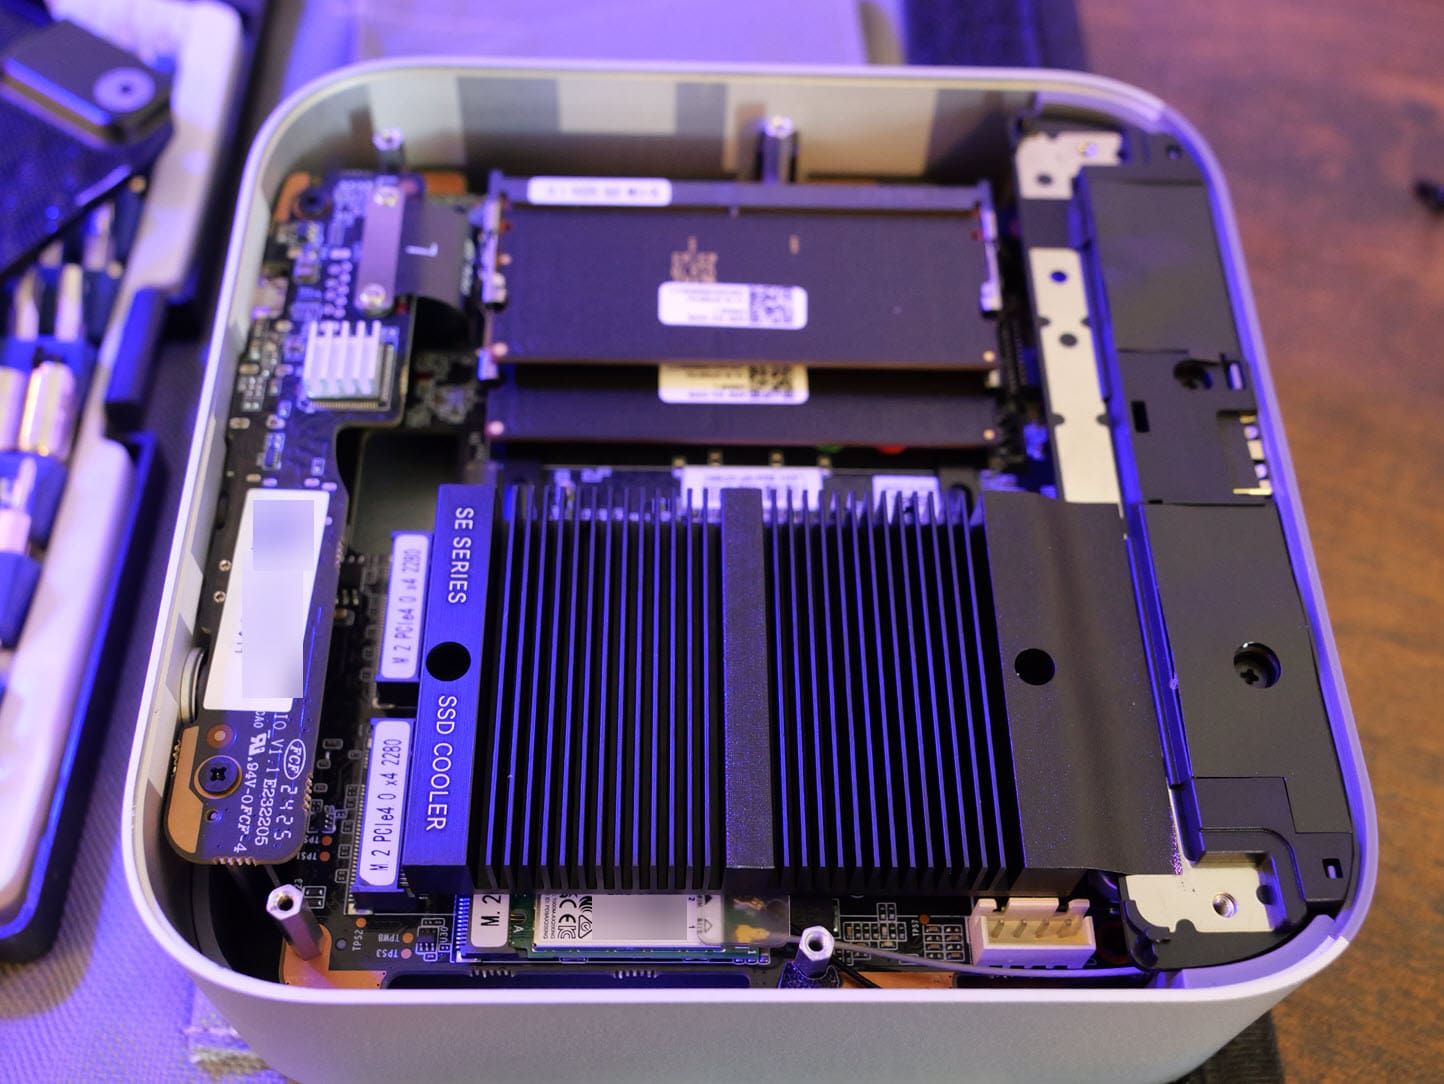
After removing the (2) screws, you will be able to pull up the heat sink that is connected to the chassis via a strip of tape. This reveals the factory-installed NVMe drive preloaded with Windows 11. You have another M.2 slot in addition to the one the NVMe drive is in with Windows 11.
To view the size comparison of the power adapter brick, here we have it sitting beside the Beelink Sei14.
Installing VMware ESXi
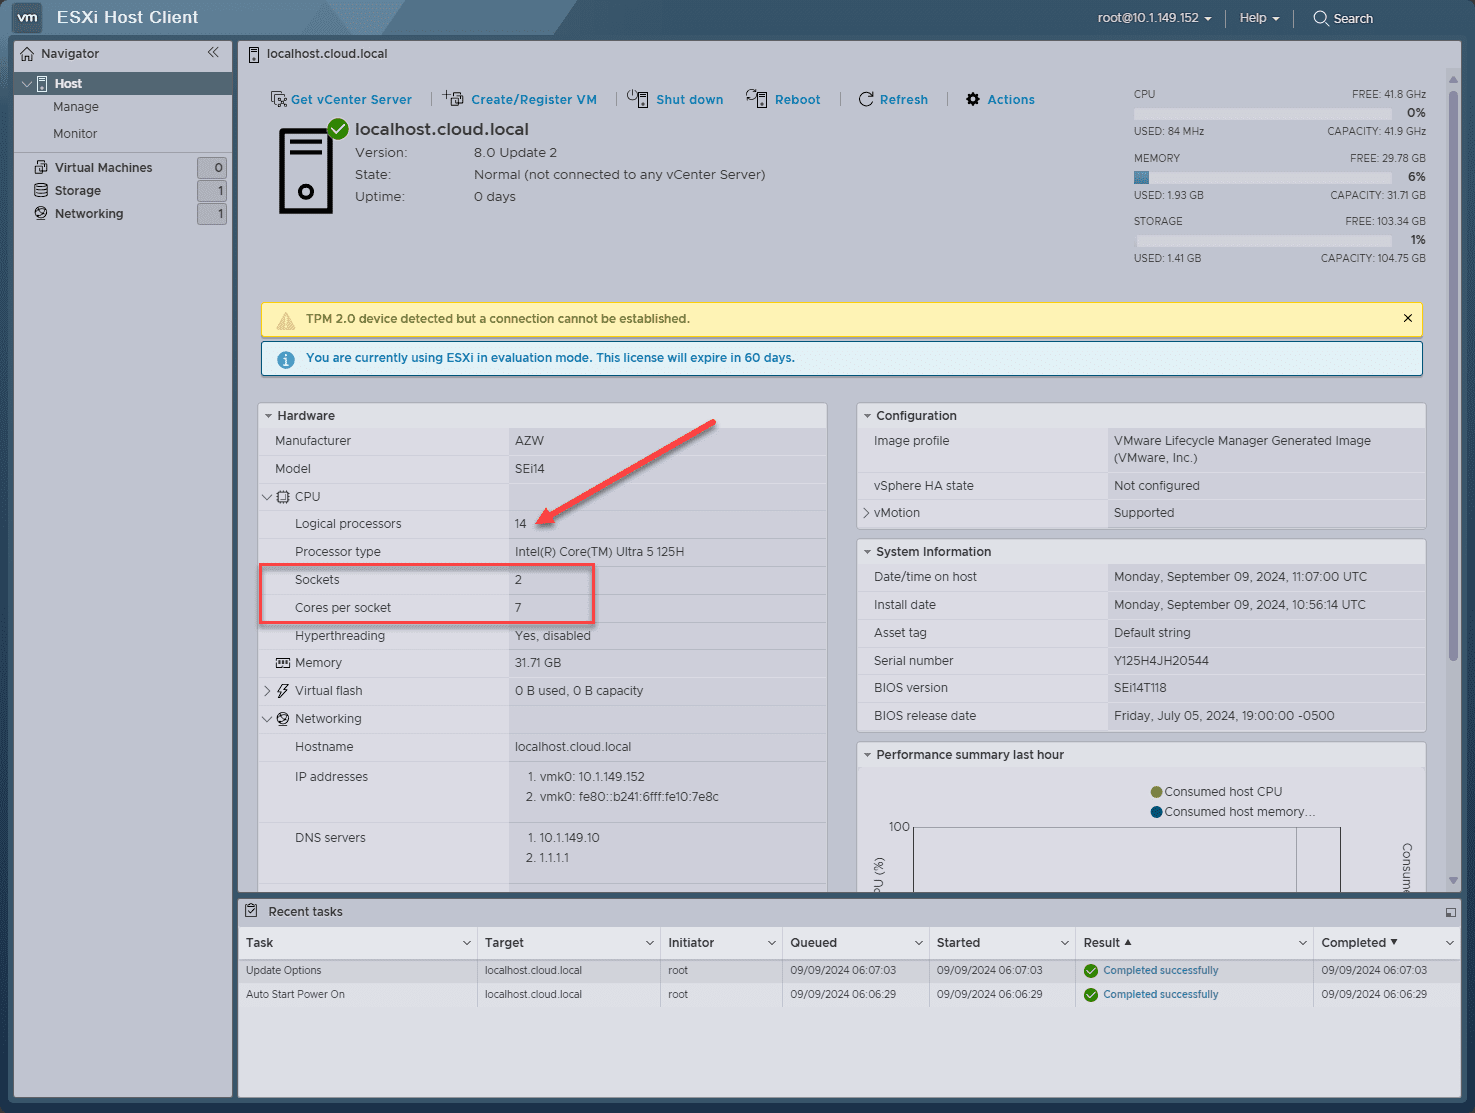
The great thing about the Beelink Sei14 is that it has an Intel 2.5GbE network adapter which means that you can run either VMware ESXi or Proxmox, not just Proxmox like it would be if you only had a Realtek network adapter.
I really like these mini PCs that give you options, as it really increases the value of the mini PC since you can do more with it. You may only be interested in running Proxmox so the Realtek would be fine for that, but what if you wanted to install VMware ESXi later to play around with it? The Intel network adapter just makes that whole process easier.
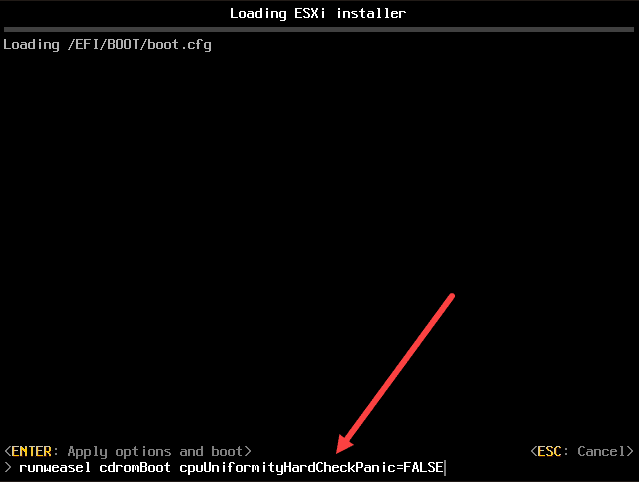
Boot parameter for hybrid processor
You will need to use the boot parameter for the hybrid processor to make sure your VMware ESXi installation will boot during the install and after install. Then we will make it permanent.
The boot parameter during the boot of the installation is:
cpuUniformityHardCheckPanic=FALSEOnce you install it, enter the above boot parameter one more time to get booted into your installed version of VMware ESXi. Then to make it permanent, use the command:
esxcli system settings kernel set -s cpuUniformityHardCheckPanic -v FALSE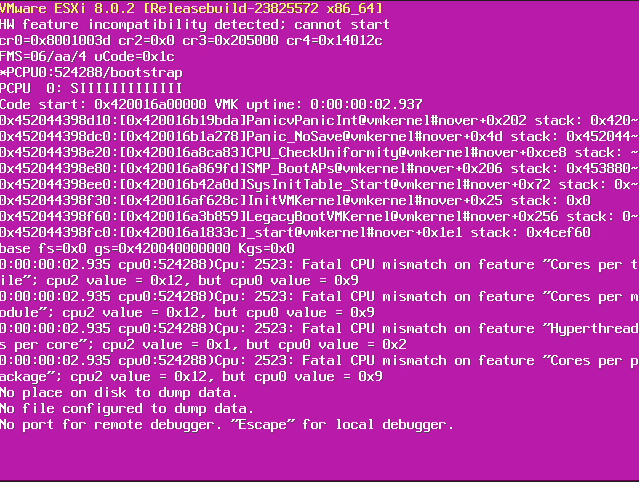
Installing Proxmox
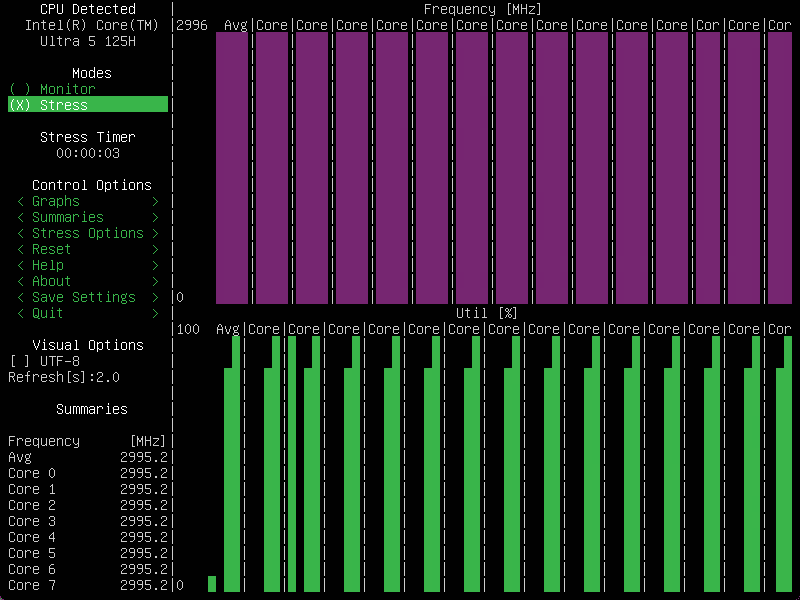
Proxmox works just fine and runs virtual machines and containers as you would expect, no issues there. You can see in the summary screen below the 18 CPUs showing in Proxmox.

Power consumption
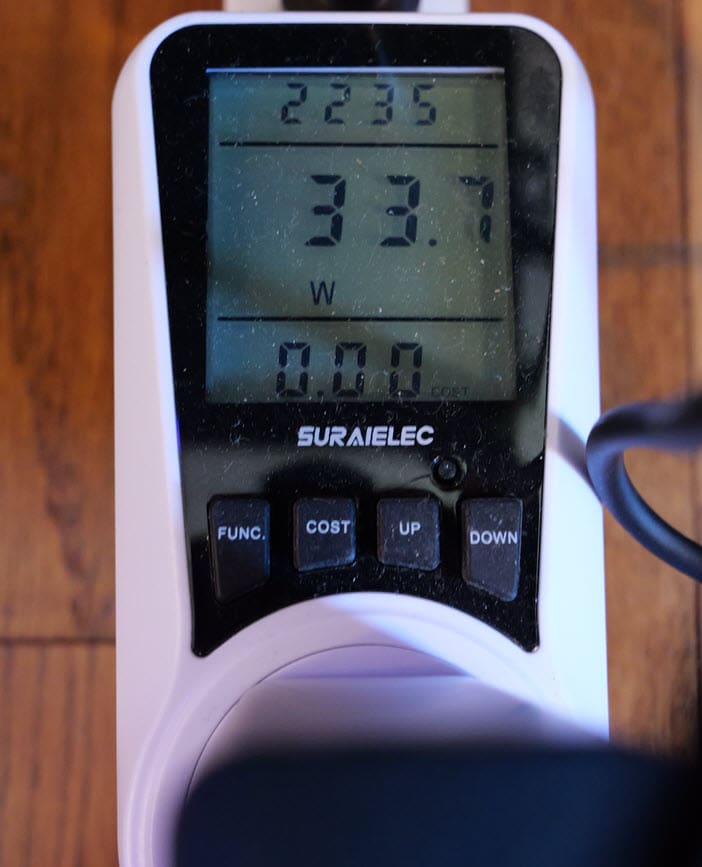
The Beelink Sei14 mini PC has good power efficiency, especially under load more so than idle. At idle I recorded power consumption in the neighborhood of 33 watts.
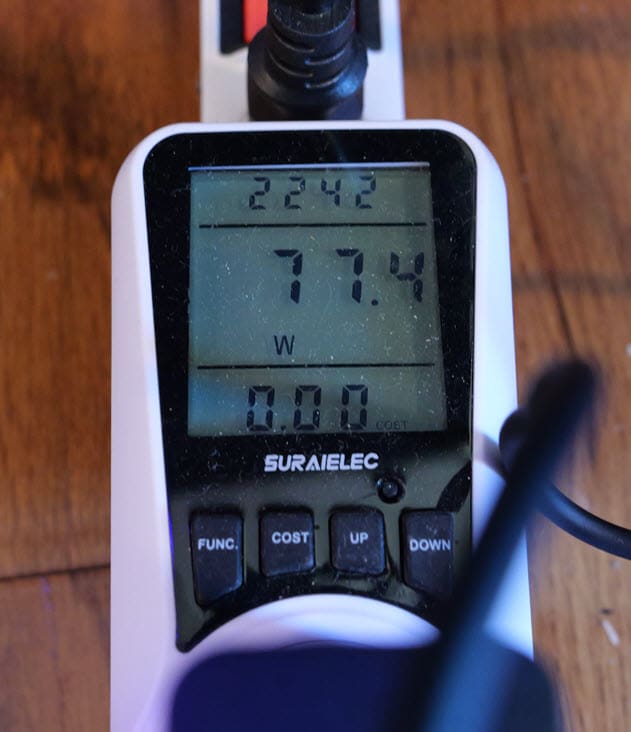
Under load using the Linux stress test and S-TUI tool pushing the CPU to 100%, I recorded around 75 watts.
My thoughts on this Beelink Sei14 Mini PC
I really like this little mini PC. It packs a lot of processing power into a small form factor. The fit and finish of the unit is really nice. Almost has a mac mini type appearance with the unit I received being the “silver frost” finish.
Pros:
- It has a modern multi-thread CPU with 18 threads to play with
- It has DDR5 so you can take it up to 96 GB of memory
- It has 2 NVMe slots so you have another option for storage
- It has Intel Arc graphics
- It comes with Windows 11 Pro
- The full power 100% CPU power draw is only around 75 watts, which is really good
- It has an Intel 2.5 GbE network adapter so is compatible with VMware vSphere
- Runs Proxmox fine too
Cons:
- It is expensive at $799 – You can find it on Amazon here: Amazon.com: Beelink Intel Mini PC SEI14
- Would be nice if it would have had (2) 2.5 GbE adapters instead of just 1 for use in the home lab
- Idle power is a bit high compared to some units in this processing range at around 33 watts
Wrapping up
Hopefully, you have enjoyed the walkthrough and discussion of the Beelink Sei14 mini PC as a home server. The unit has really good hardware that gives you lots of options in the home lab to run many different hypervisors, including VMware vSphere and Proxmox to name the couple that are on my list.