I recently looked at the installation of Fedora CoreOS on VMware. In the home lab, many are running Proxmox and maybe more coming up will be switching from VMware over the course of 2024. Let’s take a look at the topic of running Proxmox Containers with Fedora CoreOS setup.
Table of contents
- Proxmox and Fedora CoreOS
- Fedora CoreOS install on Proxmox
- 1. Clone the community repo
- 2. Enable snippets on a Proxmox VE storage repository
- 3. Run the included shell script
- 4. Configure the cloud-init settings for the created template
- 5. Clone the template VM to a new Fedora CoreOS virtual machine
- Wrapping up Proxmox containers Fedora CoreOS install
Proxmox and Fedora CoreOS
Combining an excellent hypervisor for virtualization and an operating system platform that is purpose-built for containerization and Kubernetes, is a great combination. We can do this by running Fedora CoreOS distribution on top of Proxmox VE with KVM for the purpose of running containers.
Fedora CoreOS
While you can run LXC container (Linux containers) configurations and container template machines inside of Proxmox natively, many developers and DevOps guys need access to Docker containers. In the home lab, most solutions you want to self-host are readily available as Docker containers also without running full virtual machine instances with full operating systems. So, running Docker is a great way to have access to these solutions.
Fedora CoreOS has as its focus, containerized infrastructure. If you look at the documentation, It offers an automatically updating, minimal, container-centric operating system that natively runs Docker, Podman, and can run Kubernetes as well also, with good support across the board. It is also immutable which means it has security enhancements for customers running it for their container cluster.
So if you are looking for a clean, secure, and immutable OS to run your containers on top of Proxmox, CoreOS is a great solution!
Proxmox
Running it on top of Proxmox has other benefits such as the ability to run Proxmox Backup Server solution to backup the host virtual machines. It has powerful networking and monitoring. Businesses can even choose to have enterprise support and home labbers can become a member of the Proxmox support forum (for search forums threads, requests, and share things with others in the home forums such as issues and troubleshooting) and access to other Proxmox solutions, like Proxmox Mail Gateway.
Fedora CoreOS install on Proxmox
Let’s look at the Fedora CoreOS installation on Proxmox VE and see what steps are involved. There is actually a really great community project that will allow getting up and running with Fedora CoreOS on Proxmox. We will take a look at this below. In addition, Fedora CoreOS can be installed on bare metal using a live ISO installation as well as OVA appliance for VMware.
Note the steps we will cover:
- Clone the community repo
- Enable snippets on a Proxmox VE storage repository
- Run the included shell script
- Configure cloud-init options for the created template
- Clone the template VM to a new Fedora CoreOS virtual machine
1. Clone the community repo
Before creating containers with Fedora CoreOS, ensure your Proxmox VE setup is ready. This involves checking available disk space, configuring network settings, and making sure your Promox host is up-to-date. If you can navigate to the Proxmox web interface to manage containers (view Proxmox container toolkit settings) and virtual machines you should be good to go.
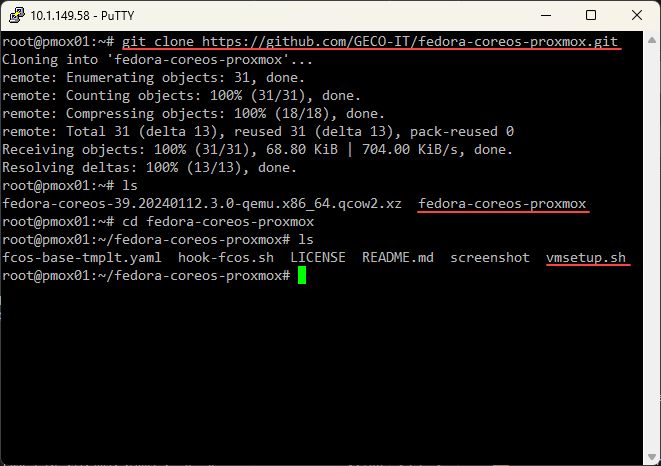
We need to clone the repository that contains the community script for deploying the Fedora CoreOS installation. You can clone the following repository:
I did this directly from my Proxmox VE host. Just install the git tools if you haven’t already: apt install git -y
You will see the fedora-coreos-proxmox folder. If you cd inside the folder, you will see a vmsetup.sh wrapper script that is the script we will run on the Proxmox VE server. The fedora-coreos-<version>.yaml serves as the ignition file for CoreOS. The Ignition file configures all the required settings..
2. Enable snippets on a Proxmox VE storage repository
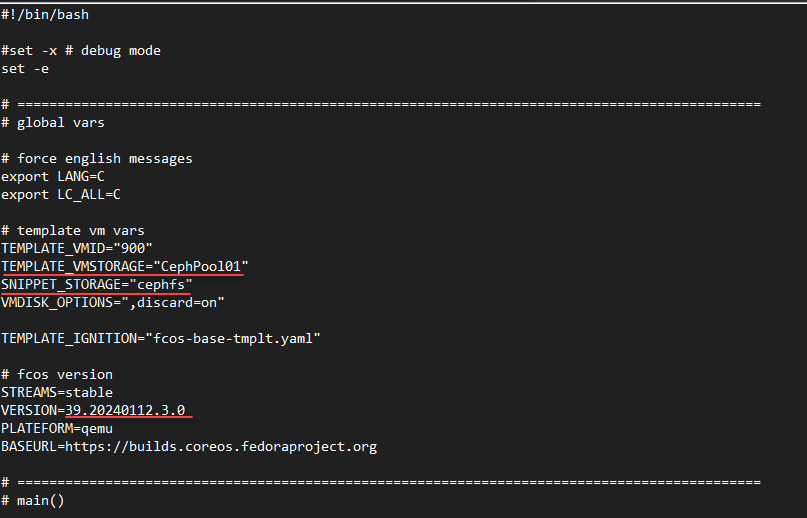
Next, following the instructions on the GitHub repo, we need to enable snippets on a local storage repository. It defaults to the local default storage in Proxmox. However, you can edit the vmsetup.sh script to point to a different storage location for both the snippet storage and template storage which is also needed.
You will see the lines I have changed below in the top part of the script. I have changed the TEMPLATE_VMSTORAGE and SNIPPET_STORAGE to the locations I wanted. Also, the vmsetup.sh script was quite a bit behind on the Fedora CoreOS version it was looking to deploy. So, I updated that to the latest at the time of writing in the file below.
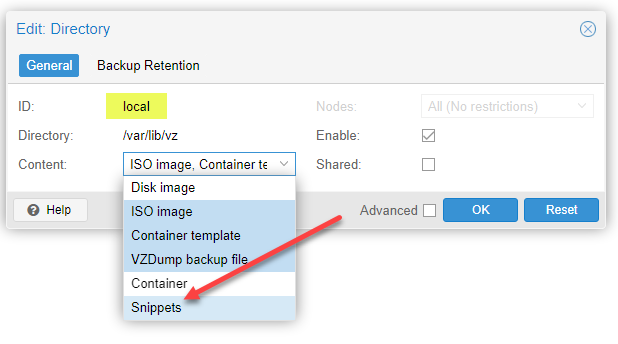
Make a connection in a browser to the URL of your Proxmox web UIIf you want to go with the default local location, or any other location, navigate to Datacenter > Storage > “your storage” in the menu navigation, then click EDIT.
Add Snippets to the Content dropdown. Then click OK. You can also create a new folder and enable it with the snippets content type if you want something specific set aside for this use case. Just create a new folder, enter a description if you like, and make changes to the vmsetup.sh file.
3. Run the included shell script
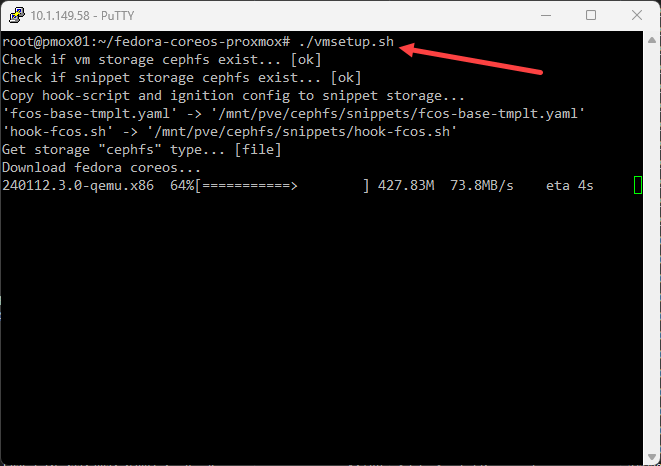
Now that we have the snippets enabled on the storage of our choice, we can run the vmsetup.sh script included in the cloned repo.
It will automatically download the Fedora CoreOS image in the QEMU QCOW format needed. The Fedora CoreOS container templates in Proxmox streamline the deployment process. The Fedora CoreOS template allows for new container creations and uses the configuration files for settings specific to Fedora CoreOS to ensure smooth operation within the Proxmox environment.
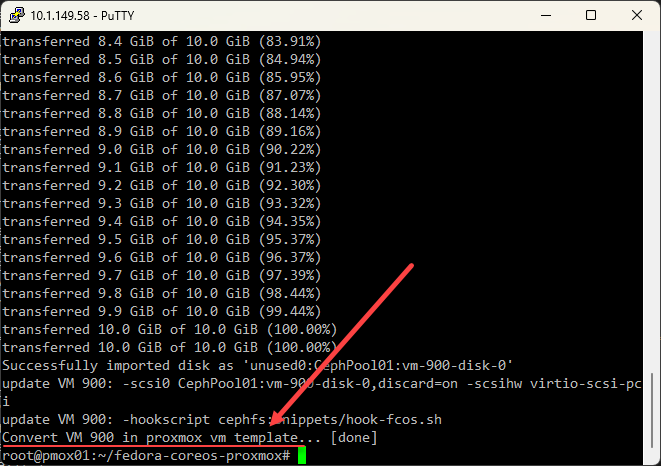
The process should complete with the message at the bottom: Convert VM 900 in proxmox vm template.
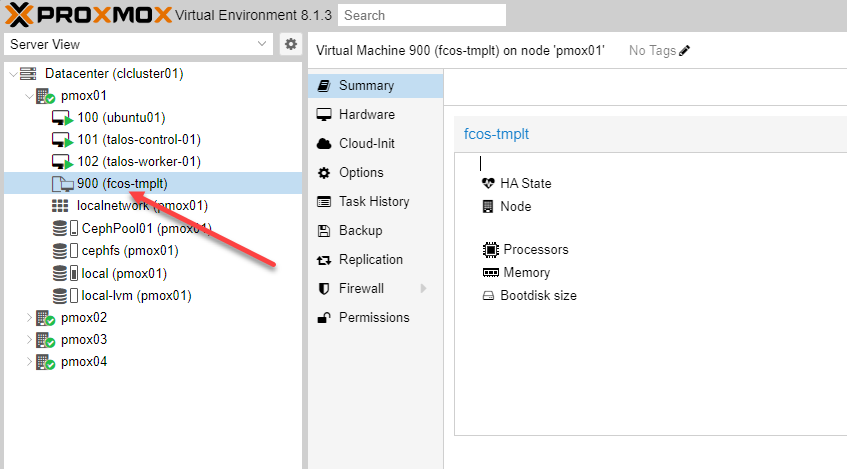
If you hop over to the Proxmox web interface, you will see the new virtual machine template.
4. Configure the cloud-init settings for the created template
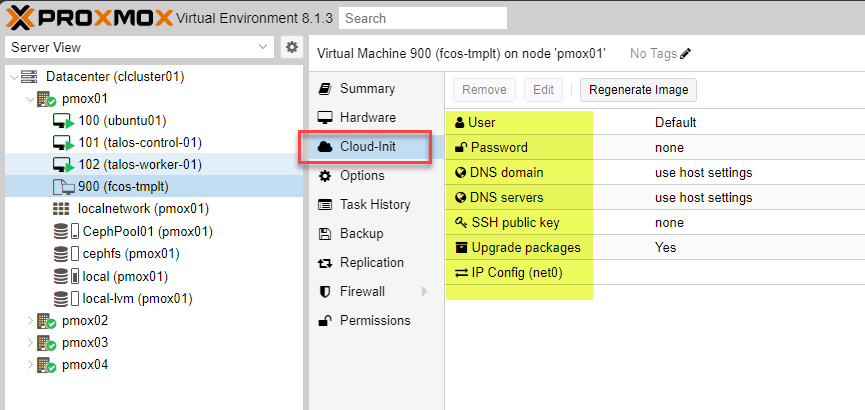
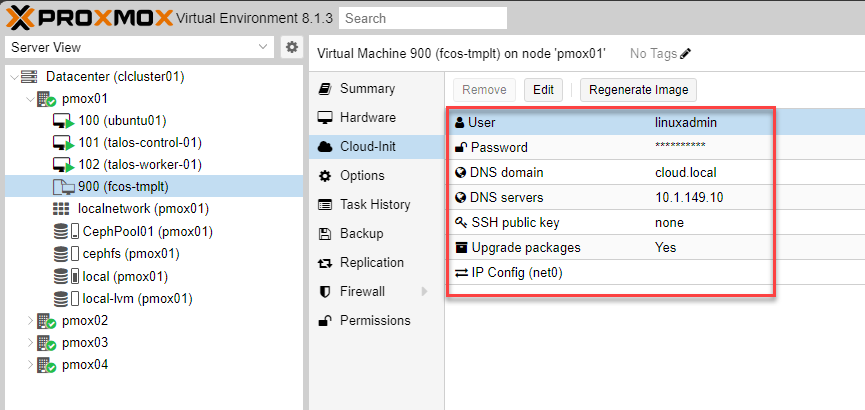
Click the VM and then look at the Cloud-Init settings. Here you will find settings you can customize for:
- User
- Password (passwd)
- DNS domain
- DNS servers
- SSH public key
- Upgrade packages
- IP Config (defaults to the default Linux bridge)
Below, I have configured custom settings for Cloud-Init.
5. Clone the template VM to a new Fedora CoreOS virtual machine
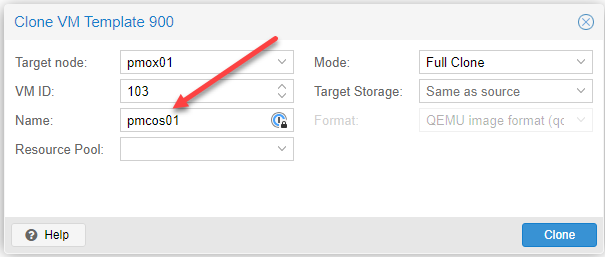
Now that we have the Cloud-Init settings configured, we can clone a new virtual machine from the new template.
Cloning a new VM called pmcos01 from the newly created template.
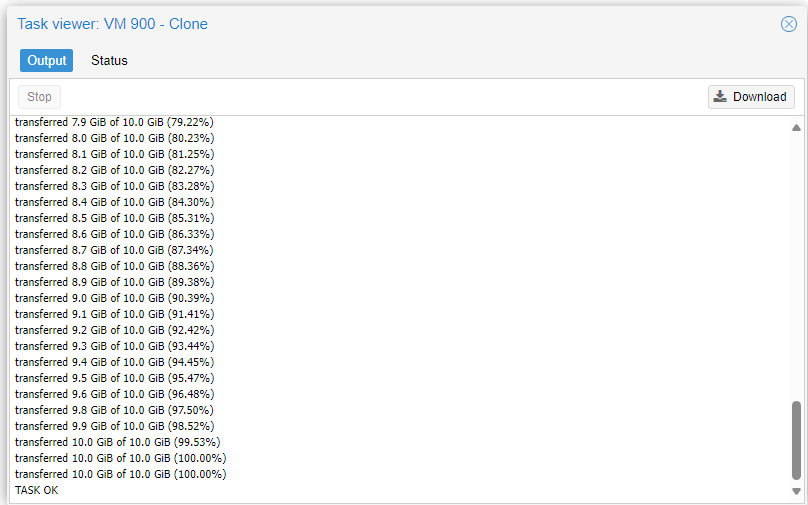
The clone task completes successfully. As you can see, the process to spin up quick Dev workloads for app development, websites, working with source, etc, is easy.
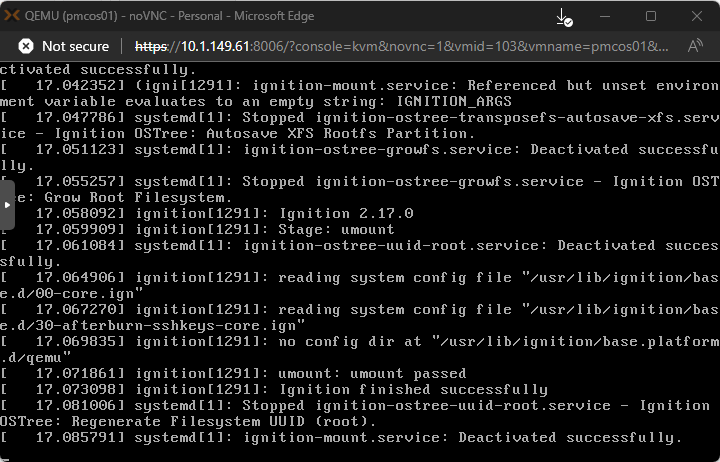
Now, we boot the new virtual machine and it boots. We can see the OS loading the config from the Ignition file.
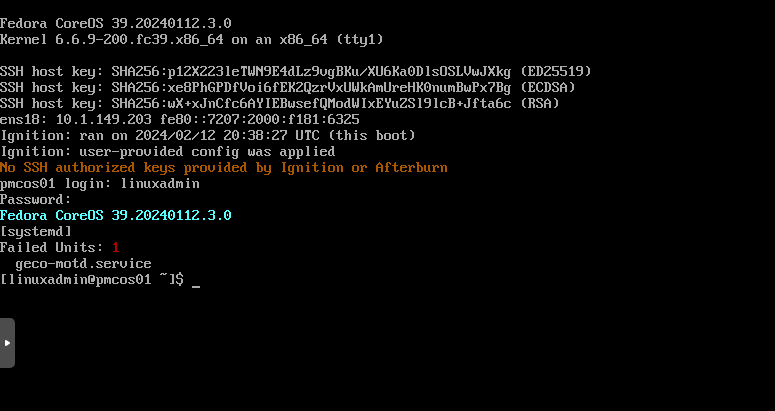
After the machine fully boots and grabs an IP address, I log into the VM on the console, and I used the linuxadmin user I had specified in the cloud-init settings.
Success! I can login with the new linuxadmin user, showing the VM has used our cloud-init settings.
The Fedora CoreOS installation already has Docker preinstalled, so we can create containers, including system containers and application containers immediately after cloning over new VMs. Now all we need to do is start spinning up our containers.
Wrapping up Proxmox containers Fedora CoreOS install
There are many advantages of using Fedora CoreOS with Proxmox for managing containers and virtual machines. Proxmox is gaining popularity in the home lab and even the business realm. Especially with the recent Broadcom shakeup with the VMware product portfolio, I think many others will be switching over to Proxmox and other options if they are currently running VMware. Fedora CoreOS provides the resources needed to go all in on an operating system set for container mode, giving dev and DevOps users what they need for development and a platform for running containers across the board. You don’t have to have a subscription for either and you can freely use many of the forum, wiki, and support thread resources out there. Let me know in the comments what you think about Fedora CoreOS and also be sure to sign up for the forums.
Google is updating how articles are shown. Don’t miss our leading home lab and tech content, written by humans, by setting Virtualization Howto as a preferred source.




Why make this so complicated?
Download the CoreOS qemu image to ProxMox.
Create a VM with no OS.
Attach the qemu image to the VM as a disk and change the boot order so it is first.
Create your butane -> ignition file and upload it to the server.
5 Attach the ignition file using qemu’s fw_cfg device: pvesh create /nodes/pve/qemu/104/config/ –args “-fw_cfg name=opt/com.coreos/config,file=/var/lib/vz/snippets/example.ign”
Start the VM.
Nate,
Thanks for the comment! Awesome, very simple and to the point. Thank you again.
Brandon
Regrets, but after having read this code, you have got to be kidding me as for this approach.
To say that downloading some untrusted script from some random cartoon avatar face from Australia and running it as root on one’s Proxmox host is not a cybersecurity best practice would be an understatement.
Geco-IT is actually a group based in France—not Australia. 😊
The source code for their script is openly available on GitHub: https://github.com/GECO-IT/fedora-coreos-proxmox. Additionally, they’ve provided a detailed explanation of their approach on the Proxmox forum, which you can read here: https://bit.ly/fedora-core-os-tut.
I understand the caution around running code from external sources, but considering this is open-source and appears well-documented and reliable, I think it should be safe to use in a home lab environment.
Hello,
I found this article, because I looked for a solution for the motd-error on the login.
But in this blogpost, the same error is in the picture with the undertitle “Logging into the fedora coreos virtual machine”.
I don’t want to blame anyone, but nobody wants a setup with bugs on the startup in an blogpost from this year. 😉
So I looked for some forks and I used this:
https://github.com/jimlee2048/fedora-coreos-proxmox (This is archived 2022, but more actual than the original)
https://github.com/Nitrousoxide/fedora-coreos-proxmox (I don’t tested it, but a actual fork of the repo above)
I also made a change for me, that the version set dynamically to the latest stable:
VERSION=$(wget -qO – https://builds.coreos.fedoraproject.org/streams/stable.json | jq -r ‘.architectures.x86_64.artifacts.qemu.release’)
JQ is required.
PS: Sry for my bad english.