TrueNAS provides a powerful platform for running a homelab. It provides a “LAN in a CAN” approach to running everything from NAS storage, virtual machines, and containerized applications, including vanilla Docker. This article will look at TrueNAS virtual machine configuration step-by-step tips for running your VM environment on top of TrueNAS SCALE.
Table of contents
- The basics of virtual machines
- TrueNAS virtual machines: pros and cons
- Deploying VMs in TrueNAS: A Step-by-Step Guide
- TrueNAS SCALE vs TrueNAS Core – Virtualization
- Optimizing VM Performance on TrueNAS
- Managing Memory and Storage for Peak Performance
- Advanced Features and Customizations in TrueNAS VMs
- Wrapping up TrueNAS Virtual Machine configurations
The basics of virtual machines
Virtual Machines provide the basic building block for most home labs and enterprise environments alike to build out virtualized infrastructure. Even with containers or Kubernetes, VMs are needed as these most often serve as the K8s or container host in production.
VMs as container hosts provide the advantages afforded by a virtualization workload, including migration, automation, monitoring, backups, high availability, etc. They also generally have low overhead and perform near bare metal in most real-world tests.
The hypervisor abstracts the underlying hardware from the virtual machines. The VMs inherit the hardware capabilities the host system supports, such as features from Intel or AMD CPUs, physical PCI devices, etc.
TrueNAS virtual machines: pros and cons
Many do not realize the TrueNAS servers can run virtual machines, and you can spin up most operating systems in TrueNAS without issue. When most think about an IXSystems TrueNAS setup, they think storage. With TrueNAS, you don’t need a RAID controller for multiple drives, since you can just utilize JBOD with ZFS storage, making it simple and easy to provision drives for many use cases.
You can also configure NFS and iSCSI targets from your ZFS pool storage. While this is certainly its bread and butter, it is also capable of virtualization, including virtual machines and running “apps” which are nothing more than containerized applications available in the TrueNAS catalog.
TrueNAS virtualization provides advanced virtualization features like support for multiple operating systems running inside VMs, BIOS and UEFI support, emulated virtual hardware, PCI passthrough device, and guest operating system customizations. With it, you can configure virtual network computing (VNC) settings.
However, there are some drawbacks to note. You won’t find working with VMs as easy as it is with VMware, Proxmox, XCP-ng, and others. Normal things like snapshots (VM snapshots not ZFS snapshots), vMotion, and virtual TPM, are missing.
Note the following table containing pros and cons of features and capabilities with TrueNAS virtual machines
| Aspect | Pros | Cons |
|---|---|---|
| Data Integrity and Security | Utilizes ZFS, a robust file system known for data integrity and protection against data corruption. | No support for Trusted Platform Module (TPM) in VMs, which can be a limitation for users needing advanced security features. |
| Storage Management | Offers powerful storage options with ZFS, including efficient use of storage through thin provisioning and compression. | Limited to ZFS snapshots; lacks the flexibility of VM-specific snapshot tools found in some other virtualization platforms. |
| Performance | Generally good performance, especially beneficial for IO-intensive applications due to ZFS optimizations. | Performance can be impacted in environments with limited resources or heavy workloads, particularly if not properly optimized. |
| Scalability | Scalable storage solutions, allowing for easy expansion as data needs grow. | Scaling in terms of VM density (number of VMs) might not be as efficient as some dedicated virtualization platforms. |
| User Interface and Management | User-friendly interface with a web-based GUI for easy management of VMs and storage. | Can have a steeper learning curve for users not familiar with ZFS or more complex networking setups. |
| Networking Capabilities | Robust networking options, suitable for various configurations and needs. | Some advanced network features and customizations might be limited compared to specialized VM management platforms. |
| Ecosystem and Community | Strong community support and regular updates, with an open-source foundation. | Smaller ecosystem compared to major virtualization platforms like VMware or Hyper-V, potentially leading to fewer integrations and third-party tools. |
| Resource Efficiency | Good resource utilization, particularly with ZFS deduplication and compression features. | Higher resource demand due to ZFS, which might require more RAM and CPU resources compared to other file systems. |
| Compatibility and Flexibility | Supports a variety of operating systems, offering flexibility in VM deployment. | Some specific OS features or hardware emulation might not be supported, limiting compatibility with certain use cases. |
| Cost and Licensing | Free and open-source, making it a cost-effective solution for VM hosting. | Operational or licensing restrictions in some environments, especially in commercial settings that may require additional features or support. |
| Backup and Disaster Recovery | Efficient backup and disaster recovery options with ZFS snapshots and replication. | Lack of integration with broader enterprise backup solutions; reliance on ZFS-specific tools may not fit into all IT workflows. |
Operating system type
The VM operating system type includes Microsoft Windows, Linux, and other Linux derivatives. You can add virtual devices that will be presented to the operating system installed. Like other hypervisors, you need to be aware of the amount of system RAM you have available to run multiple VMs and the CPU cores and processors available to service VM threads for the best experience.
Keep in mind that running virtual machines on TrueNAS is definitely supported, and it gets the job done. It is not a robust virtualization platform compared to VMware, Proxmox, etc. Many if they want advanced features running virtual machines with TrueNAS will simply use it as a storage target for VMware ESXi or another hypervisor to benefit from the more advanced virtualization features.
Deploying VMs in TrueNAS: A Step-by-Step Guide
Deploying a virtual machine in TrueNAS involves several key steps. From selecting the VM operating system to configuring the virtual hardware, this section provides a detailed guide on setting up a VM within the TrueNAS environment, including tips on choosing the right operating system and leveraging existing disk images for quick deployment.
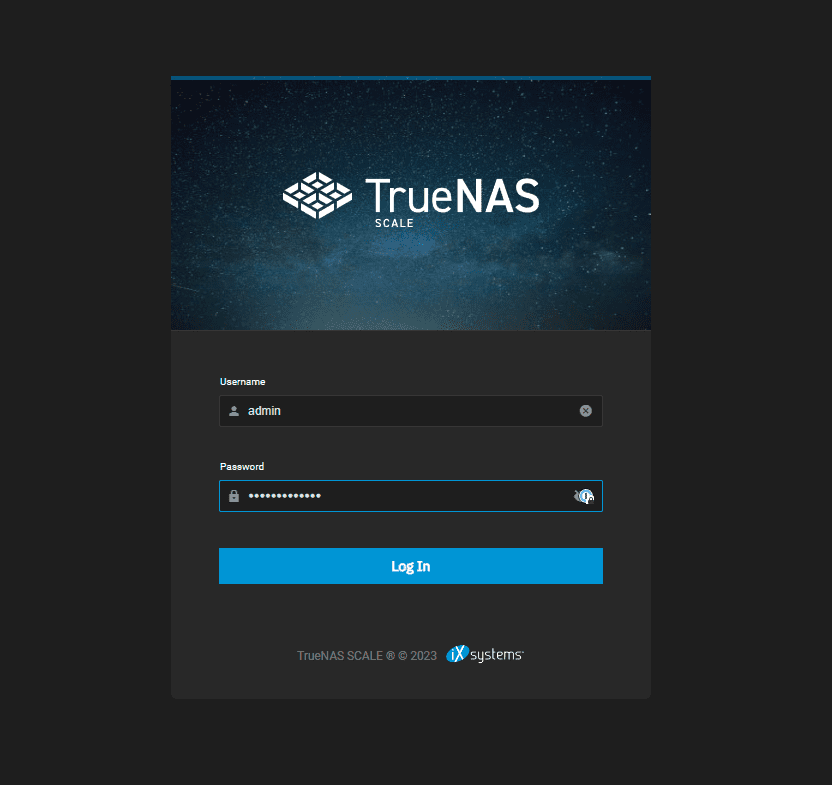
Below, we are logging into the TrueNAS SCALE interface.
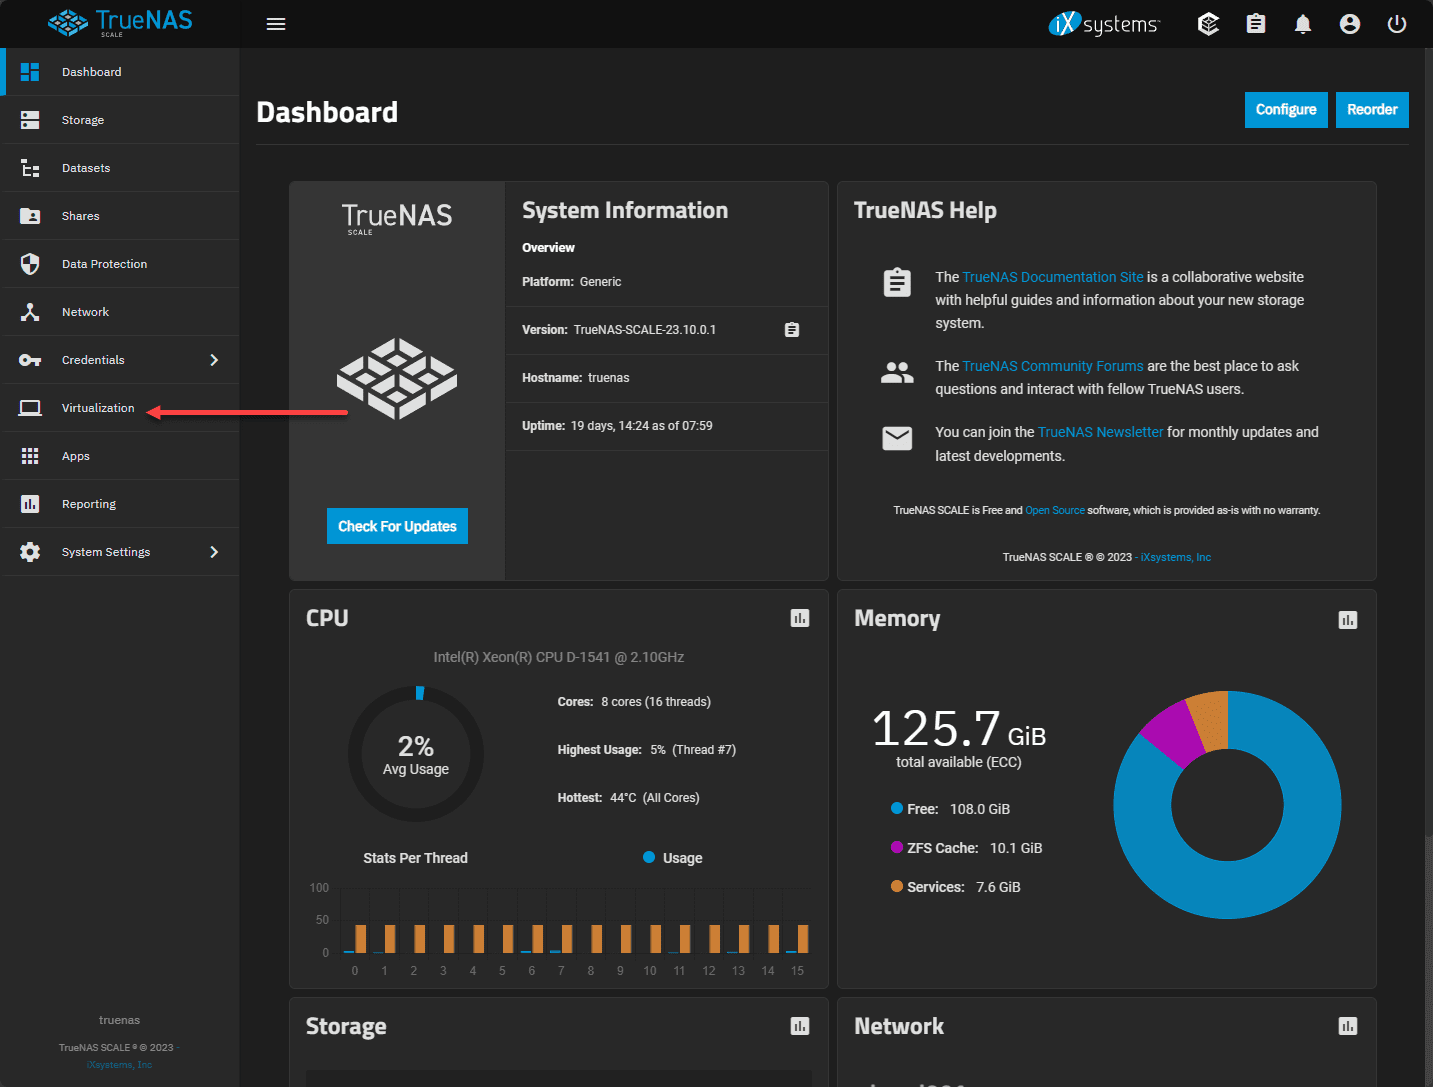
Choose the Virtualization menu.
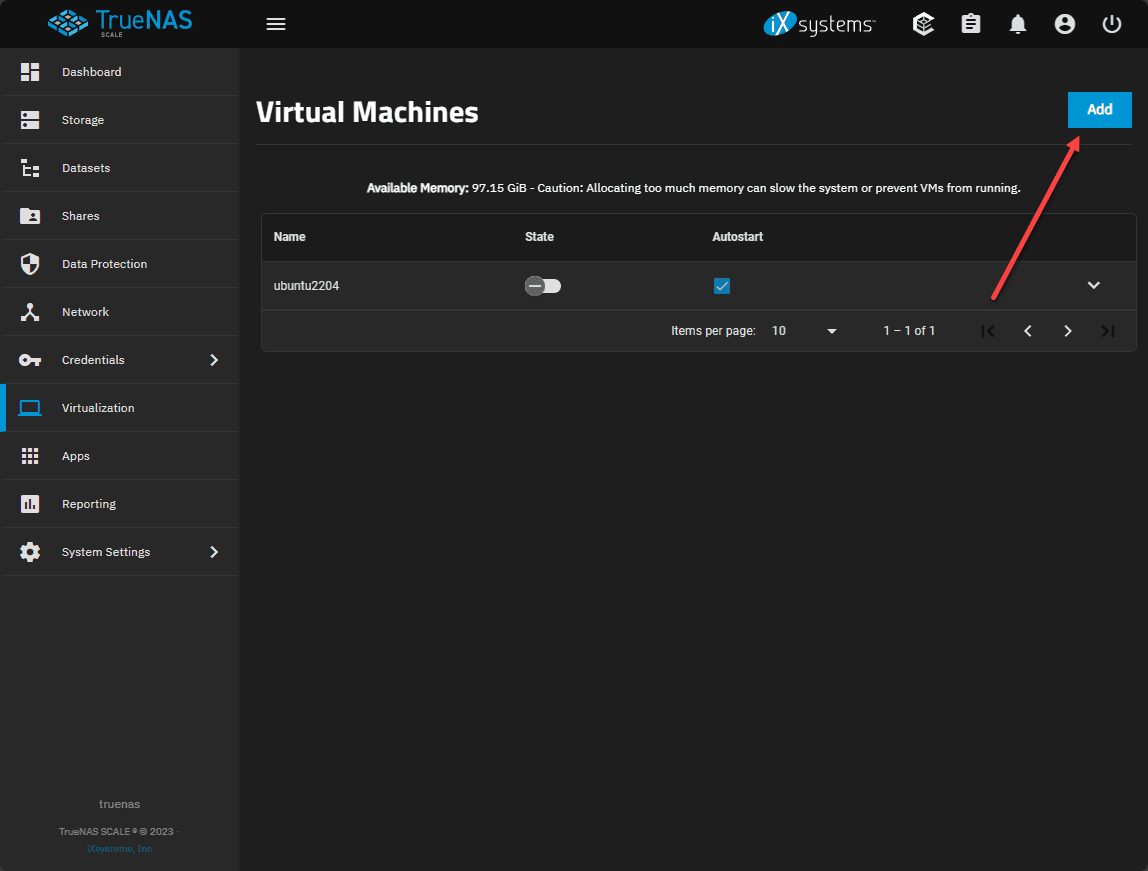
Click Add to add a new virtual machine.
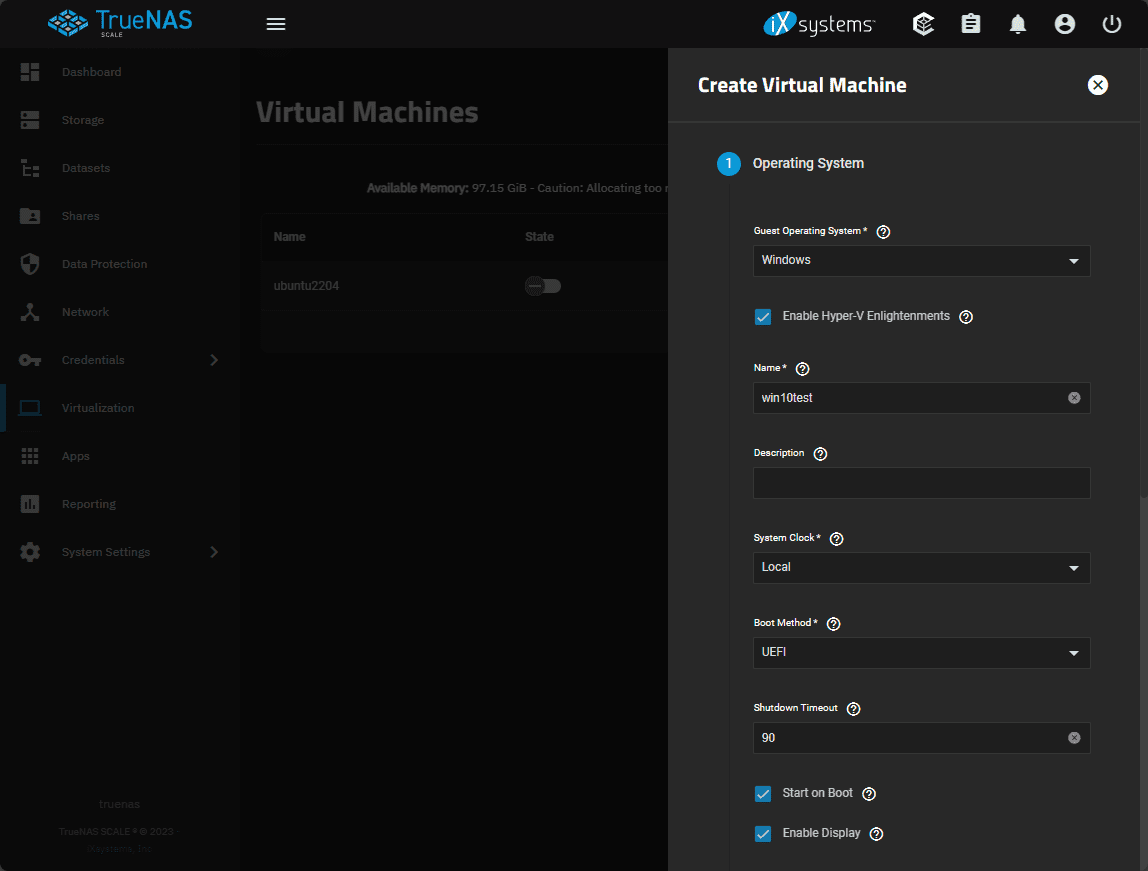
This launches the Create Virtual Machine wizard that has you complete the configuration for how you want the virtual machine configured. The choice of an operating system for a VM is important. Selecting an appropriate VM operating system, considering factors like compatibility, OS version, performance requirements, and the specific needs of your applications among other information are key.
On the first section of configuration under the Operating system configuration, you will configure:
- Guest operating system
- Name
- Description
- System Clock
- Boot Method
- Shutdown Timeout
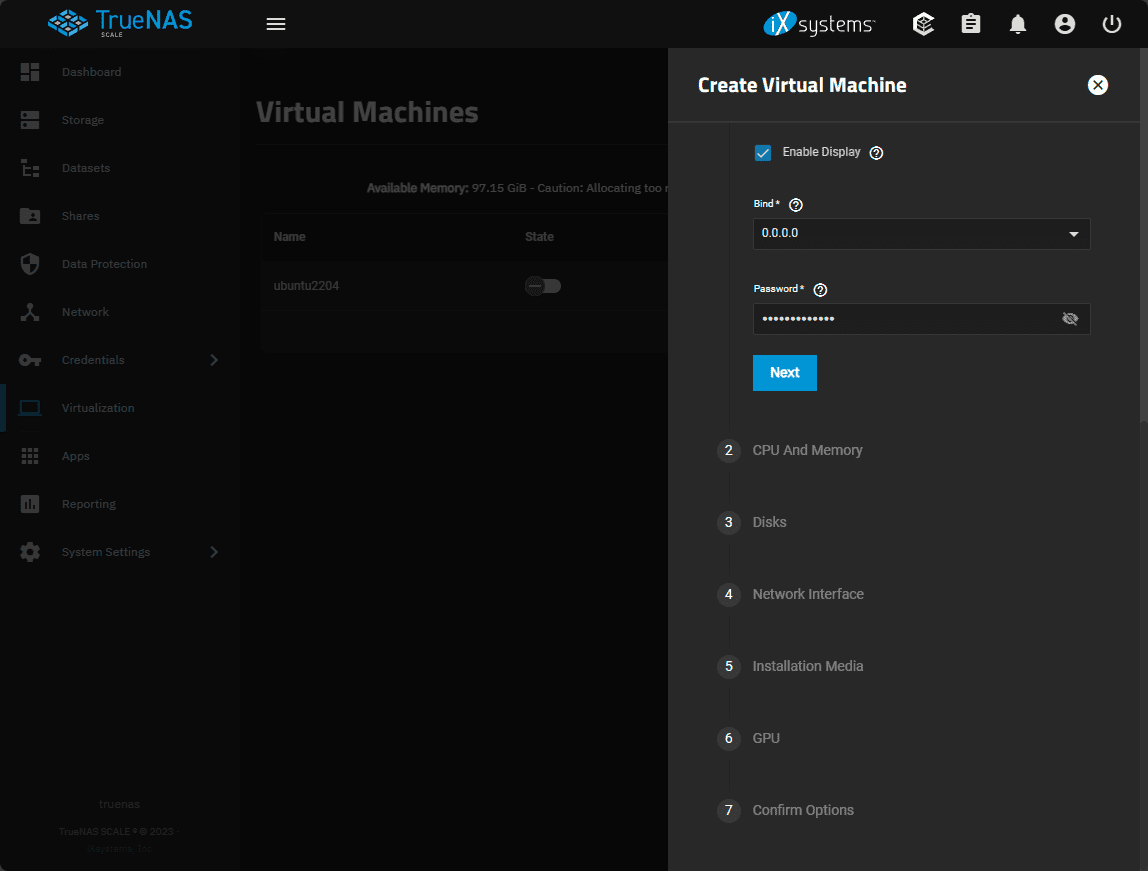
Next, enable display binding, password for the Spice console, etc.
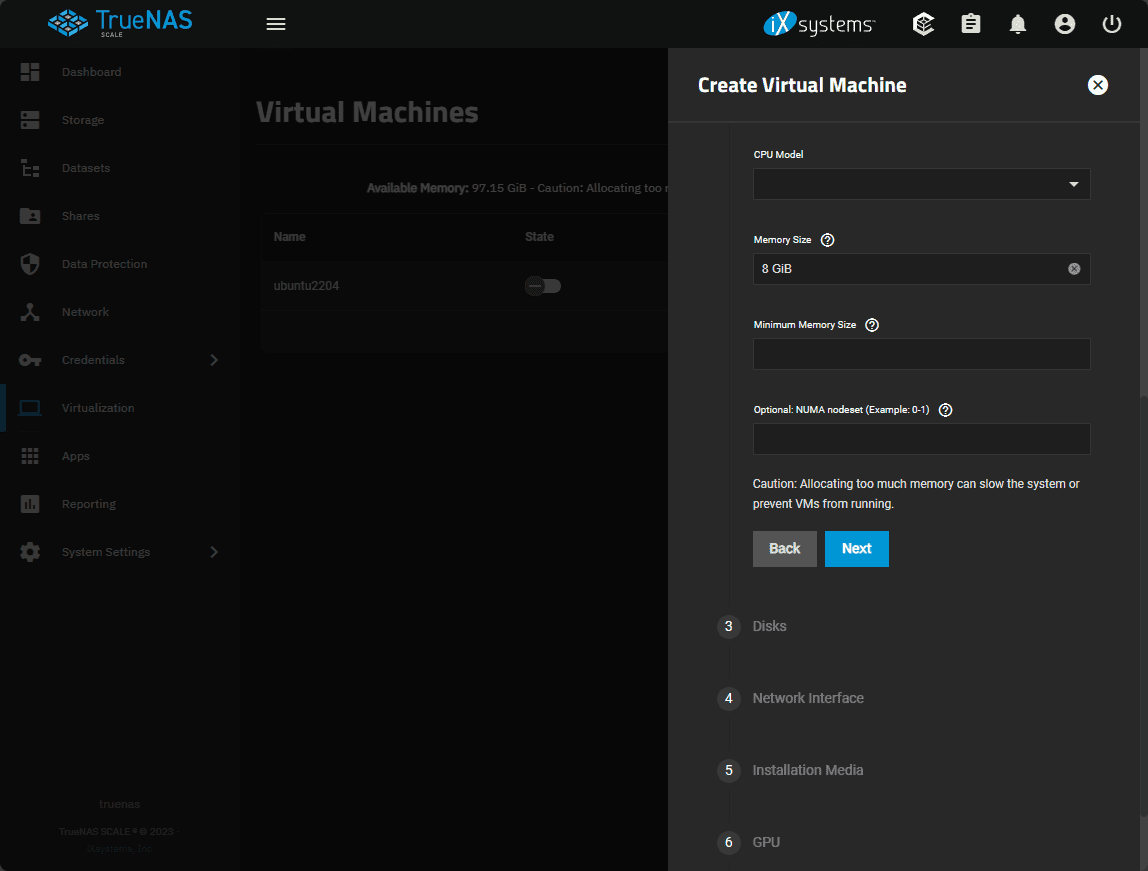
Next, we allocate system resources like virtual CPUs and RAM. Configure the CPU model, memory size, minimum memory size, and optional NUMA settings.
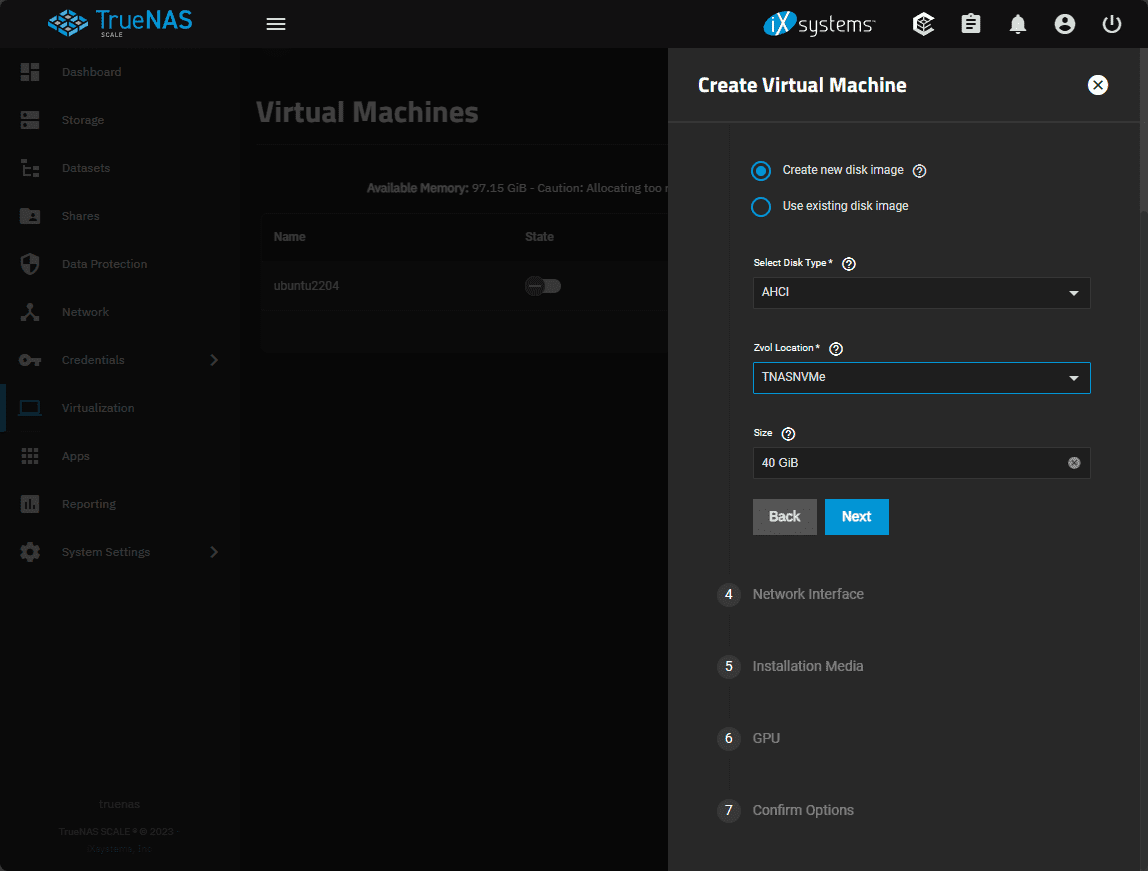
Next, choose to create new disk image, or use existing disk image for the virtual hard drive configuration. Also, you will define on which ZVol location you want to store the virtual machine.
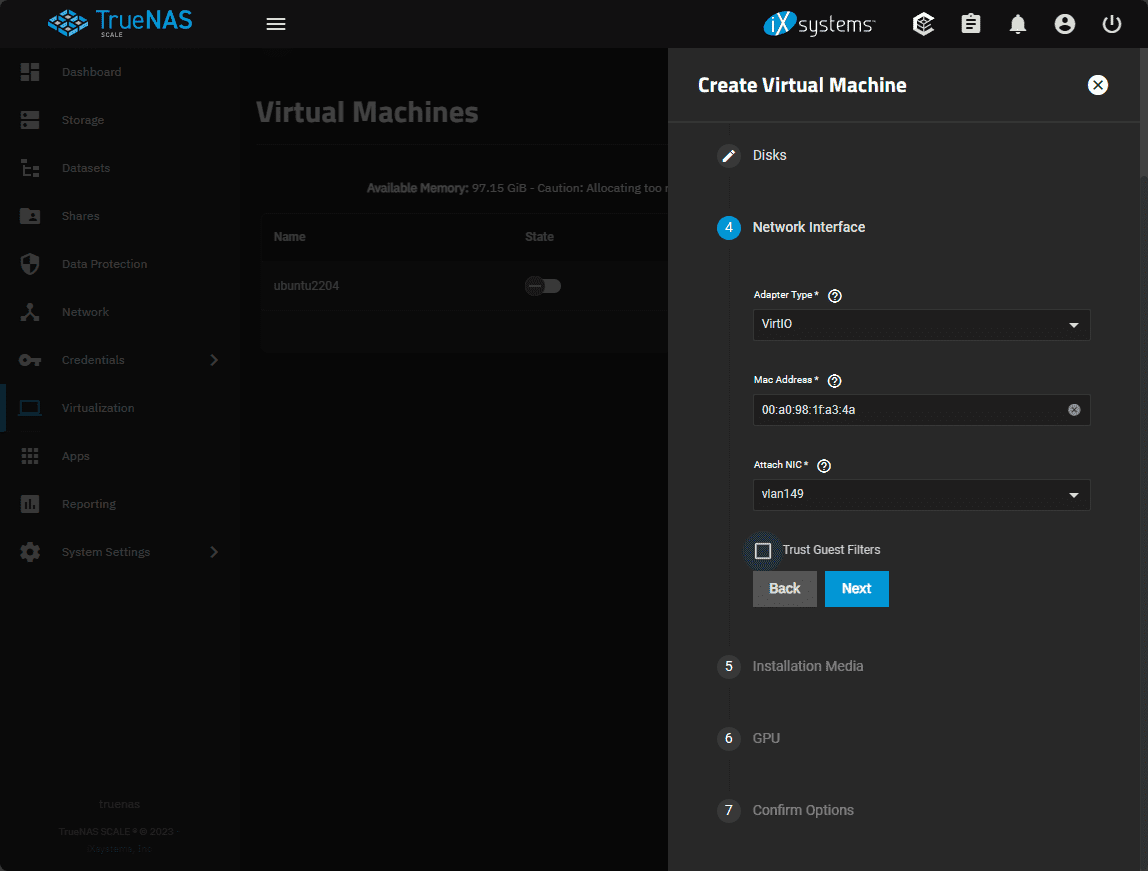
On the Network Interface configuration, set the Adapter type, mac address, and attach the NIC to a specific network interface. Here we configure the network interfaces, including the primary interface IP address and network interface settings.
The network interface connection in TrueNAS can be defined in the network configuration, and the network configuration for logical networks is attached to the physical interface of the TrueNAS server. Below, we are configuring the adapter type to VirtIO and connected to a specific VLAN interface.
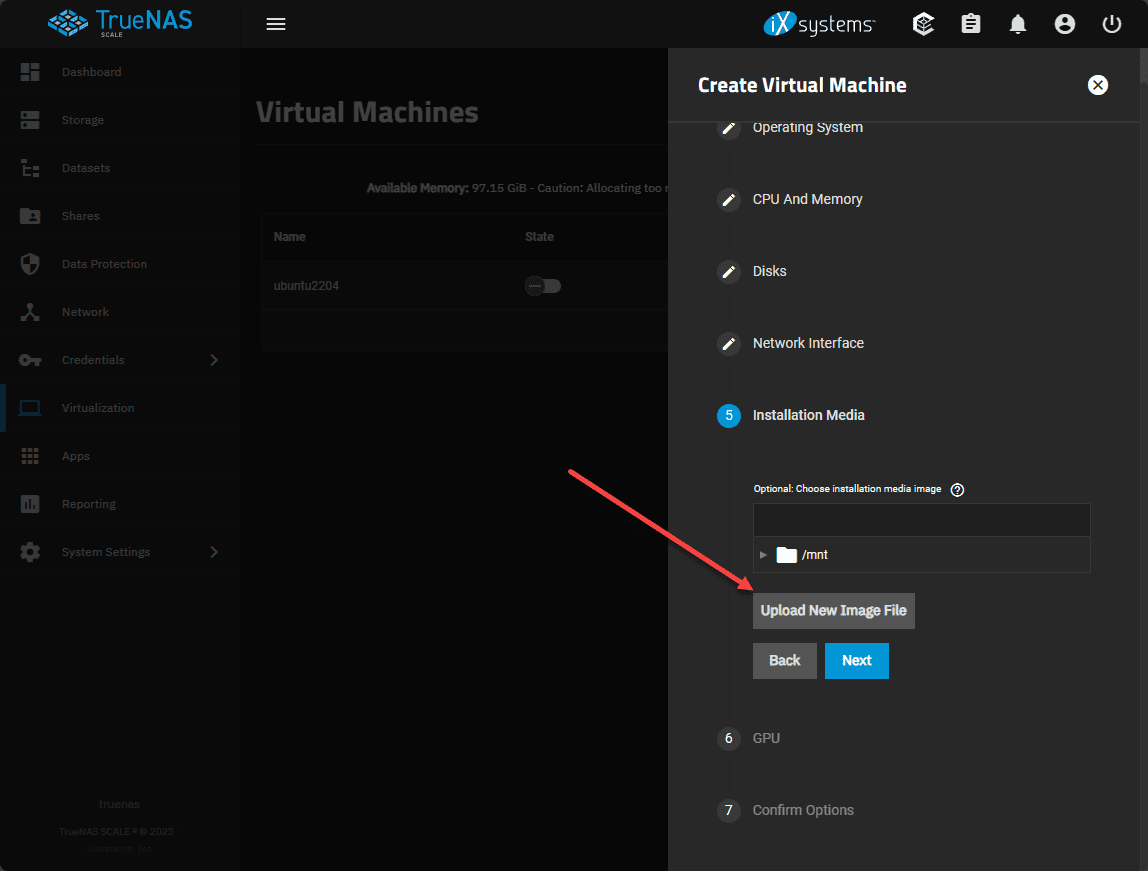
Next, under the Installation media, you can select an existing ISO image file, or you can Upload New Image File which will open a dialog box to upload a new ISO.
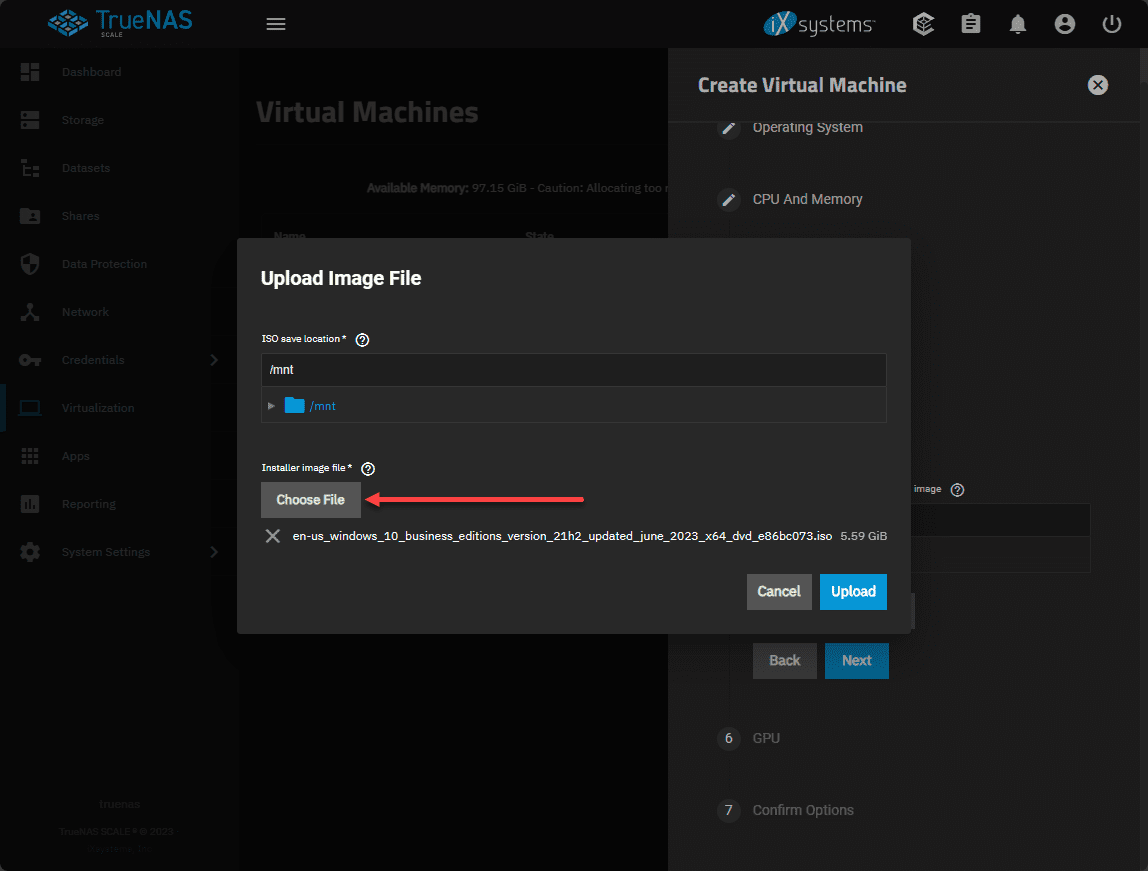
Choose your ISO image file and upload the file using the dialog box.
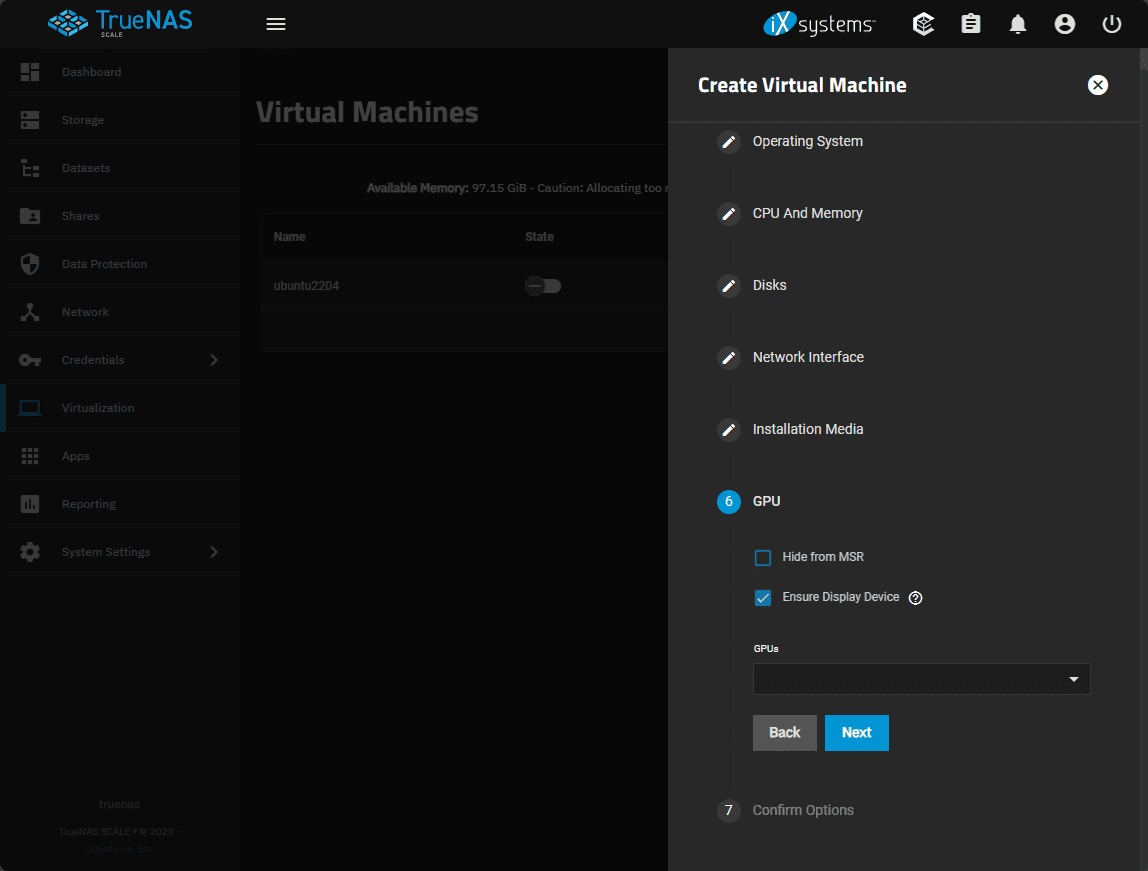
The GPU configuration is next. If you don’t have a discreet GPU, you can just Next.
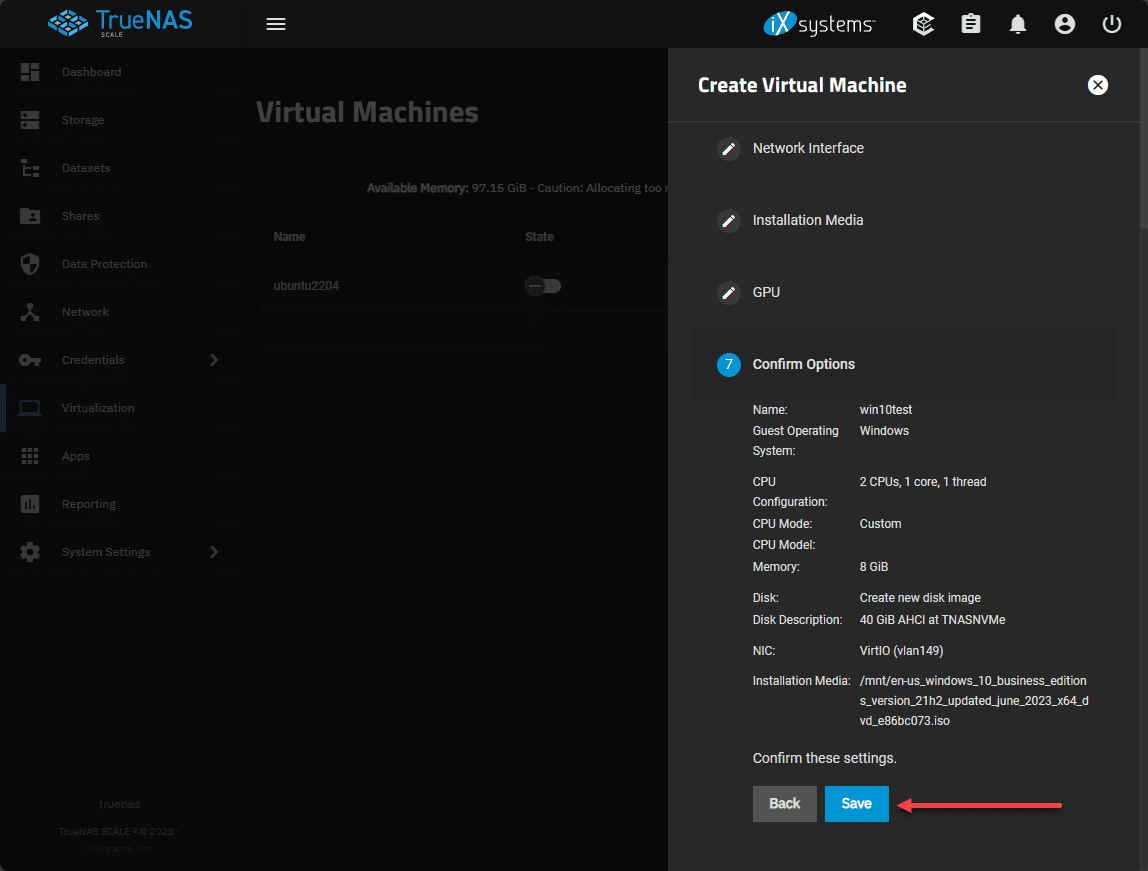
Finally, we come to the Confirm Options step. Here we confirm the configuration settings and save the new virtual machine.
TrueNAS SCALE vs TrueNAS Core – Virtualization
There are two releases of TrueNAS to be aware of: TrueNAS SCALE and TrueNAS Core. Note the following high-level comparison between TrueNAS SCALE and TrueNAS Core as it relates to virtualization:
| Feature/Factor | TrueNAS SCALE | TrueNAS Core |
|---|---|---|
| Operating System Base | Linux-based, leveraging the Debian operating system. | FreeBSD-based, known for its robustness and stability. |
| Virtualization Support | Native support for both VMs and Linux containers (Docker, Kubernetes). | Primarily supports VMs with bhyve hypervisor. Limited container support via plugins or jails. |
| File System | ZFS is used for storage, offering robust data protection and scalability. | Also uses ZFS, providing similar benefits in terms of data integrity and efficiency. |
| User Interface | Modern, user-friendly interface with advanced management features. | Classic, reliable interface known for its stability and ease of use. |
| Scalability | Designed for scale-out architecture, suitable for larger, distributed environments. | Better suited for traditional scale-up scenarios, ideal for centralized storage needs. |
| Performance | Optimized for high performance in large-scale and clustered environments. | Excellent performance, particularly in single-node configurations. |
| Network Protocols | Broad support for various network protocols, catering to diverse environments. | Strong support for key network protocols, but may lack some advanced features of SCALE. |
| Community and Updates | Active development with a focus on incorporating the latest Linux-based features. | Strong, well-established community with a focus on stability and long-term support. |
| Use Case Suitability | Ideal for users requiring flexible scalability, containerization, and modern features. | Best for users seeking a stable, straightforward VM environment with robust ZFS support. |
| Hardware Compatibility | Broad hardware support due to Linux base, including newer hardware. | Good hardware support, but may lag in compatibility with the very latest hardware compared to SCALE. |
Optimizing VM Performance on TrueNAS
Maximizing the performance of your virtual machines on TrueNAS is important to have the best experience possible. What VM settings do you need for performance, including adjustments to memory size, virtual CPUs, and the use of virtual disk images?
- Memory – you want to have enough memory for the operating system and any applications you are running. A lack of memory will negatively impact performance since the operating system will start paging to disk, which is much slower, if the system runs out of memory.
- CPUs – You don’t want to overprovision CPUs as this can negatively impact performance. On the other hand, you want to right-size your CPU configuration to ensure the OS and the applications have the threads needed for the workloads.
- Virtual disk images – Make sure you have placed your virtual machines on a ZFS pool with enough IOPs to handle your virtual machine workloads and the other tasks that TrueNAS may be performing.
Managing Memory and Storage for Peak Performance
Efficient management of memory and storage is key to VM performance. This section delves into strategies for optimizing memory size and disk image usage in TrueNAS VMs, including tips on balancing performance with available resources on the host computer.
Advanced Features and Customizations in TrueNAS VMs
TrueNAS offers a range of advanced features for VMs, catering to more complex and specific needs. This section explores these features, including support for multiple operating systems, virtualization of specialized hardware, and customizations like boot delay settings and specific VM operating system types.
Wrapping up TrueNAS Virtual Machine configurations
If you are looking for a basic virtualization platform that can do a lot of other things related to storage and host most other self-hosted app installations you can think of, TrueNAS SCALE is a great platform for running your home lab environment. Just keep in mind that it isn’t as powerful as other virtualization platforms like VMware vSphere, Proxmox, and others that offer way more feature sets for VMs.
Google is updating how articles are shown. Don’t miss our leading home lab and tech content, written by humans, by setting Virtualization Howto as a preferred source.


Hi Brandon, setting up a NIC in a virtual machine doesn’t seem to offer a MTU setting in the WebUI. Doesn’t the VirtIO driver support jumbo frames? If so, is there a under the hood method that can be used to set a custom/jumbo MTU size for the virtual NIC in a TrueNAS virtualized host? Thanks for any help!