A really great open-source log management platform for both production and home lab environments is Graylog. Using Docker Compose, you can quickly launch and configure Graylog for a production or home lab Syslog. Using Docker Compose, you can create and configure all the containers needed, such as OpenSearch and MongoDB. Let’s look at this process.
Table of contents
What is Graylog?
Graylog is a well-known open-source log management platform designed to collect, store, and analyze large volumes of log data in real-time. It helps to simplify searching, analyzing, and visualizing log data. It also makes it easier for administrators and security professionals to gain insights from their log data.
Graylog uses Opensearch as its search engine and MongoDB to store configuration and meta-information. With its processing pipeline, Graylog parses and transforms logs before they’re indexed. The platform also has a user-friendly web interface, enabling users to manage log data, set alerts, and create dashboards.
Advantages of using Graylog
Graylog is very scalable and flexible. It can be used in all types of environments, from small setups with a single server to large enterprise architectures. Also, it has a plugin architecture that allows it to be extended, and new capabilities added.
Log management tools like Graylog are in high demand, especially with the focus on security today. Log captures play a crucial role in security and compliance requirements.
Graylog Rest API
The Graylog REST API plays a central role in the platform’s operations. In fact, the Graylog web interface uses this REST API for all its interactions with the Graylog cluster.
To explore the Graylog REST API using a web browser, simply add api/api-browser to your existing http_publish_uri setting. Another approach is to use the API browser button located on the nodes overview page under System / Nodes in the web interface.
For clarity, if your Graylog REST API listens on https://192.168.17.23:9000/api/, the API browser can be accessed at https://192.168.17.23:9000/api/api-browser/.
Prerequisites and planning your deployment
Before the Graylog setup begins, Docker and Docker Compose must be already installed on your Ubuntu system. If you’re missing these components, ensure you have Docker installed as it’s the foundation for our Graylog Docker setup.
You can spin up a very simple installation for testing and demo purposes and you can also spin up a production configuration. Note those below:
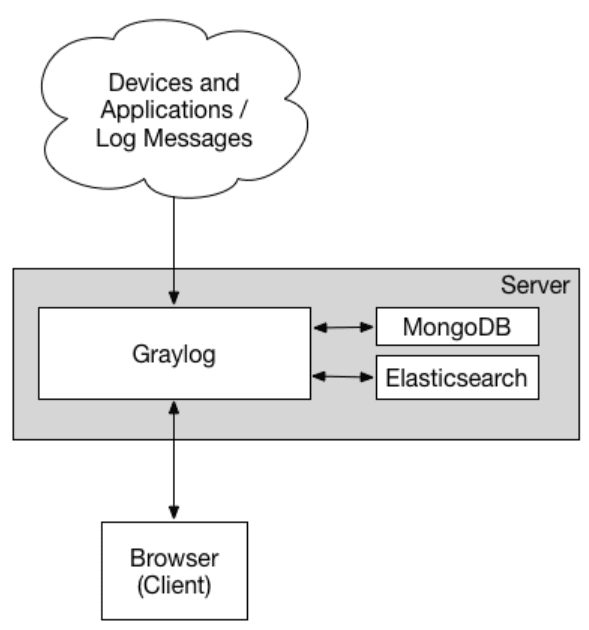
The following is the simple configuration with just the minimum requirements.
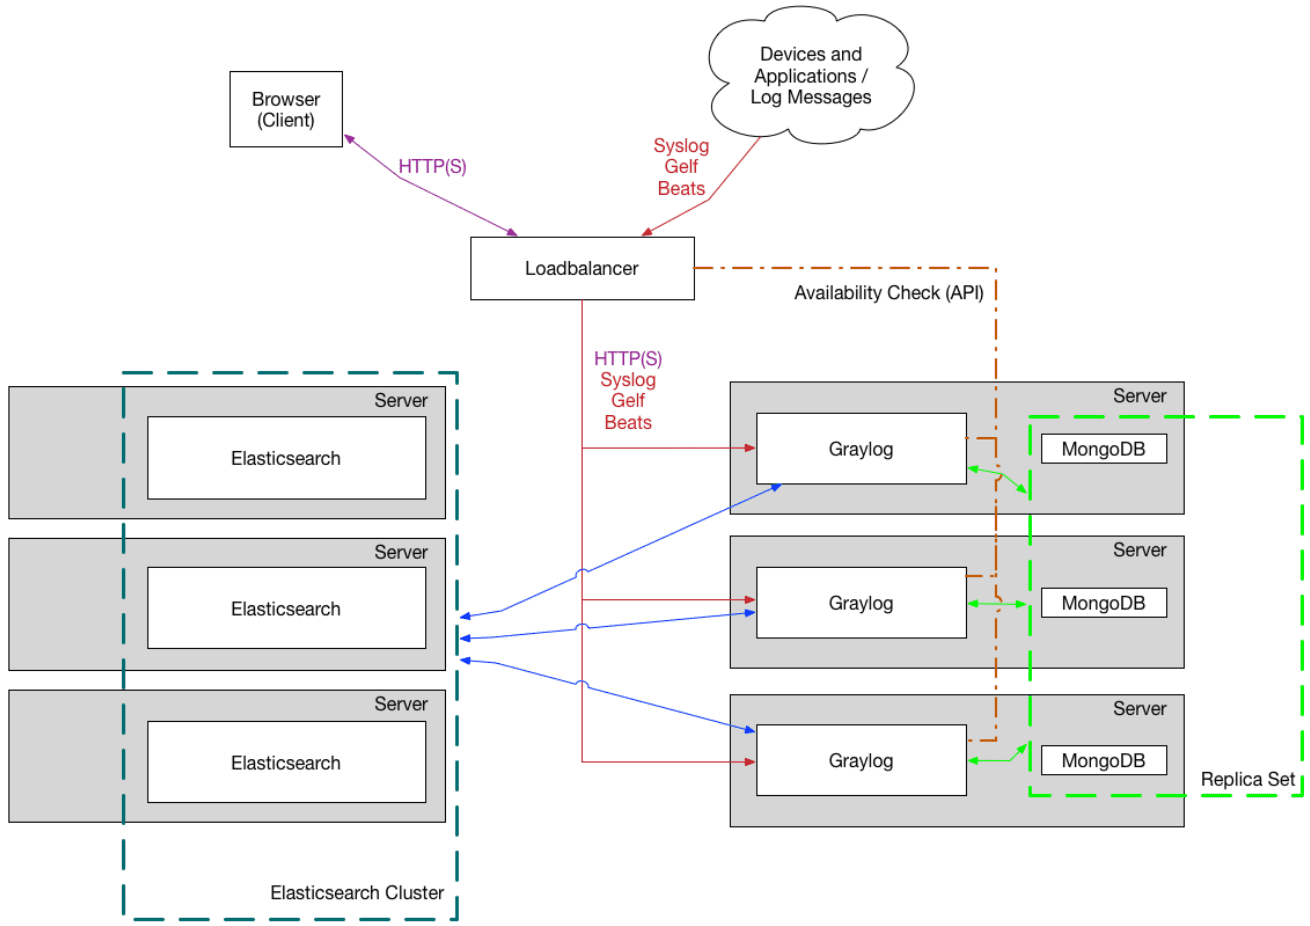
Below is the more complex production deployment.
Graylog Docker containers in the configuration
The docker-compose.yml YAML file will be your main configuration file. The Docker Compose file allows easily bring up the required containers for your Graylog installation.
Note the following containers in the Graylog configuration:
MongoDB
Opensearch (latest), Elasticsearch (legacy)
Graylog frontend
MongoDB: The Data Backbone
The MongoDB Docker image, fetched from mongodb https://hub.docker.com/mongo, will act as the primary database for Graylog. Within the docker-compose.yml, environment variables and parameter names specific to MongoDB will need to be set. This ensures the smooth operation and persistence of your Graylog data.
Opensearch: The new search provider
Opensearch is the default search provider when you deploy Graylog now and Graylog recommends migrating your installing over.
Elasticsearch (now deprecated)
Graylog previously used Elasticsearch. However, now the project has transitioned to Opensearch as the default search provider in the solution. Graylog recommends migrating to Opensearch.
Graylog Docker Compose configuration
You can manually pull the Graylog Docker image from graylog https://hub.docker.com/r/graylog. However, you can also rely on the Docker-compose file.
Your docker-compose file should include sections detailing environment variables, configuration options, and settings specific to the Graylog Docker container, such as the entrypoint usr bin tini and usr bin tini wait directives.
There are two files that you need for the Docker Compose installation method for the simple architecture:
.env file with variables for passwords
docker-compose.yaml file
ENV file contents
Below are the example contents of the most basic .env file. Notice the two variables you need to populate:
GRAYLOG_PASSWORD_SECRET
GRAYLOG_ROOT_PASSWORD_SHA2
# You MUST set a secret to secure/pepper the stored user passwords here. Use at least 64 characters.
# Generate one by using for example: pwgen -N 1 -s 96
# ATTENTION: This value must be the same on all Graylog nodes in the cluster.
# Changing this value after installation will render all user sessions and encrypted values in the database invalid. (e.g. encrypted access tokens)
GRAYLOG_PASSWORD_SECRET=""

# You MUST specify a hash password for the root user (which you only need to initially set up the
# system and in case you lose connectivity to your authentication backend)
# This password cannot be changed using the API or via the web interface. If you need to change it,
# modify it in this file.
# Create one by using for example: echo -n yourpassword | shasum -a 256
# and put the resulting hash value into the following line
# CHANGE THIS!
GRAYLOG_ROOT_PASSWORD_SHA2=""
I am also experimenting with the following additional parameters for performance and housekeeping. You can check out the full list of server parameters here: server.conf (graylog.org).
processbuffer_processors = 8
outputbuffer_processors = 3
processor_wait_strategy = blocking
ring_size = 65536
inputbuffer_ring_size = 65536
inputbuffer_processors = 2
inputbuffer_wait_strategy = blocking
message_journal_max_age = 12h
elasticsearch_max_time_per_index = 3d
retention_strategy = delete
GRAYLOG_PASSWORD_SECRET
As the comments section mentions, you need to generate at least a 64-character secret to secure/pepper stored user passwords.
You can generate that with the command:
pwgen -N 1 -s 96If your password/pepper string is not long enough, you will see your Graylog container go into a restart loop with the following in the logs:
GRAYLOG_ROOT_PASSWORD_SHA2
To generate the GRAYLOG_ROOT_PASSWORD_SHA2 variable, you will need to run the following command. Note whatever you place in <your password> will be the initial admin password when you install Graylog and log into the web UI.
echo -n <your password> | shasum -a 256Docker-compose.yaml file
Now, the Docker Compose file, which is the example file that Graylog has documented, including the services like Opensearch or Elasticsearch ports for Graylog itself, and other needed configuration:
services:
  mongodb:
    image: "mongo:5.0"
    volumes:
      - "mongodb_data:/data/db"
    restart: "on-failure"

  opensearch:
    image: "opensearchproject/opensearch:2.4.0"
    environment:
      - "OPENSEARCH_JAVA_OPTS=-Xms1g -Xmx1g"
      - "bootstrap.memory_lock=true"
      - "discovery.type=single-node"
      - "action.auto_create_index=false"
      - "plugins.security.ssl.http.enabled=false"
      - "plugins.security.disabled=true"
    ulimits:
      memlock:
        hard: -1
        soft: -1
      nofile:
        soft: 65536
        hard: 65536
    volumes:
      - "os_data:/usr/share/opensearch/data"
    restart: "on-failure"

  graylog:
    hostname: "server"
    image: "${GRAYLOG_IMAGE:-graylog/graylog:5.1.5}"
    depends_on:
      opensearch:
        condition: "service_started"
      mongodb:
        condition: "service_started"
    entrypoint: "/usr/bin/tini -- wait-for-it opensearch:9200 --  /docker-entrypoint.sh"
    environment:
      GRAYLOG_NODE_ID_FILE: "/usr/share/graylog/data/config/node-id"
      GRAYLOG_PASSWORD_SECRET: "${GRAYLOG_PASSWORD_SECRET:?Please configure GRAYLOG_PASSWORD_SECRET in the .env file}"
      GRAYLOG_ROOT_PASSWORD_SHA2: "${GRAYLOG_ROOT_PASSWORD_SHA2:?Please configure GRAYLOG_ROOT_PASSWORD_SHA2 in the .env file}"
      GRAYLOG_HTTP_BIND_ADDRESS: "0.0.0.0:9000"
      GRAYLOG_HTTP_EXTERNAL_URI: "http://localhost:9000/"
      GRAYLOG_ELASTICSEARCH_HOSTS: "http://opensearch:9200"
      GRAYLOG_MONGODB_URI: "mongodb://mongodb:27017/graylog"
    ports:
    - "5044:5044/tcp"   # Beats
    - "5140:5140/udp"   # Syslog
    - "5140:5140/tcp"   # Syslog
    - "5555:5555/tcp"   # RAW TCP
    - "5555:5555/udp"   # RAW TCP
    - "9000:9000/tcp"   # Server API
    - "12201:12201/tcp" # GELF TCP
    - "12201:12201/udp" # GELF UDP
    #- "10000:10000/tcp" # Custom TCP port
    #- "10000:10000/udp" # Custom UDP port
    - "13301:13301/tcp" # Forwarder data
    - "13302:13302/tcp" # Forwarder config
    volumes:
      - "graylog_data:/usr/share/graylog/data/data"
      - "graylog_journal:/usr/share/graylog/data/journal"
    restart: "on-failure"

volumes:
  mongodb_data:
  os_data:
  graylog_data:
  graylog_journal:
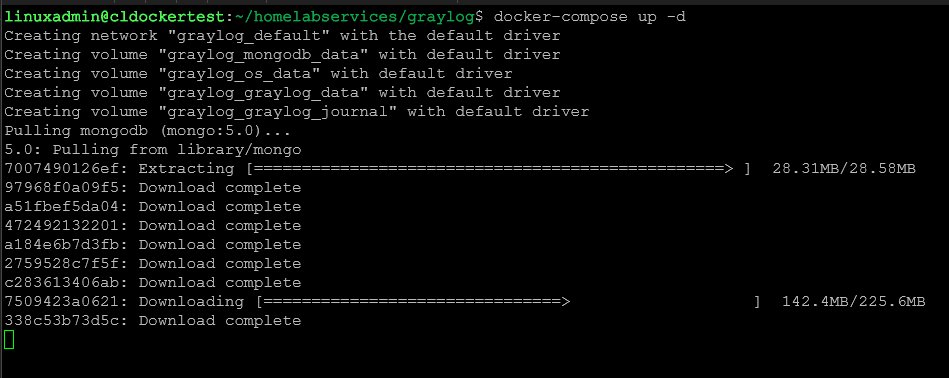
With the docker-compose.yml and .env file in place, we can bring up the Docker containers. The docker-compose up -d command is used to provision the containers.
docker-compose up -dYou can check the status of your containers with the command:
docker-compose psThe Graylog Web UI: First Steps Post-Installation
Access the Graylog web interface after bringing up the Docker containers. Here, you will use the default username: admin and the password you created when forming the hash.
At this point, you can begin setting up inputs for Syslog UDP to capture log data.
Creating a Syslog input listener
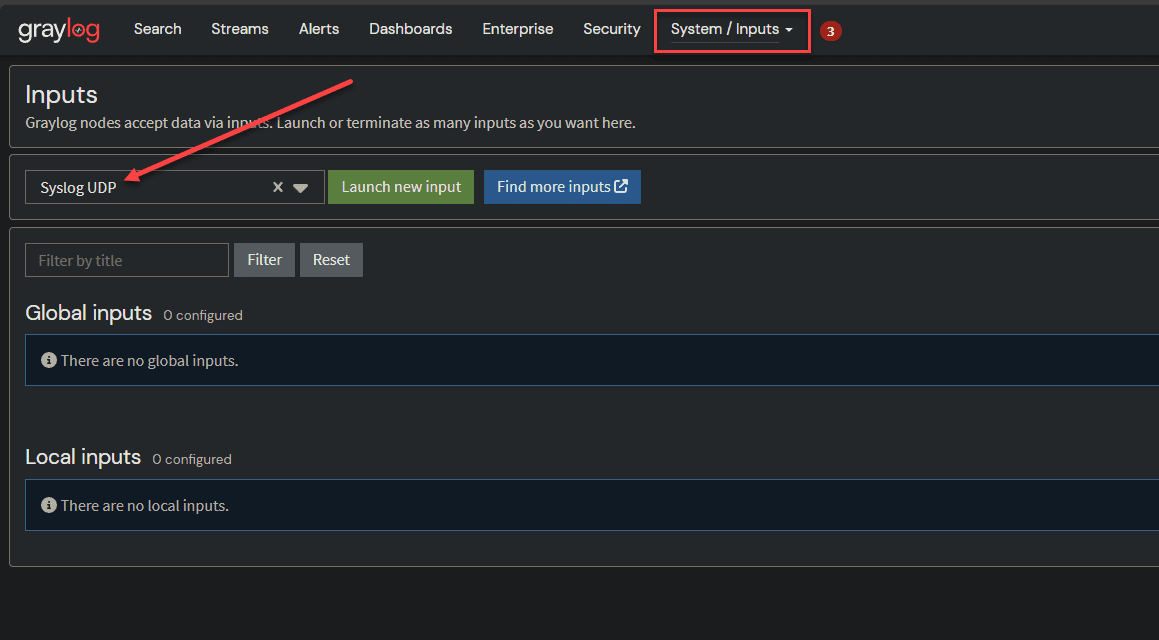
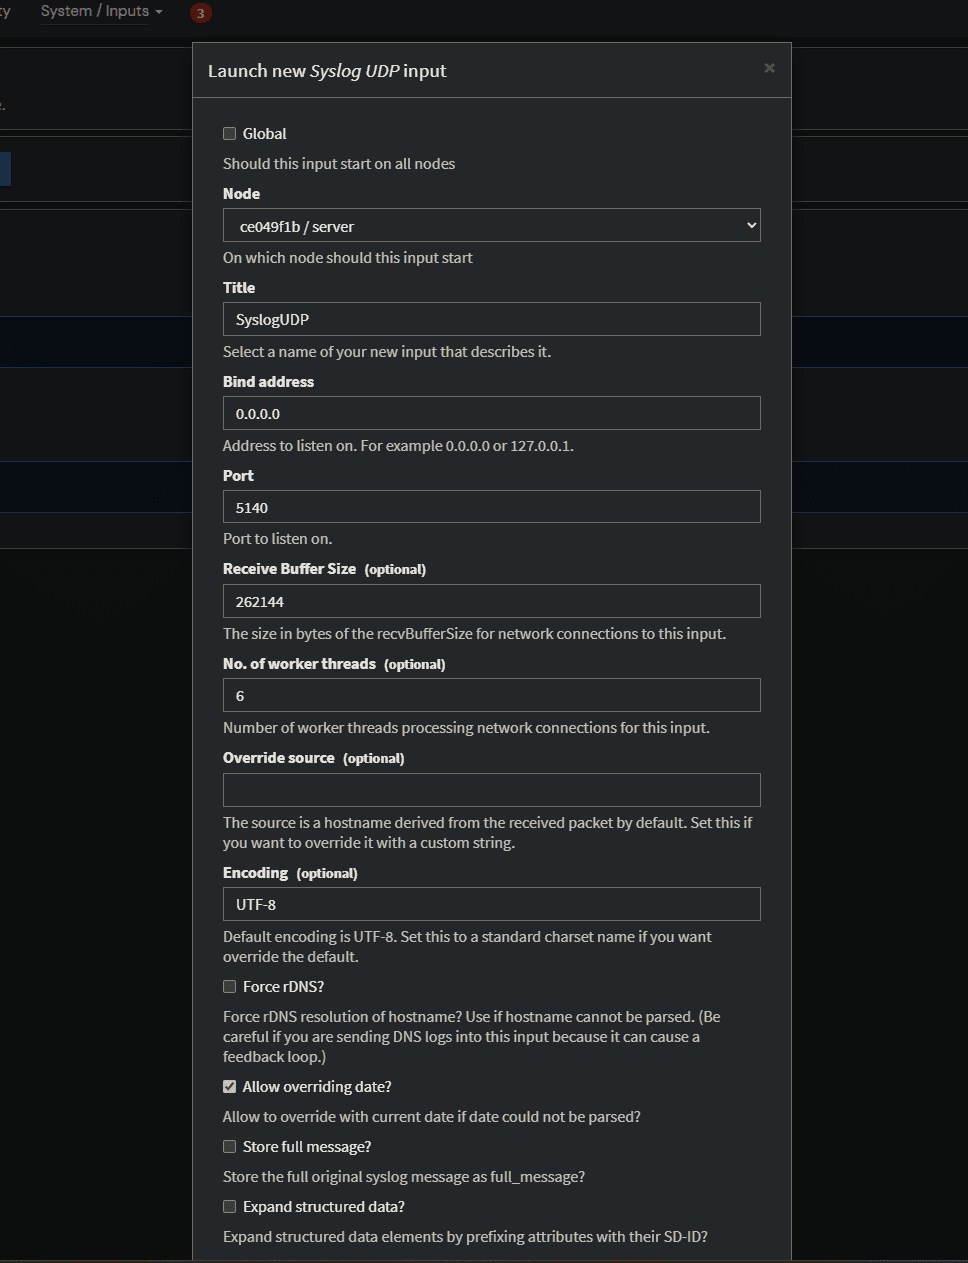
Graylog isn’t configured as a Syslog receiver right out of the box. For that, you have to create a new input. Click on the menu option System > Inputs and then select the Syslog UDP input in the dropdown box. Then click the Launch new input button.
You will see a configuration dialog box that looks like the following. Here you can leave the defaults for the most part. Give it a Name, and also, I did update the Port. You will want to make sure the Port you choose is also exposed in your Docker Compose configuration.
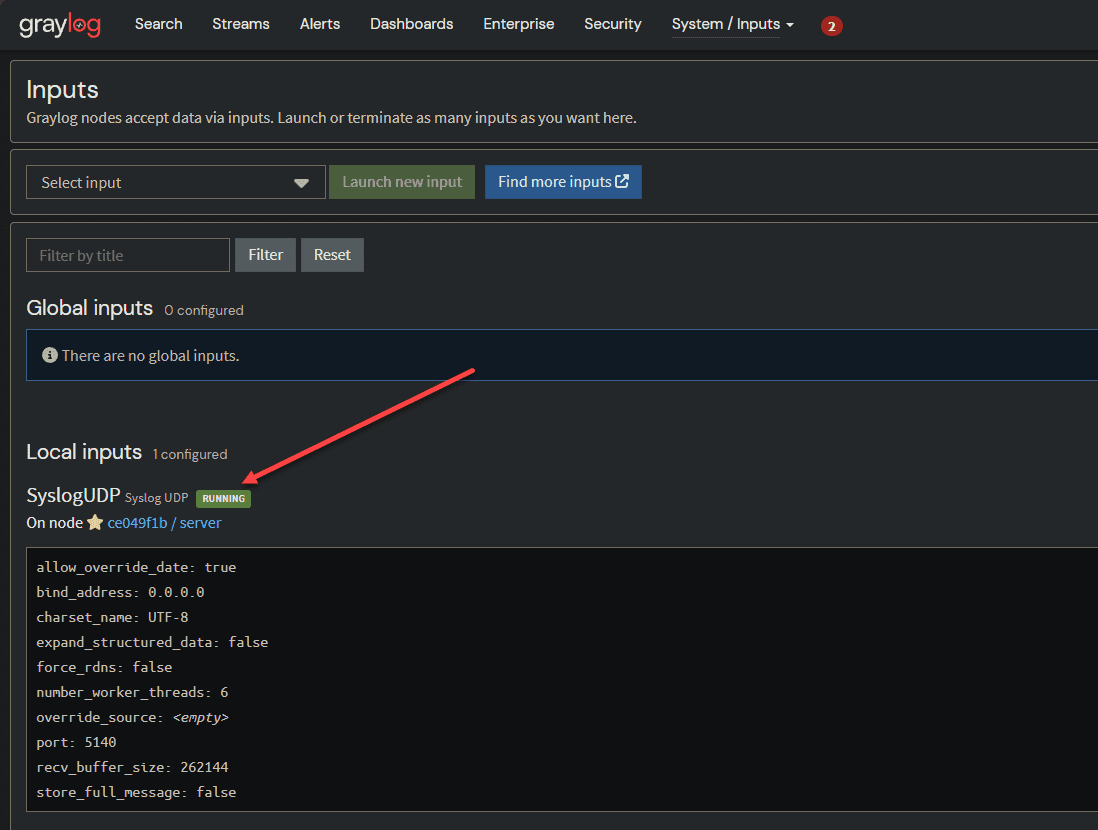
Save your configuration and then on the Inputs page, make sure your new Syslog input is running.
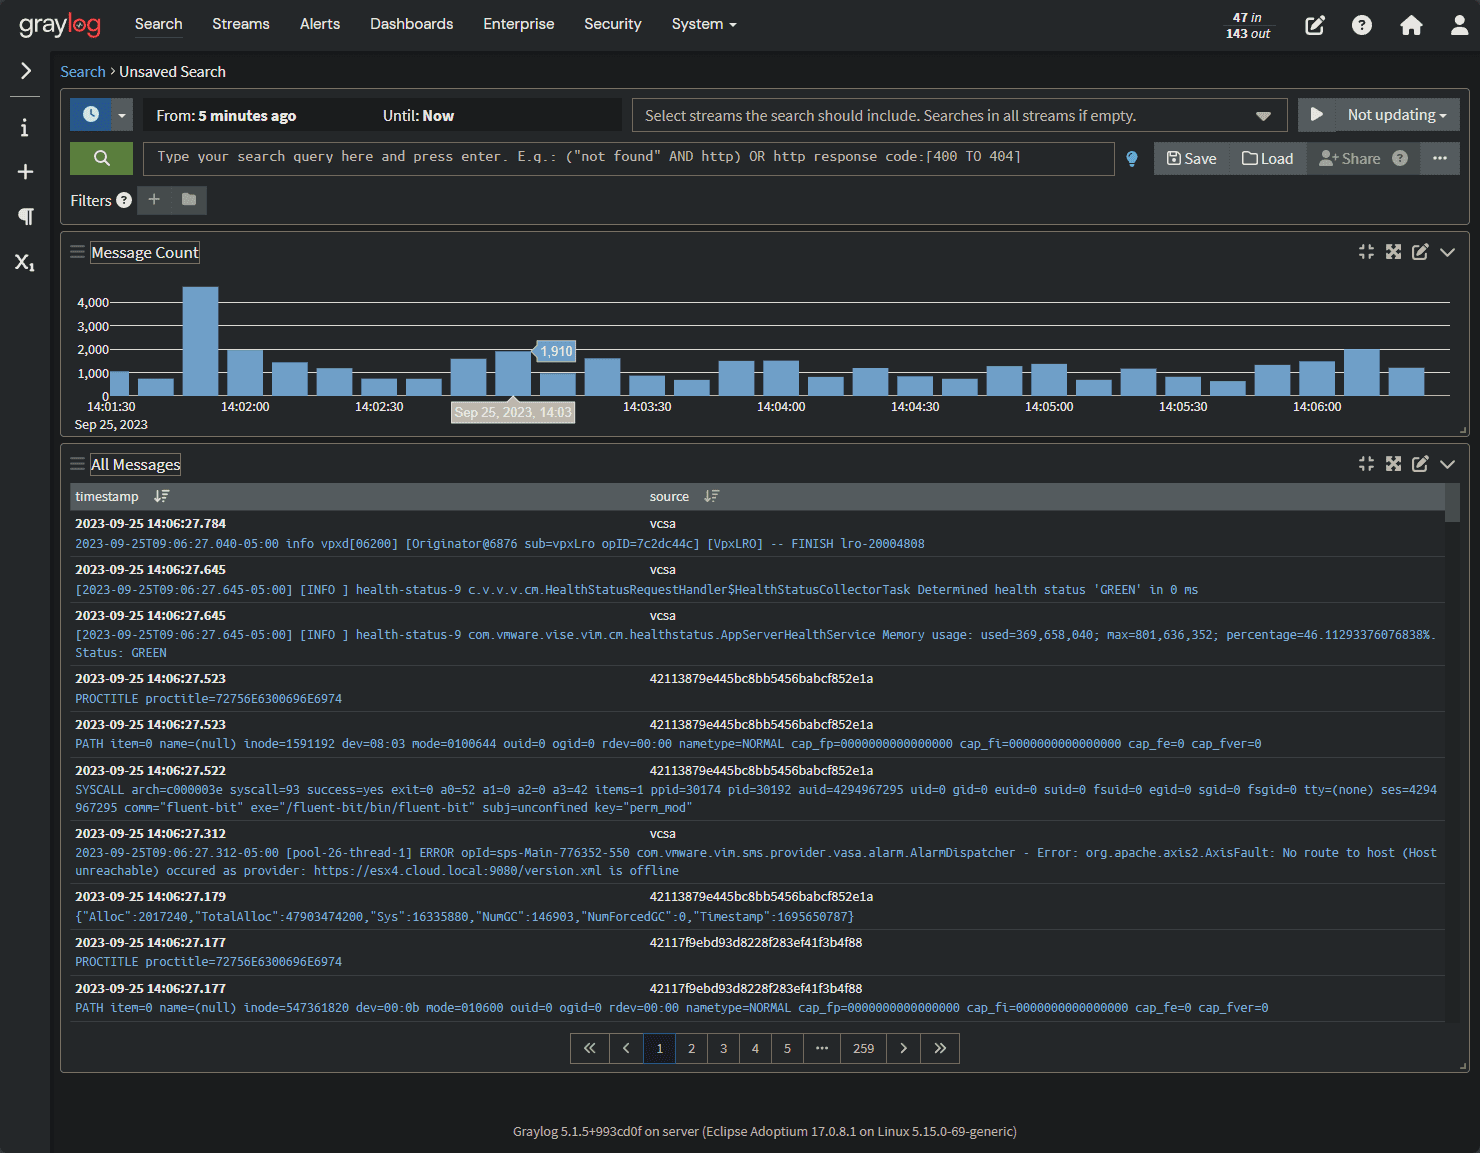
After adding the Syslog input, you can point your devices to your Graylog server. Below, I have pointed my lab vCenter Server to the Graylog Syslog target.
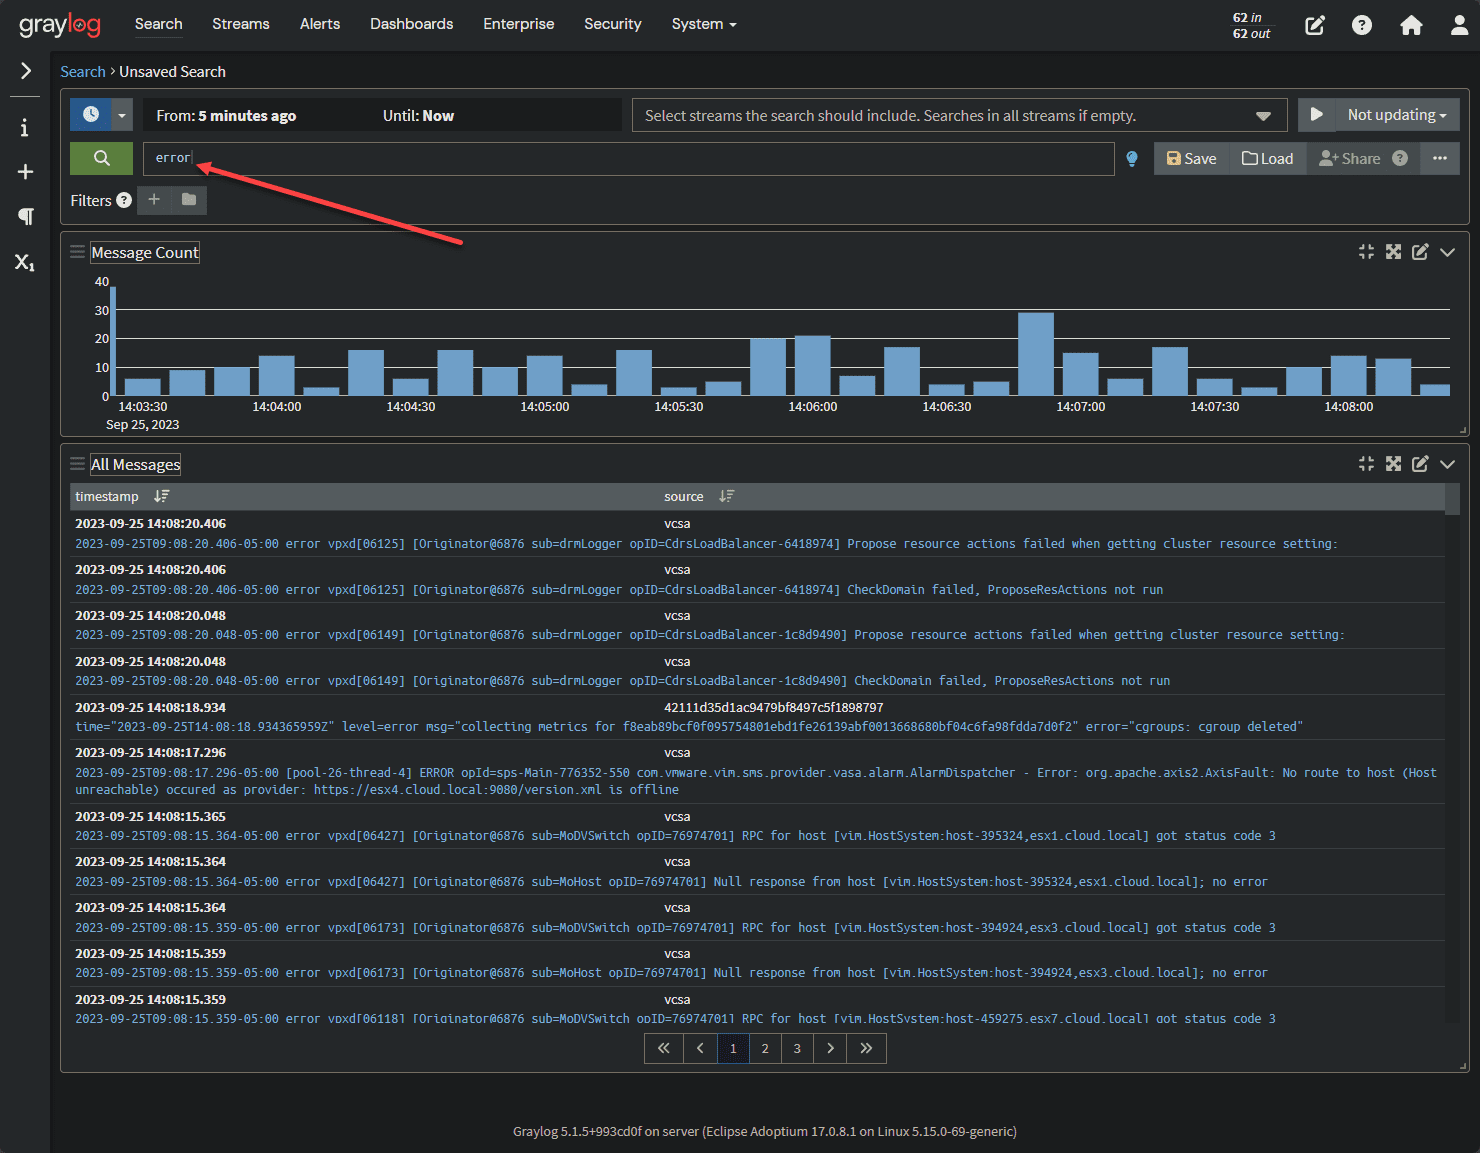
One of the great things about Syslog solutions like Graylog is its search capabilities.
Persisting Data
The Graylog installation is configured with external volumes in Docker. These external volumes allow your data to persist on the Docker host file system, even if you pull new and updated containers for the solution. Make sure you understand the use of persistent volumes and backing up your Docker data.
Graylog Troubleshooting
You may see issues from time to time or when first spinning up your Graylog solution. Solutions often revolve around restarting services using commands such as sudo systemctl restart elasticsearch or executing a graylog restart if using a full installation in Linux.
If you are running as containers, make sure to check out your docker logs <container name> command to see the underlying issue if you have containers restarting.
Wrapping up
Graylog is a fantastic solution for capturing syslog and other logging in your home lab or production environments. Installing Graylog using Docker Compose on Ubuntu is straightforward. Graylog has good documentation on the process and the environment variables needed. However, this post may help fill in the gaps in the official documentation page so you can easily spin up a new Graylog instance to start capturing your Sylogs in your environment.
Google is updating how articles are shown. Don’t miss our leading home lab and tech content, written by humans, by setting Virtualization Howto as a preferred source.








Hi,
Thanks a lot for this page that has been very valuable to me to setup and test Graylog in no time.
I wonder about upgrades. What shall I consider before changing the version of the different component in the docker compose file please ?
Cheers,
G
Gahe,
Thank you for your comment. That is great! Glad the article was helpful. What types of logging projects are you using it for? On upgrades, I would always use the documented versions before upgrading as these may need to be kept in lockstep.
Brandon
Hi Brandon! Thank you for the tutorial! Great stuff!
I’m having an issue running Graylog under a rootless docker. The issue appears to be setting up the ulimits, since ulimits requires root access! Do you have any solution for that?
Thanks again for a great tutorial!
Cheers!
Sergio,
Thank you for the comment! I am not sure if you have found a solution to this as of yet. However, I am afraid I haven’t tested this myself. I am guessing you are running rootless for better security which is great. Let me know what you have found.
Brandon
I still haven’t found anything! And yes, I’m running rootless for better security!
Thanks!