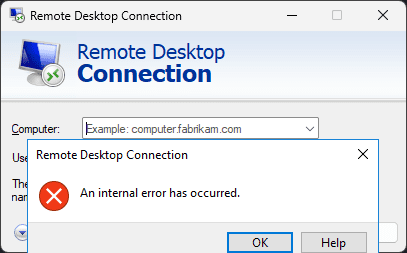
Microsoft Remote Desktop Protocol RDP makes it easy to remotely control and administer servers and clients. However, sometimes there are issues. If you have see the RDP An Internal Error has occurred issue, this post will look at some common fixes for the problem.
Table of contents
- What causes the Internal Error for Windows?
- Things to check on the target computer
- Check the domain
- Delete MachineKeys
- Reconnect the Domain
- RD Gateway settings
- Allow the Windows Firewall to Connect to RDP
- Change the Startup Status of RDP service
- Configure your network address for DHCP instead of Static
- Enable Persistent Bitmap Caching
- Monitor Windows System Logs
- Change Remote Desktop Connection App Settings
- Update Remote Desktop Connection Client
- Check Proxy Server Settings
- Update Windows Server
- Troubleshoot Network Connectivity
- Wrapping up
What causes the Internal Error for Windows?
There may be incorrect Remote Desktop Connection settings, network issues, security settings, Windows Firewall configuration problems that interfere, and problems with the Remote Desktop Service itself.
Things to check on the target computer
To enable remote connections on the target computer, follow these steps:
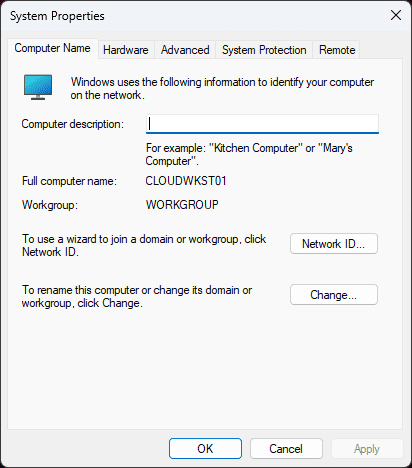
Go to your system properties (right-click on This Computer and select properties)
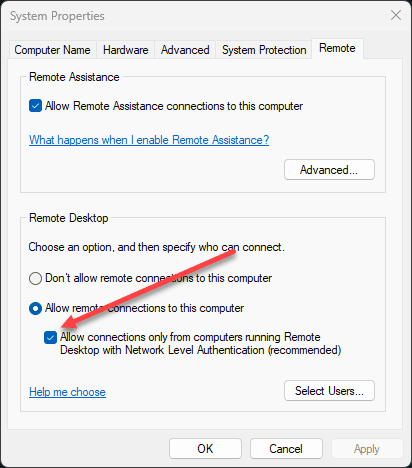
Click on Remote settings in the System Properties window.
Under Remote Desktop, select Allow remote connections to this computer.
Click Apply and then OK
Check the domain
Make sure that the client computer and the remote computer are part of the same domain or workgroup. This can help make sure to avoid issues with authentication. Certain security policies are applied when a computer is a member of the domain that could cause issues if the other computer isn’t a domain member as well.
Restart Remote Desktop Service
You can try to restart the Remote Desktop Service on your RDP server and this can sometimes resolve the RDP error. To do this, follow these steps:
Press Windows Key + R to open the Run dialog.
Type services.msc and press Enter.
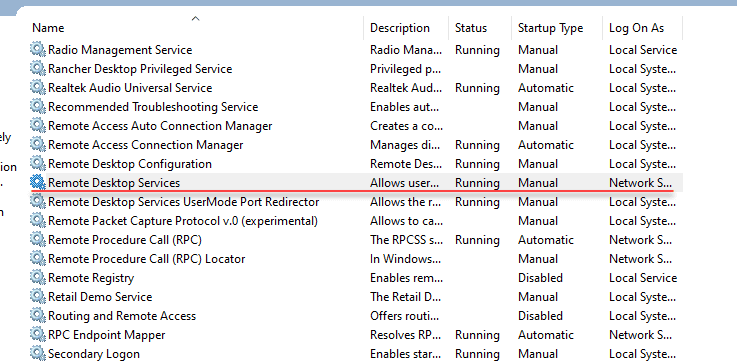
Find Remote Desktop Services in the list of services.
Right-click and select Remote Desktop Services and select “Restart.”
Change RDP Security Settings
To change RDP security settings, follow these steps:
Open the Local Group Policy Editor by pressing Windows Key + R, and typing gpedit.msc, and pressing Enter.
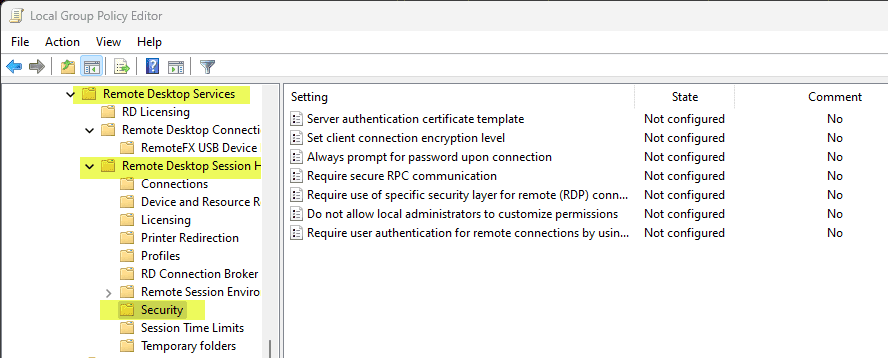
Go to Computer Configuration > Administrative Templates > Windows Components > Remote Desktop Services > Remote Desktop Session Host > Security.
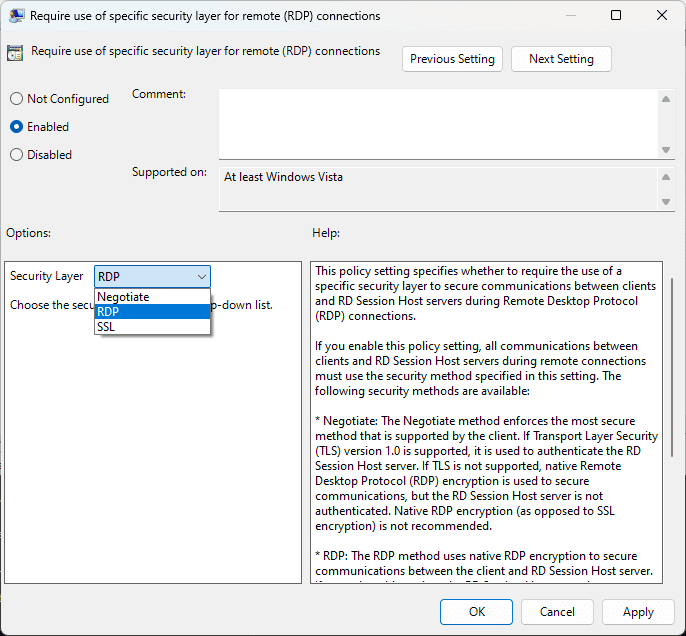
Double-click on Require use of specific security layer for remote (RDP) connections and select Enabled.
In the Options section, select the appropriate security layer from the drop-down menu, such as RDP Security Layer or Negotiate.
Click Apply and then OK.
If you have settings defined here, make sure of what those are and if there are security settings that may cause issues connecting.
Below, you can change the Require use of specific security layer for remote (RDP) connections setting.
Delete MachineKeys
Corrupt or outdated MachineKeys can cause RDP internal errors. To delete MachineKeys, follow these steps:
Press Windows Key + R to open the Run dialog.
Type
%ProgramData%\Microsoft\Crypto\RSA\MachineKeysto find the machine keys folder and press Enter.Back up the MachineKeys folder by copying the folder and pasting it in a backup location
Delete all files in the original MachineKeys folder.
Restart the computer and try the Remote Desktop Connection again.
Reconnect the Domain
If the remote computer is part of a domain, try removing it from the domain and then rejoining it. This can resolve potential authentication issues.
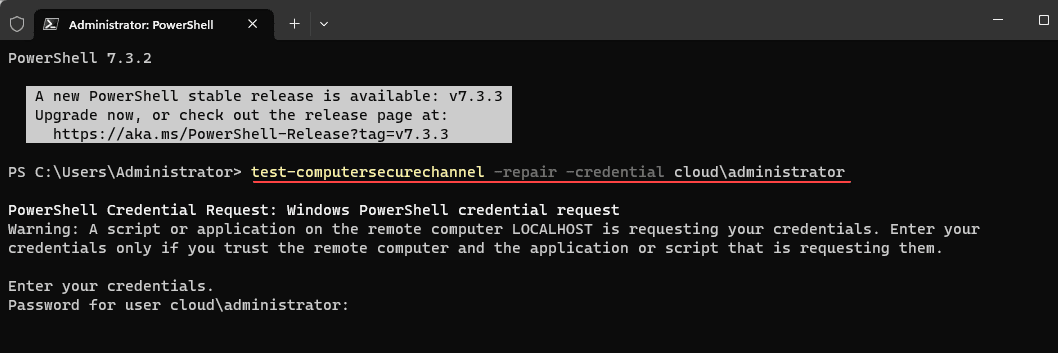
An easy way to do this with PowerShell is using the command shown below:
test-computersecurechannel -repair -credential <your user>RD Gateway settings
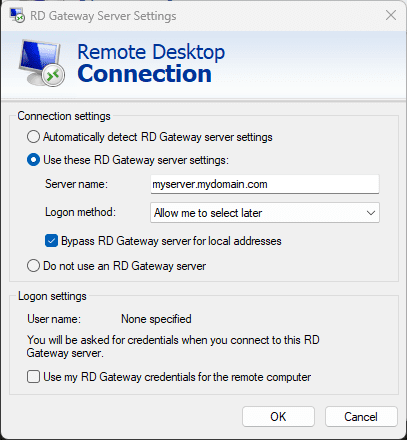
In the Remote Desktop Connection app, go to the Advanced tab and click Settings under Connect from anywhere.
Make sure that the correct RD Gateway server name is entered, and select Use my RD Gateway credentials for the remote computer. You may need to make changes to the settings here.
Allow the Windows Firewall to Connect to RDP
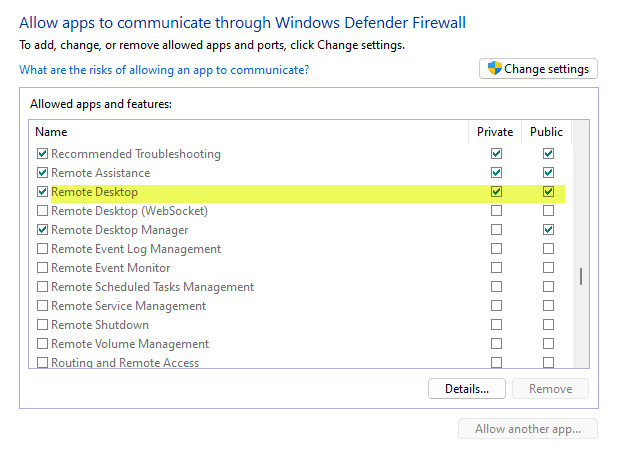
Make sure you have setup the Windows Firewall to not block RDP connections. To do this:
Press Windows Key + R and type firewall.cpl, then press Enter.
Click on Allow an app or feature through Windows Firewall.
Locate Remote Desktop in the list and ensure that it is allowed for both Private and Public networks.
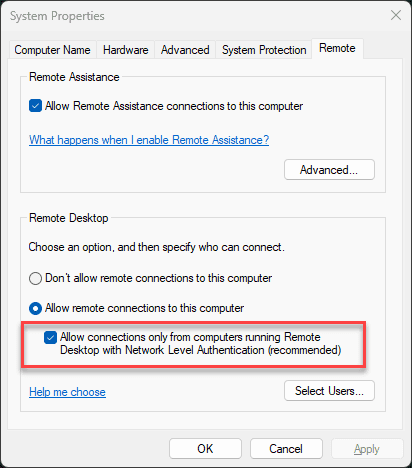
Disable Network Level Authentication
Disabling Network Level Authentication is something that can sometimes resolve RDP internal errors. To do this, uncheck the box Allow connections only from computers running Remote Desktop with Network Level Authentication.
Disable VPN Connections
If you have a VPN connection enabled, try to disable any active VPN connections and connect to the remote computer again. VPN can capture and try to route traffic a certain way that may cause issues if the computer you are trying to remote into is located on your local network.
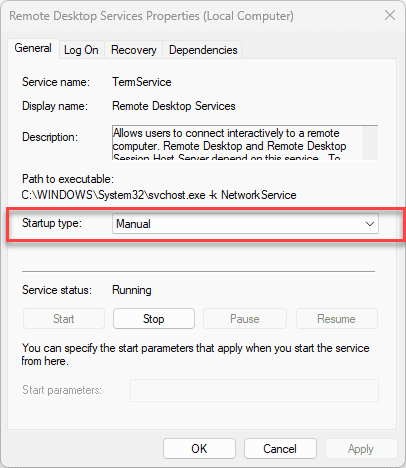
Change the Startup Status of RDP service
Make sure the Remote Desktop Protocol service has the correct startup status. Go to the services console by typing services.msc. Set the startup type to Automatic for this service.
Configure your network address for DHCP instead of Static
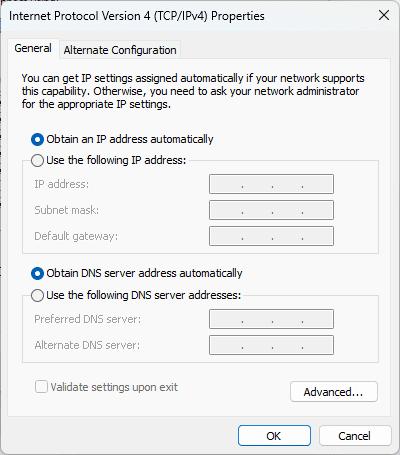
If your computer has a static IP address, try disabling it and switching to DHCP. This can resolve RDP internal errors caused by network issues or IP conflicts.
Press Windows Key + R, type ncpa.cpl, and press Enter to open the Network Connections window.
Right-click on your network adapter and select Properties.
Double-click on Internet Protocol Version 4 (TCP/IPv4).
Select Obtain an IP address automatically and Obtain DNS server address automatically.
Click OK and restart your computer.
Change the MTU Value
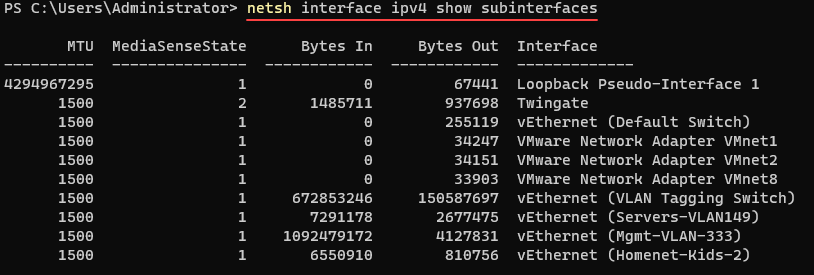
MTU settings that aren’t right can cause something called fragmentation of your TCP packets where the packets get fragmented and have to be retransmitted which isn’t good and can cause issues for connections.
Open an admin Command Prompt by right-clicking on the Start button and selecting Command Prompt (Admin).
Type
netsh interface ipv4 show subinterfaces. You will see the MTU value.Note the name of the network interface you are using for RDP.
Type
netsh interface ipv4 set subinterface "Interface Name" mtu=1458 store=persistentand press EnterRestart your computer and then you can try the RDP connection again
Enable Persistent Bitmap Caching
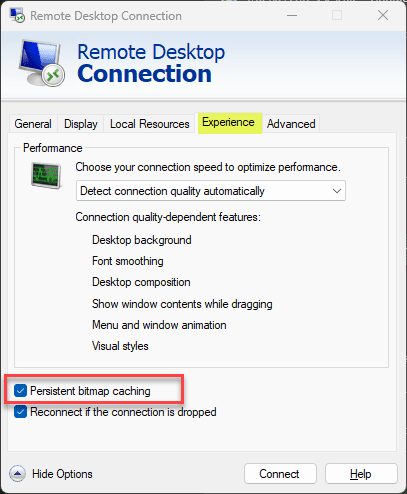
Enabling persistent bitmap caching can improve the performance of your Remote Desktop Connection and possibly resolve RDP internal errors.
Open the Remote Desktop Connection app.
Click on Show Options to access advanced settings.
In the Experience tab, check the box Persistent bitmap caching.
Click Connect to establish the RDP connection.
Monitor Windows System Logs
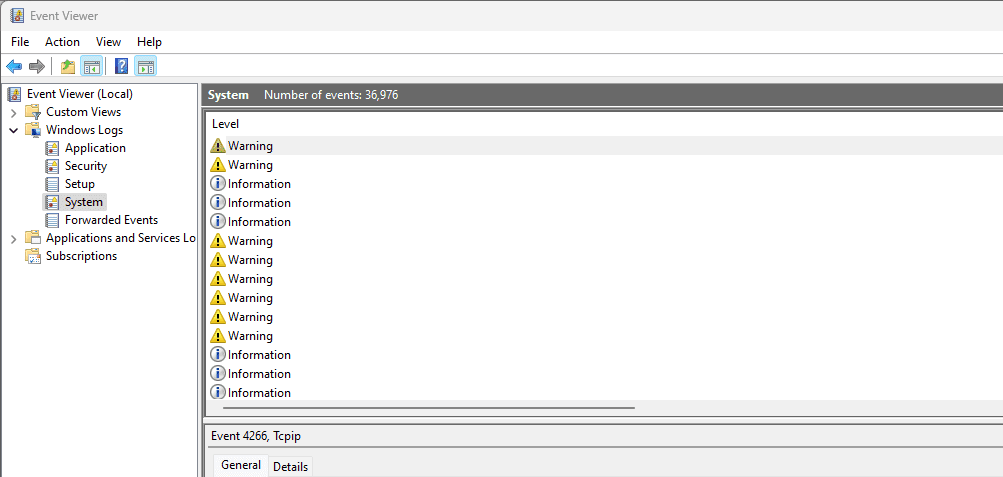
Monitoring Windows System Logs can provide possible information or error messages about the cause of the RDP an internal error has occurred issue. To access the Event Viewer and check the logs, follow these steps:
Press Windows Key + R, type eventvwr.msc, and press Enter to open the Event Viewer.
In the left pane, navigate to Windows Logs > System.
Look for events related to Remote Desktop Services or any errors that occurred around the time the issue was encountered.
You may also want to check the Windows Logs > Application section for any related events or errors.
Change Remote Desktop Connection App Settings
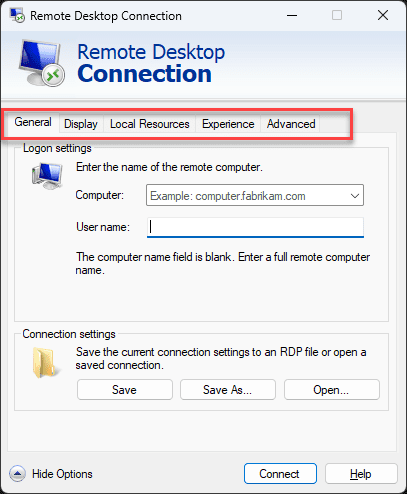
In some cases, adjusting the settings of the Remote Desktop Connection app may resolve the internal error. To do this:
Open the Remote Desktop Connection app.
Click on Show Options to access advanced settings.
In the Display tab, adjust the screen resolution and color depth settings.
In the Local Resources tab, configure the settings for audio, keyboard, and local devices.
In the Experience tab, select the appropriate connection speed from the drop-down menu and enable or disable specific performance options.
You can try and experiment with these settings to find the settings and configuration that may help with the internal error.
Update Remote Desktop Connection Client
An outdated Remote Desktop Connection client may cause internal errors. To update the client, follow these steps:
Press Windows Key + R, type appwiz.cpl, and press Enter to open the Programs and Features window.
Look for Remote Desktop Connection or Microsoft Remote Desktop in the list of installed programs.
Follow the on-screen instructions to update the client if an update is available.
Check Proxy Server Settings
A misconfigured proxy server providing an Internet connection can interfere with RDP connections and this may be something that is causing internal errors.
Press Windows Key + I to open the Windows Settings app.
Click on Network & Internet.
In the left pane, select Proxy.
Make sure you have the right settings configured for your proxy settings
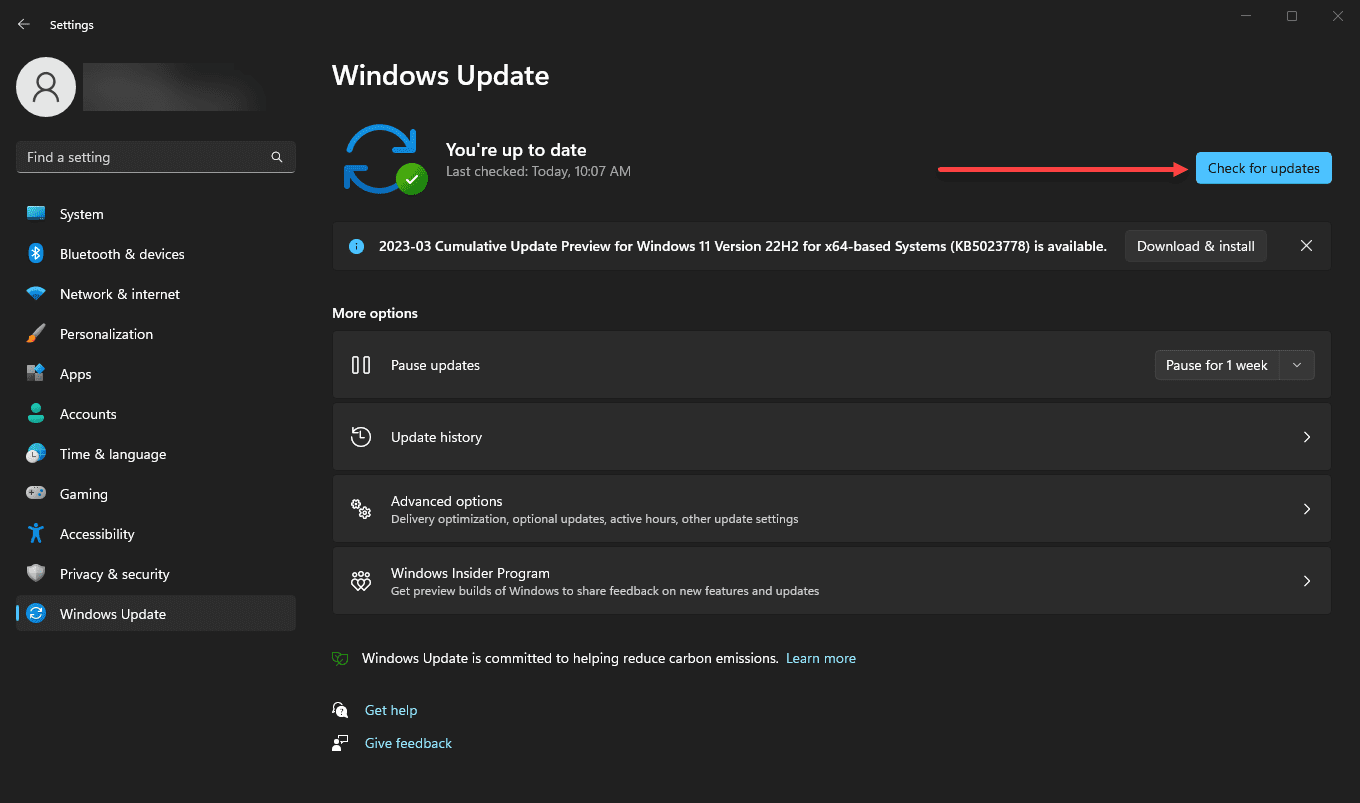
Update Windows Server
There may be pending Windows updates that could resolve the issue or just updates pending in general that need a reboot. To update your server, follow these steps:
Press Windows Key + I to open the Settings app.
Click on Update & Security.
In the Windows Update tab, click on Check for updates and follow the on-screen instructions to install any available updates.
Troubleshoot Network Connectivity
Network connectivity issues can cause RDP internal errors. To troubleshoot your network connection:
Check the physical connections (the wire) between your computer, and modem/router, etc
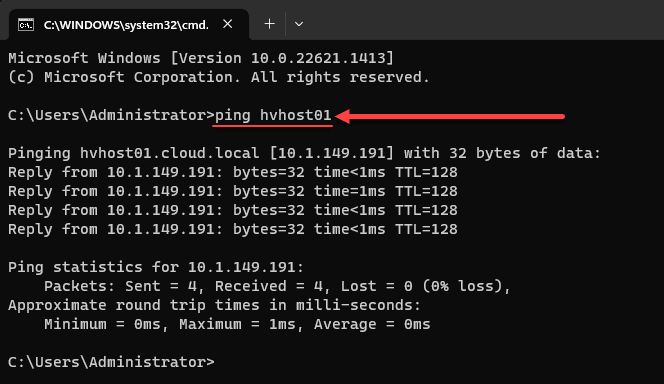
Use the ping command to test the connection between your and remote computers. So use something like
ping mycomputer.domain.comorping 192.168.1.2Check your router or switch for any configuration issues like VLAN configuration problems or other settings that could cause problems.
Wrapping up
The “RDP an internal error has occurred” issue can be a tricky one to pinpoint. However, you can use the methods listed in the post to troubleshoot RDP connectivity, the service, domain joins, and other problems that can lead to this issue.
Google is updating how articles are shown. Don’t miss our leading home lab and tech content, written by humans, by setting Virtualization Howto as a preferred source.

