While Kubernetes has been wildly popular for quite some time now, I think many are just starting their journey of learning Kubernetes and cloud-native technologies. If you are like me, you have goals of sharpening your Kubernetes skills in 2022. Part of that process for me is the home lab and running Kubernetes infrastructure there. I have posted quite a few posts covering Kubernetes home lab builds. However, for me, I wanted something more automated. I am starting with automating virtual machine deployments for Kubernetes nodes as this comes closer to what you would see in production. I love the container-based Kubernetes nodes for learning and also Minikube, both of which I have written about. However, many of the online classes and courses you can take have you build out VMs for Kubernetes nodes and this has other advantages in my opinion as it allows you to think about HA and DRS of the Kubernetes nodes themselves, sharpening these skills for what you see in production. Keep in mind too the awesome vSphere with Tanzu solution that is gaining momentum as well. Let’s take a look at using a Terraform vSphere Kubernetes automated lab build.
Below are links to my other posts about Kubernetes home labs:
- VMware vSphere with Tanzu Kubernetes Home Lab
- Kubernetes Home Lab Setup Step-by-Step
- VMware Home Lab and Learning Goals 2022
- Install Kubernetes in Windows using Tanzu Community Edition
- Install Applications in vSphere with Tanzu Kubernetes using Helm
- VMware Home Lab Network Design
- Kubernetes LXC Containers Configuration – Lab Setup
Minikube:
- Install Minikube in Windows Server 2022 using Winget
- Install Minikube in WSL 2 with Kubectl and Helm
- Install minikube on Windows Server 2019 Hyper-V
Why use VMs in the lab for Kubernetes nodes?
One of the main reasons that we use containers and other nested approaches for learning Kubernetes is resources. Running Kubernetes nodes as containers themselves helps to spare resources for labs you want to run on a laptop or other smaller environments.
These are great in my opinion and work really well. However, one thing I have found is that outside of getting the basics down, I have ran into challenges with nested labs on the networking side of things with Kubernetes and playing around with the more advanced topics when it comes to ingress controllers, general network connectivity, etc.
One of the most straightforward, outside of VMware Tanzu for me has been spinning up (3) Ubuntu VMs and spinning these up as Kubernetes nodes. It makes networking and other aspects easier to wrap your head around in my opinion.
Terraform vSphere Kubernetes automated lab build
The prerequisites for the Terraform vSphere Kubernetes automated lab build mainly include the need for a vSphere template using your Ubuntu distro of choice. If you want to see how you can quickly and easily build an Ubuntu 21.04 template using Hashicorp Packer, look at my post here: Packer Build Ubuntu 21.04 for VMware vSphere. Also, to level-set, the Terraform script I have come up with does the following:
- Builds the (3) Ubuntu VMs using an Ubuntu 21.04 vSphere template (built with Packer as linked above)
- Sets DNS – this is kind of kludgy how I am setting the DNS server. However, haven’t found a reliable way to set this with Terraform as of yet. I welcome comments on this.
- Installs all the available Ubuntu updates – runs in “non interactive mode.” In doing some Googling found this to be effect to suppress the “service restart” prompts you get when installing Ubuntu updates.
- Configures root for logging in via SSH – You can comment this out if needed as it doesn’t really affect your Kubernetes install. You can always sudo the underprivileged user of your choosing. The Packer build I have linked to creates an ubuntu/ubuntu user.
- Also sets a password for root – Again can be commented out
- Installs prereqs for Docker, Docker keyring, and then installs Docker – Container runtime used for the automated build.
- Installs prereqs for Kubernetes, kubeadm, and kubectl – Normal stuff needed for
- Turns off swap
- Puts Kubernetes, kubeadm, and kubectl on hold so these can be closely controlled
- Change the Docker cgroup to systemd
- Restarts Docker services
So, using the above, you will have three pristine Ubuntu VMs, ready for Kubernetes configuration. The script could be easily modified to go ahead and configure Kubernetes and then automatically join the worker nodes to the Kubernetes cluster. This is another version of the script I will post. However, for the first go around, I want the three VMs to be left at the point of me being able to run the kubeadm init command. This allows me to pick up and configure Kubernetes how I want each go around which only takes no more than a couple of minutes at most.
Folder structure
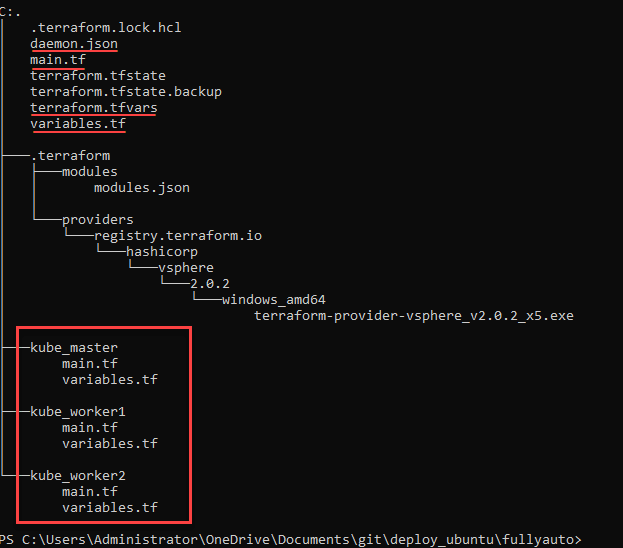
What does the folder structure for the Terraform automated build look like? Below, you will see a lot of extra files and folders from the previous terraform run that get created due to the Terraform init process. However, I have underlined and boxed the files you will have in each directory.
The top-level main.tf calls the other .tf files for the individual nodes as modules.
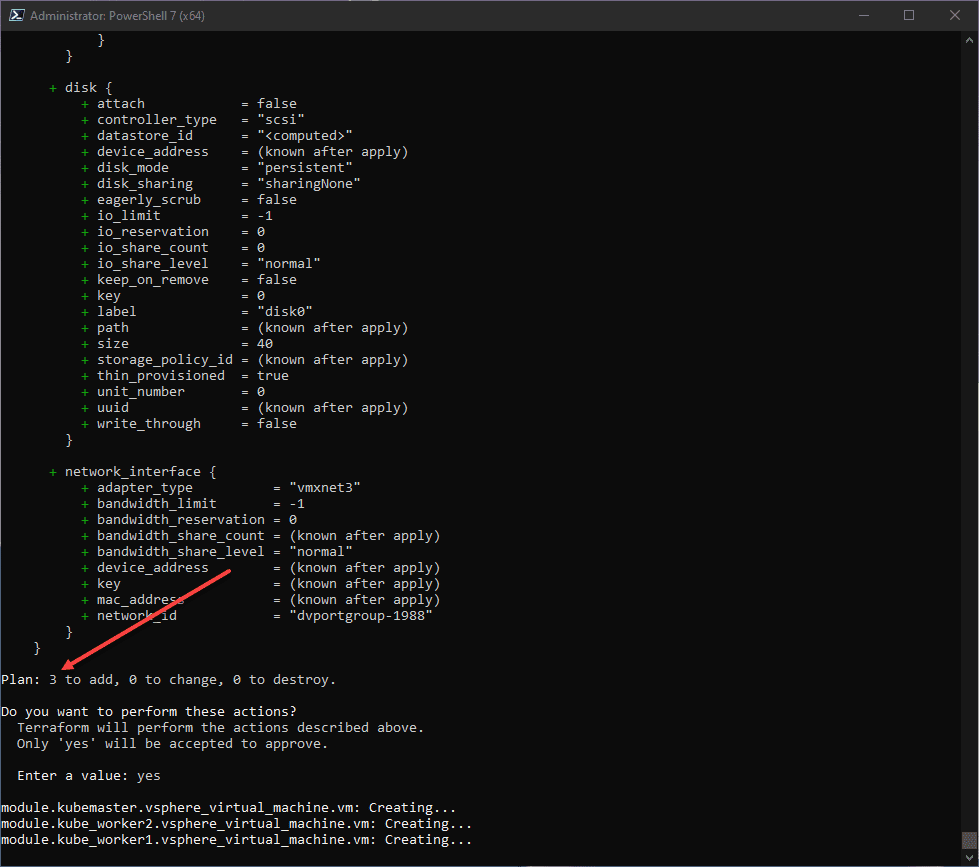
Below, I have initiated the terraform apply command and confirmed the action.
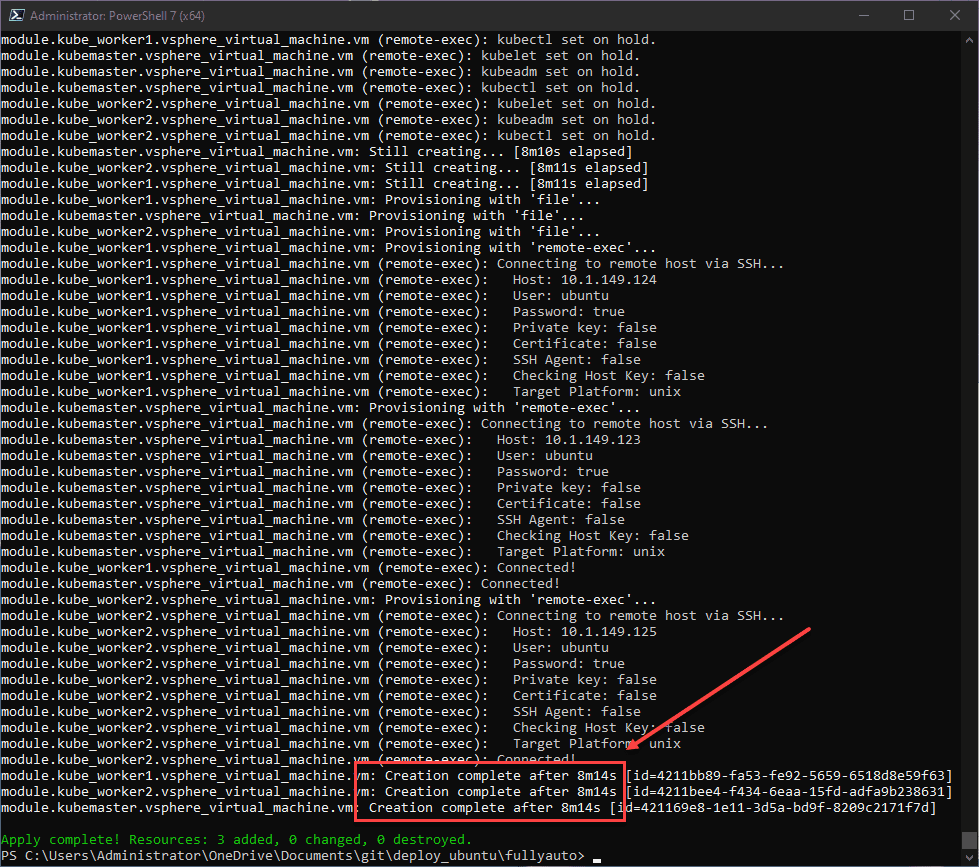
In just over 8 minutes (using XEON-D hardware), the (3) Ubuntu 21.04 VMs finish building, installing updates, Docker, Kubernetes, kubeadm, kubectl, and other tweaks as these VM builds run in tandem.
What commands need ran to finish out the Kubernetes installation after the Terraform script finishes?
In case you are wondering what needs to be done to configure Kubernetes, you only need to run the following commands. The below commands will only take couple of minutes.
On the Kubernetes master/controller:
If you use the naming I have used, this is Kube-1. Run the following:
##Configure Kubernetes
kubeadm init --pod-network-cidr=10.244.0.0/16 --ignore-preflight-errors=all

##Configure kubectl to work with your cluster
mkdir -p $HOME/.kube
sudo cp -i /etc/kubernetes/admin.conf $HOME/.kube/config
sudo chown $(id -u):$(id -g) $HOME/.kube/config

##Install your Kubernetes networking (choose one of the below):

- Flannel
  kubectl apply -f https://raw.githubusercontent.com/coreos/flannel/master/Documentation/kube-flannel.yml

- Calico
  kubectl apply -f https://docs.projectcalico.org/manifests/calico.yaml
On the two worker nodes
##Run the kubeadm join command displayed on the Master/controller node, it will look like the following:

kubeadm join 10.1.149.123:6443 --token pqrc0n.iow5e2zycn5bu1uc \
        --discovery-token-ca-cert-hash sha256:7b6fd631048cc354927070a82a11e64e6afa539822a86058e335e3b3449979c4

##If you accidentally close your session and need to see the join command run the following on your master:

kubeadm token create --print-join-commandTerraform vSphere Kubernetes Lab Code
You can view the code and clone down the repo here: brandonleegit/terraformvspherekubernetes: Terraform vSphere Kubernetes automated lab build (github.com)
What do you need to do to customize in the script?
- The Linux options in each VM folder still have the IPs for my lab environment – I will work on getting these into variables for the next commit
- Change the information in the .tfvars file for template name, datastore, username, password, network switch, and other variables to fit your environment.
Clone the repo here:
https://github.com/brandonleegit/terraformvspherekubernetes.gitWrapping Up
Hopefully, this Terraform vSphere Kubernetes automated lab build in 8 minutes will help to jumpstart your Kubernetes learning in 2022. The great thing about having your Kubernetes lab automated is it makes tearing things down and building it back quickly a non-event. Let me know your thoughts and feel free to contribute to the code. Happy Kubernetes learning!
Google is updating how articles are shown. Don’t miss our leading home lab and tech content, written by humans, by setting Virtualization Howto as a preferred source.

