How to use iPerf to test Internet Speed
It is important to check your Internet speed as you want to make sure you get what you pay for in terms of bandwidth. Residential connections are generally quite a bit flakier in terms of fluctuations you see in available bandwidth and other metrics. SLAs in terms of residential connections are much more liberal as well, unfortunately. However, it is still a good idea to trend these types of things in your home lab especially. If you are like me, you depend on the home lab to a large degree, even using it as a testing ground for production technologies, presentations, and other things. Aside from using the commercial “speed test” type sites, I encourage you to use a well-known tool called iperf. Let’s look at how to use iperf to test internet speed and see how you can set up this type of test.
What is iPerf?
The iPerf tool is a command-line tool for actively measuring your maximum achievable bandwidth on a TCP/IP network. The iPerf tool allows measuring bandwidth, loss, and other parameters. The latest version of iPerf is denoted as iPerf3. As a note, it is not compatible with the original iPerf tool.
iPerf features:
- TCP and SCTP
- Measure bandwidth
- Report MSS/MTU size and observed read sizes.
- Support for TCP window size via socket buffers.
- UDP
- The client can create UDP streams of a specified bandwidth.
- Measure packet loss
- Measure delay jitter
- Multicast capable
- Cross-platform: Windows, Linux, Android, MacOS X, FreeBSD, OpenBSD, NetBSD, VxWorks, Solaris,…
- Client and server can have multiple simultaneous connections (-P option).
- The server handles multiple connections, rather than quitting after a single test.
- Can run for the specified time (-t option), rather than a set amount of data to transfer (-n or -k option).
- Print periodic, intermediate bandwidth, jitter, and loss reports at specified intervals (-i option).
- Run the server as a daemon (-D option)
- Use representative streams to test out how link layer compression affects your achievable bandwidth (-F option).
- A server accepts a single client simultaneously (iPerf3) multiple clients simultaneously (iPerf2)
- New: Ignore TCP slow start (-O option).
- New: Set target bandwidth for UDP and (new) TCP (-b option).
- New: Set IPv6 flow label (-L option)
- New: Set congestion control algorithm (-C option)
- New: Use SCTP rather than TCP (–sctp option)
- New: Output in JSON format (-J option).
- New: Disk read test (server: iperf3 -s / client: iperf3 -c testhost -i1 -F filename)
- New: Disk write tests (server: iperf3 -s -F filename / client: iperf3 -c testhost -i1)
How to use iPerf to test Internet Speed
Basically iPerf works under the premise that you have iPerf loaded on two nodes. One node serves as the server node, and the other node serves as the client node. The client sends data and the server listens for data to be sent. Based on this exchange of data, the bandwidth can be calculated between the two nodes. While the premise is simple, it provides a very accurate way to measure the real-world bandwidth between two different nodes.
This is what I really like about iPerf compared to simply visiting a speed test type site. With that being said, you need a couple of nodes. Obviously, one will be at your home or in the home lab environment. This will serve as the client. What I like to do that is simple and easy is spin up a quick EC2 instance, load iPerf, and then setup a quick security group rule that is scoped down to my home IP.
Also, as a note, you don’t have to run iPerf on the same platform. In other words, you can have the server running on Linux and the client on Windows or vice versa. It doesn’t matter. Just make sure you are running iPerf or iPerf3 on both server and client.
Setup an iPerf server on Amazon AWS EC2
To effectively see what kind of Internet bandwidth you are getting, you need to have a server on the Internet. One of the easiest ways to do this is to spin up an EC2 instance. You can spin up a quick EC2 VM running in Amazon EC2 and only have this running for the duration of the test, after which you can power down and terminate the instance.
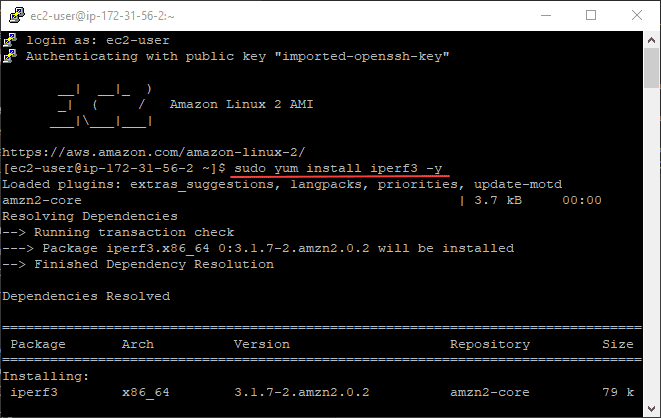
First, let’s setup iPerf3 on the Amazon AWS EC2 instance. To do that, use the command:
sudo yum install iperf3 -yNow that iPerf3 is installed on the Amazon EC2 instance, to run the server, simply use the command:
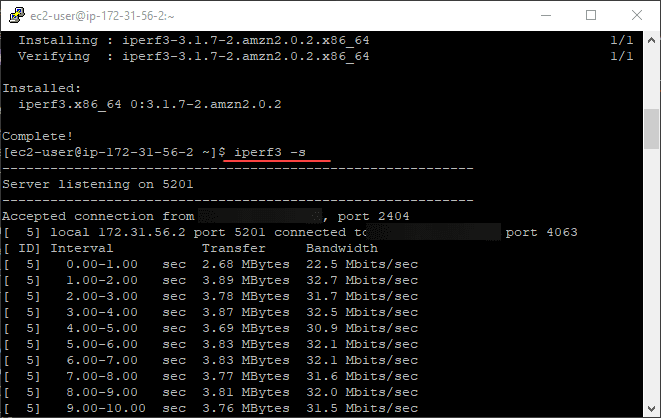
iperf3 -sBy default, the server will be listening on port 5201. Keep this in mind when you are configuring your EC2 security groups. Also, iPerf allows you to customize the port on which the server listens so you can use any port you like.
Configuring an iPerf client using Windows
I am using a Windows iperf client. However, the general process is the same on most platforms.
- Download iperf for your platform here: iPerf – Download iPerf3 and original iPerf pre-compiled binaries
- Extract the iperf utility
- Run the iperf client using the connection information for the server you have setup
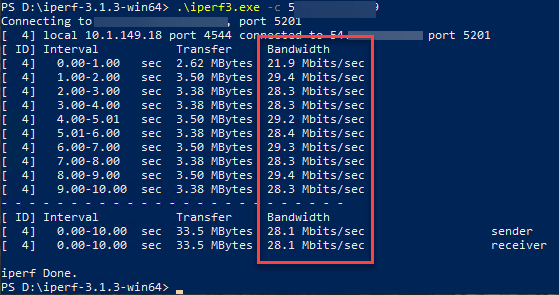
Below, I have downloaded iPerf3 for Windows, extracted the .ZIP file and am just running the executable from PowerShell. As you can see below, the syntax is straightforward:
iperf3.exe -c 5X.XX.XX.XXThe iperf tool will then begin transferring data across between your client and the iperf server. The output will look like the following.
Wrapping Up
If you want to have a third-party, customized way of testing your Internet connection, iPerf is a great way to do that. If you have wondered how to use iPerf to test Internet Speed, hopefully, this quick walkthrough helps to show just how easy this is to do. Iperf is used by network professionals the world over as an accurate way to gauge bandwidth. I have used it many times before to test out connections between ESXi hosts and high-bandwidth links that you want to make sure you are getting the speed you think you are getting.





Hi mate, on last picture actually there is public ip which you tried to blur 🙂 Take care!
Dave,
thanks for the note and letting me know! Take care.
Brandon