Backup Office 365 Email with NAKIVO
Recently, NAKIVO Backup & Replication v9.2 was released to the masses. It has one new really important feature to note – Office 365 backup. We took a look at the NAKIVO Backup & Replication v9.2 beta release here. However, now that v9.2 is GA, we want to take a closer look at the Office 365 backup functionality. How does it work? How is it configured? In this post, we will look at how to backup Office 365 email with NAKIVO Backup and Replication v9.2.
Office 365 Email Backup
Backing up email in Microsoft Office 365 is extremely important. Often, among backup vendors, you may find the emphasis being placed more so on backing up OneDrive where file storage resides.
However, it is easy to forget that email is still the primary communication channel for most businesses today both internally and externally. So, imagine a situation where you Office 365 email is down. How well would your business function? Would communication be hindered? Most likely, if you make use of email as a primary communication platform, your business continuity will be adversely affected.
Backing up email will ensure that if an end user unintentionally deletes messages from their inbox, or maybe even all the messages in their inbox, you have a copy of their email data stored safely away in your backup repository.
On-premises and Office 365 Email Backups with NAKIVO
One of the great things about the NAKIVO solution is that you can consolidate both the on-premises backups of virtualized environments and physical servers/workstations with the backup of your Office 365 email under the umbrella of one solution.
This means you don’t have to juggle multiple solutions, interfaces, skill sets, and logins to cover the bases of protecting your data as it exists in today’s hybrid environments.
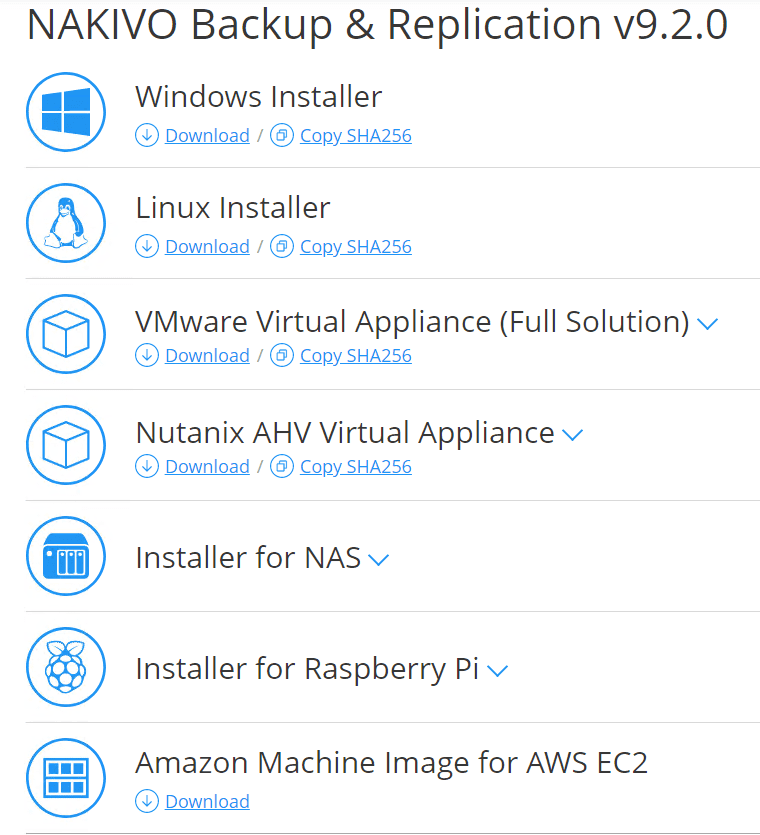
The NAKIVO solution is one of the easiest data protection solutions to stand up. Literally, using the virtual appliance download, you can have a backup appliance up and running in minutes, and start creating your backup jobs. Now, with the addition of Office 365 Exchange Online email backup, the same is true with protecting your Office 365 user accounts and the associated email inboxes. Again, all of this functionality is accomplished with the download of a single virtual appliance.
Configuring NAKIVO to Backup Office 365 Email
Let’s now get our hands dirty and dive into configuring NAKIVO to backup Office 365 email. In the walk through below, I will be using the VMware vSphere virtual appliance download of NAKIVO Backup & Replication v9.2 to configure Office 365 email backup.
There are two parts to getting the configuration up and running for NAKIVO to backup your Office 365 email. This includes:
- NAKIVO Backup & Replication v9.2 configuration
- Configuration of API application in Azure
- Configuration of API application permissions
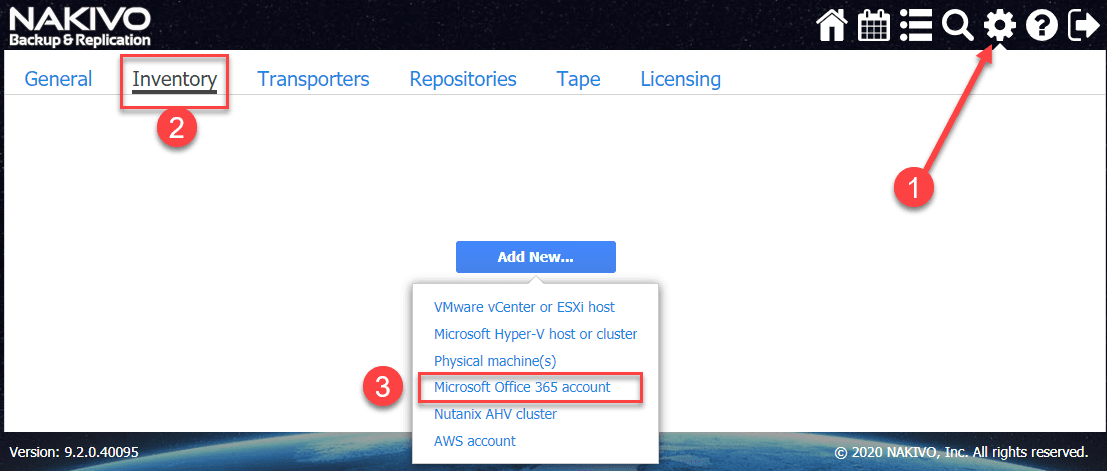
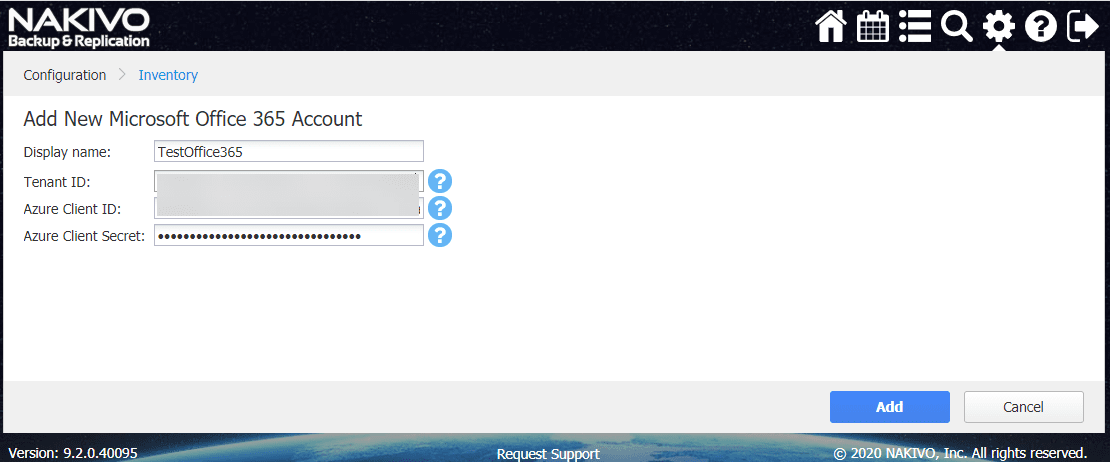
First of all, let’s take a look at the configuration of Office 365 email backup in NAKIVO. The first thing we need to do is actually add the Office 365 environment to our NAKIVO appliance inventory. To start this process, click the “settings cog” in the upper right-hand corner of the interface > click Inventory > Microsoft Office 365 account.
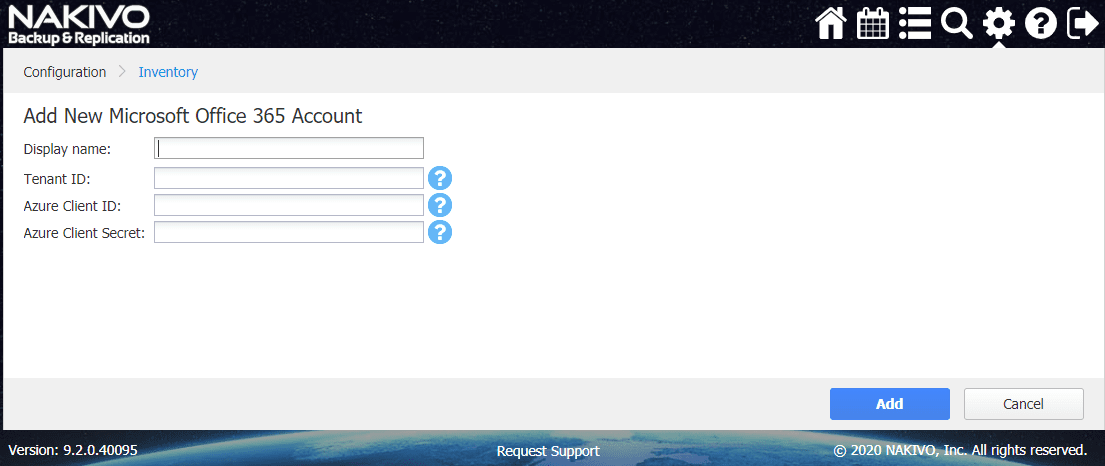
This launches the Add New Microsoft Office 365 Account wizard. Here you have information specific to your environment that needs to be filled in. This includes:
- Tenant ID
- Azure Client ID
- Azure Client Secret
This information is information we need to get from the Azure portal. What I did was just left my NAKIVO screen up and open at this step. The steps needed to complete the configuration on the Azure size amount to about 5 minutes worth of work as long as you have the permissions to your Azure Active Directory backing the Office 365 environment.
Configuring Azure Active Directory for NAKIVO API access
There is a bit of manual work that needs to be accomplished when getting your Azure Active Directory configured so that NAKIVO can access Office 365 at the API layer.
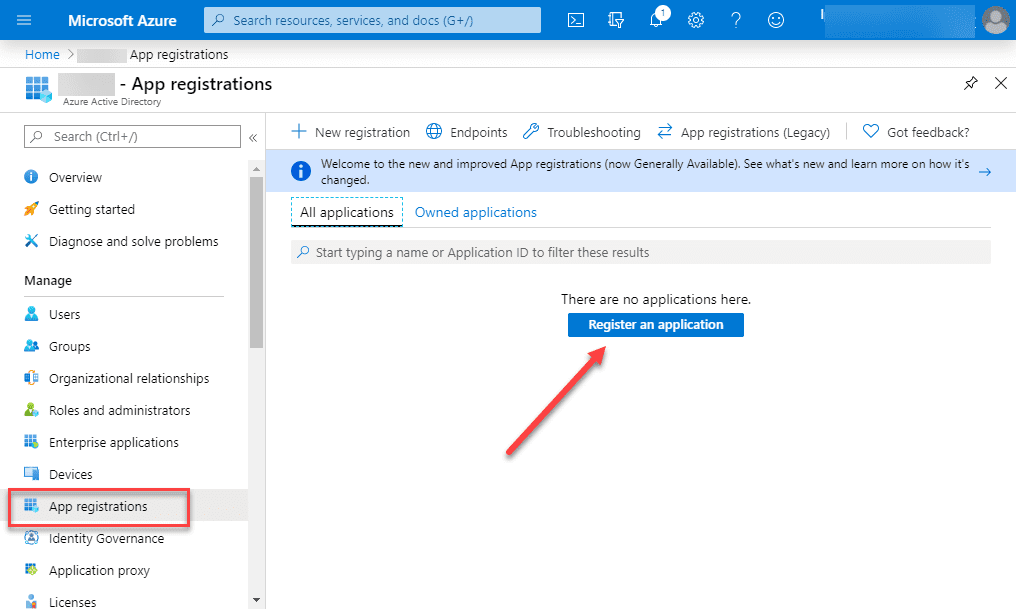
Click the App registrations blade under the Manage group. Then click Register an application.
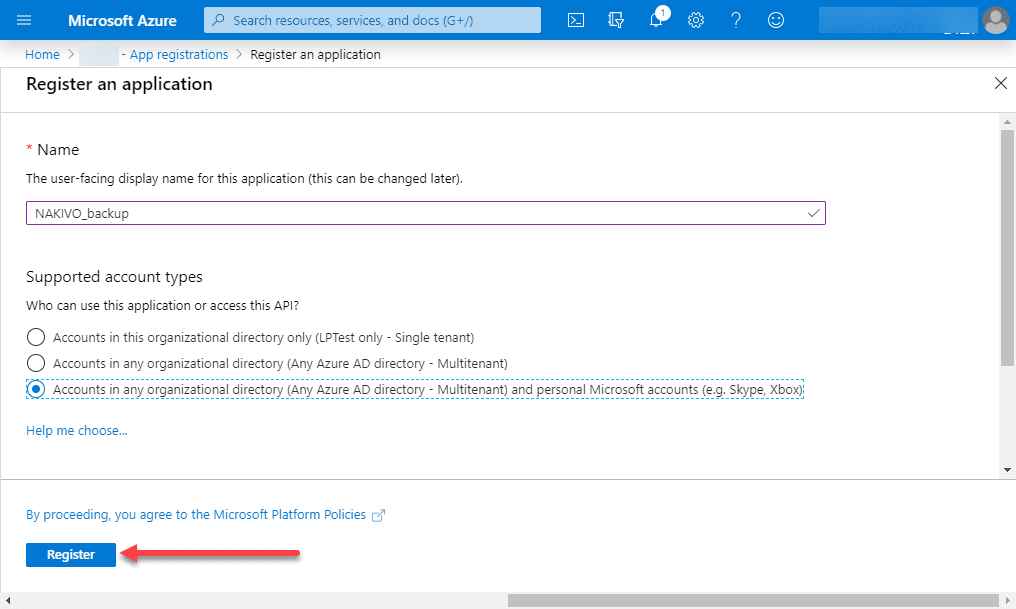
Name the application and select who can use this application or access this API. In their documentation, NAKIVO shows the Accounts in any organizational directory (Any Azure AD directory – Multitenant) and personal Microsoft accounts (e.g. Skype, Xbox) selected. Then click the Register button.
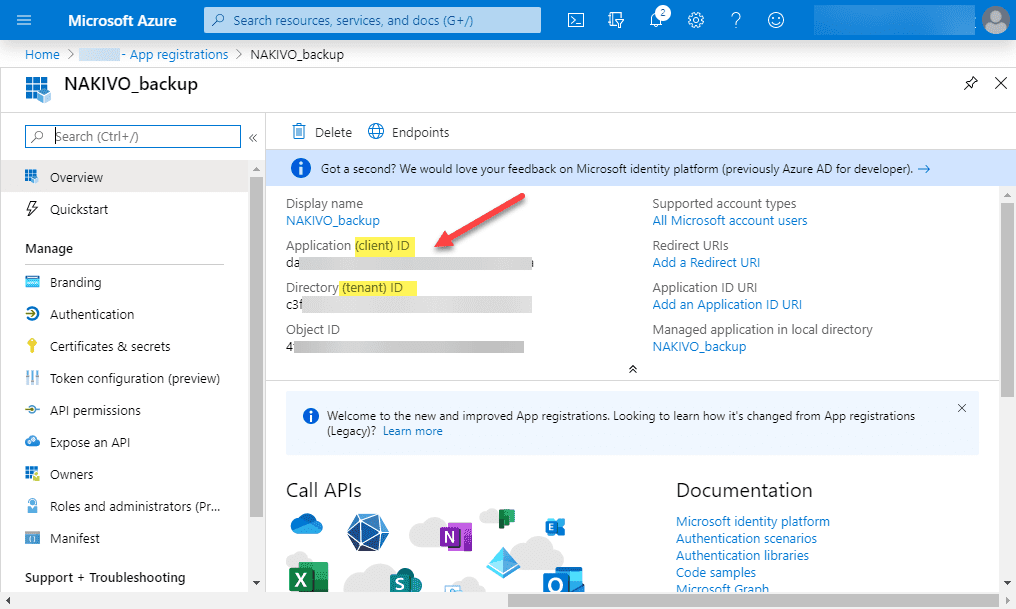
Once you have registered the new application, you will be taken back out to the Overview screen showing the client ID and the tenant ID. As you saw above, this is 2 out of the 3 pieces of information needed to connect NAKIVO to Azure Active Directory.
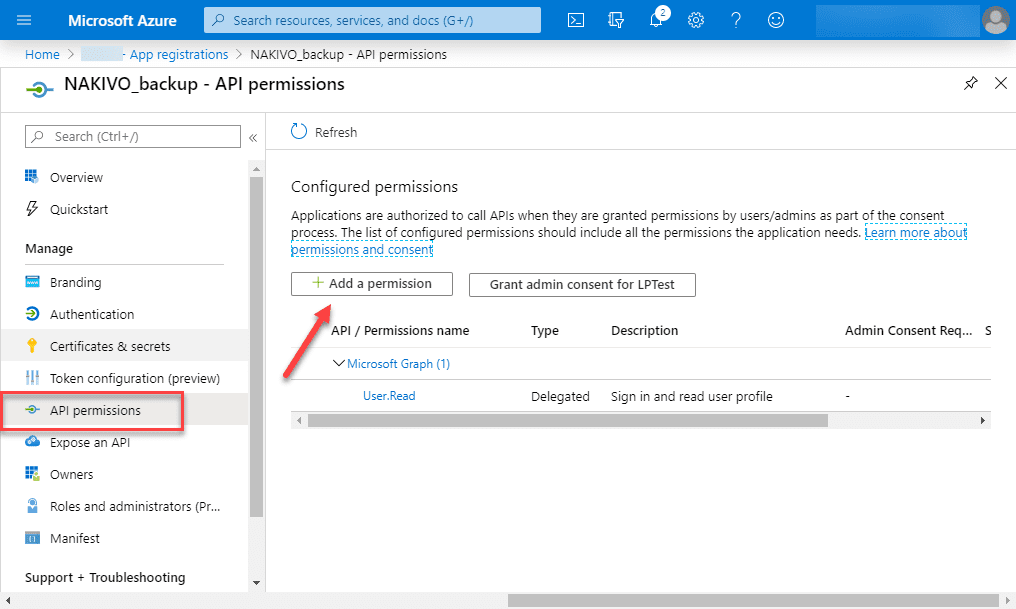
Next, we need to give the API application the permissions needed. Click API permissions > Add a permission.
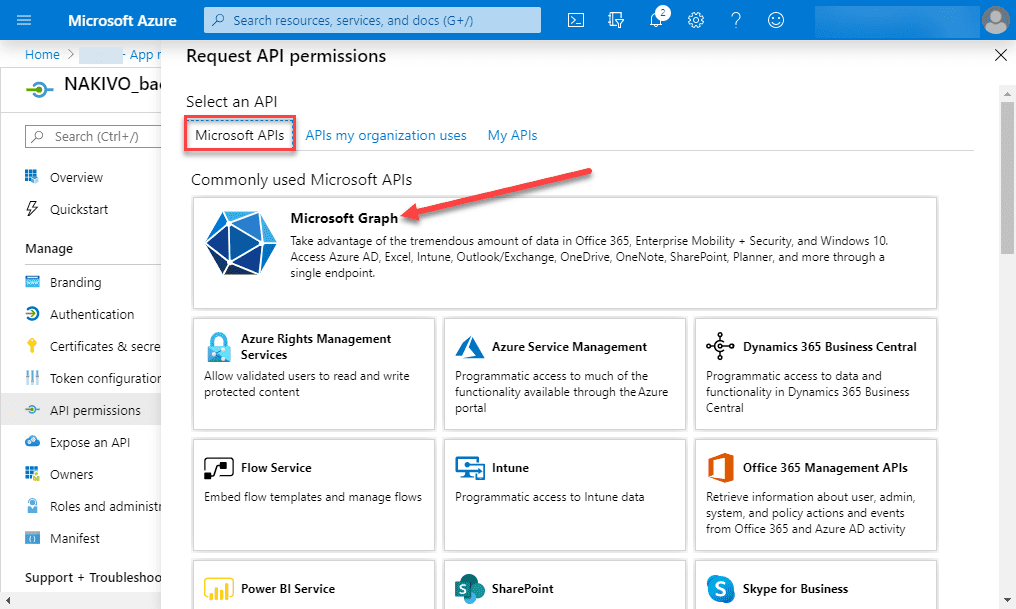
Select Microsoft APIs > Microsoft Graph.
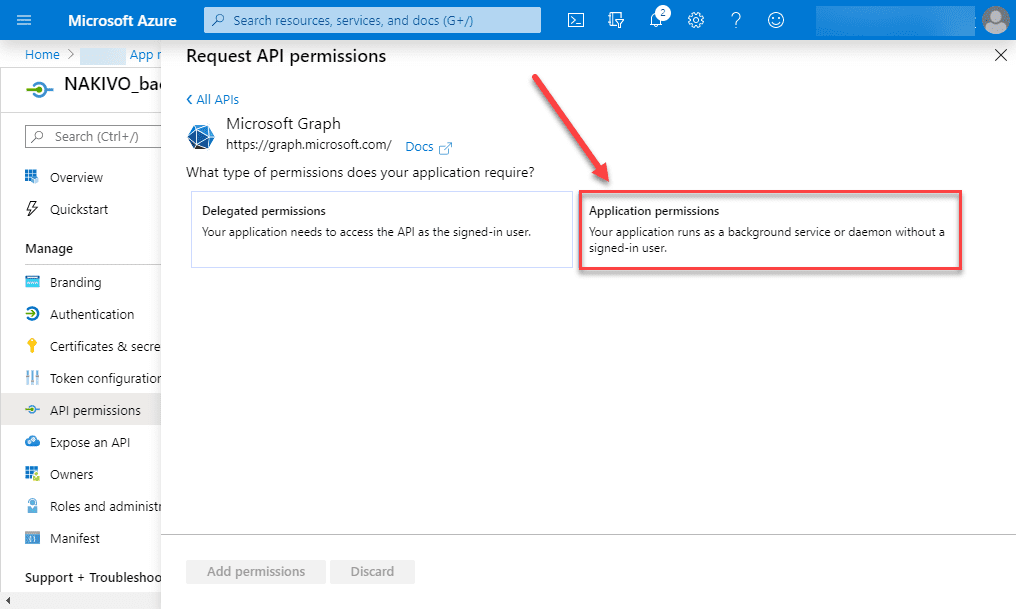
Select Application permissions as our application will run as a background service or daemon without a signed-in user.
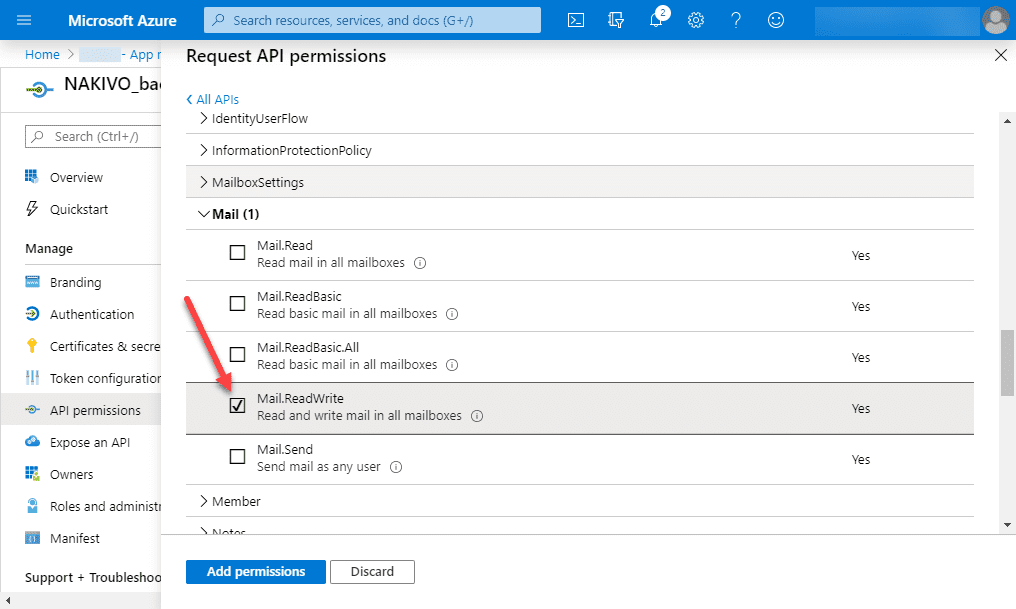
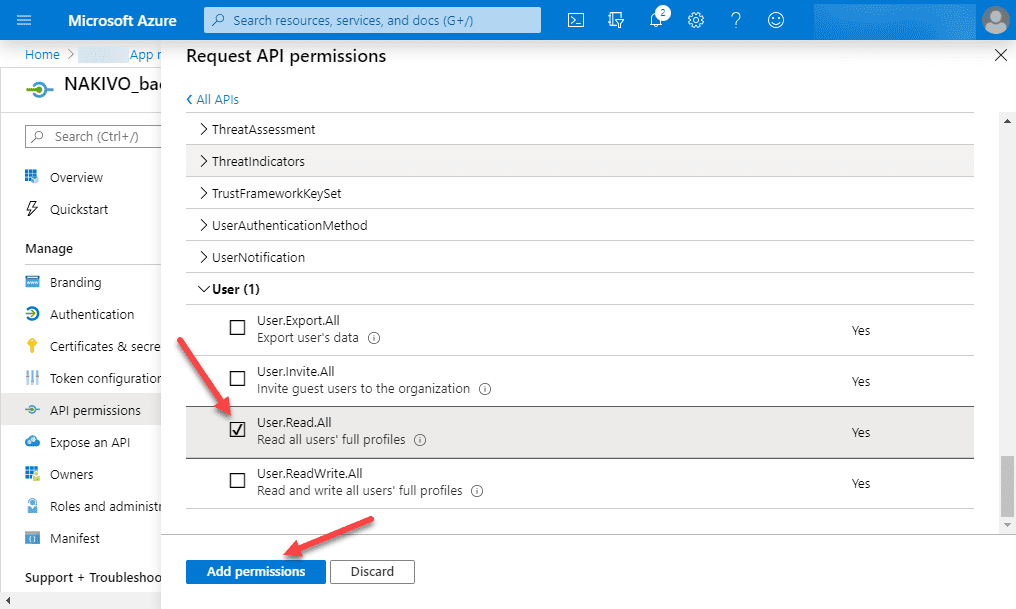
As documented by NAKIVO, the permissions needed include:
- Mail – Mail.ReadWrite
- User – User.Read.All
You can add both in the same screen before you click the Add permissions button.
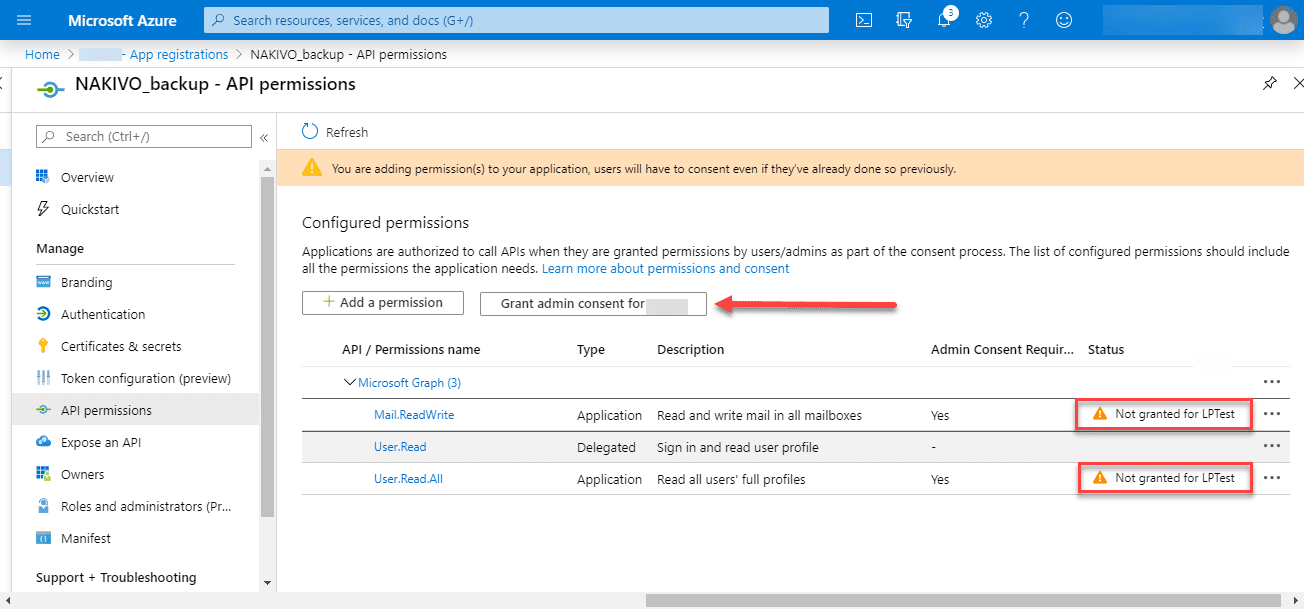
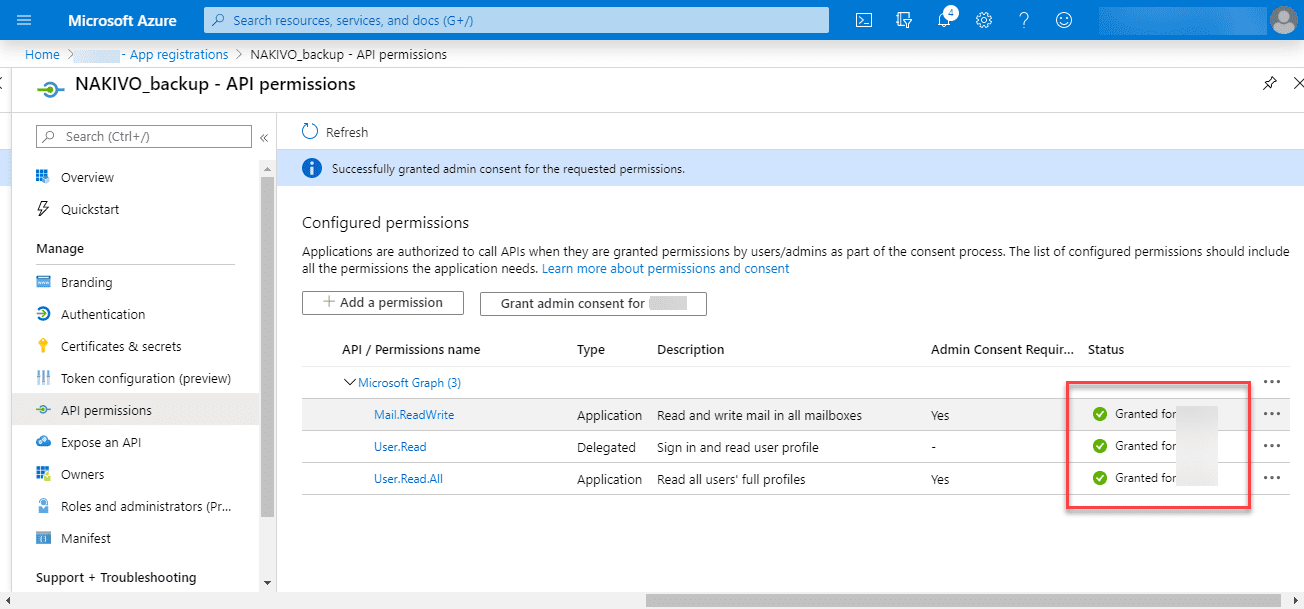
Next, we need to Grant admin consent for the additional permissions. Click the button.
After clicking the Admin consent button, you should see the Granted
Now that the new API application is added and permissions have been assigned and granted, we need to create a new secret key for use in connecting NAKIVO to the Azure Active Directory environment.
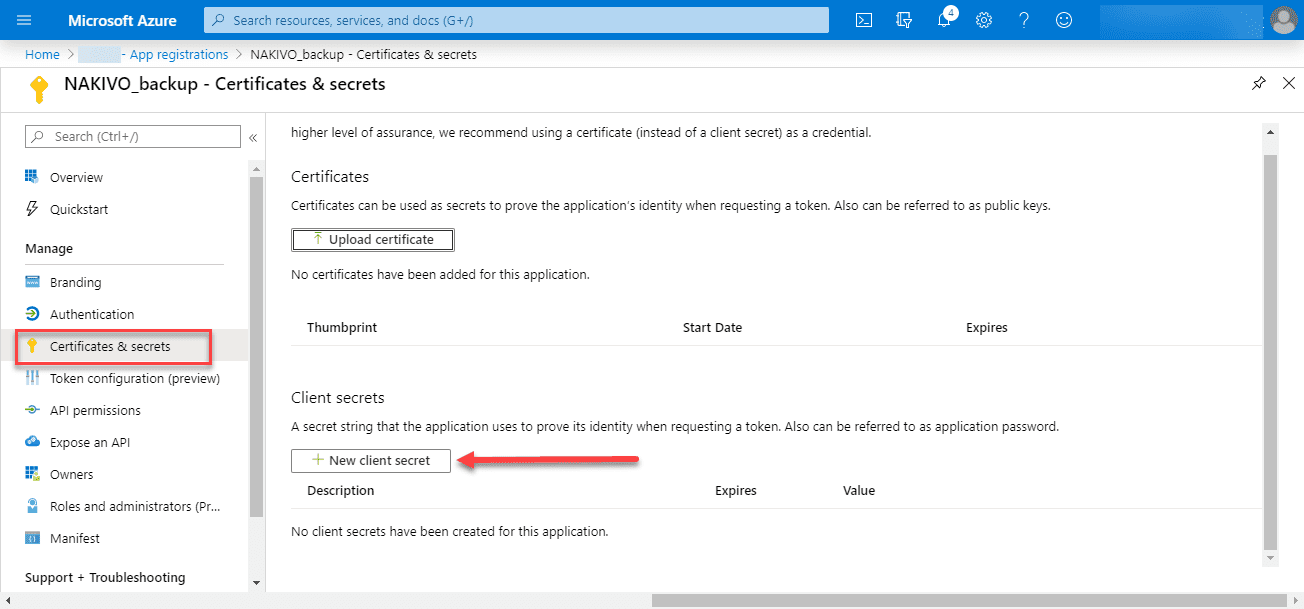
To do this, click the Certificates & secrets button and then click the New client secret.
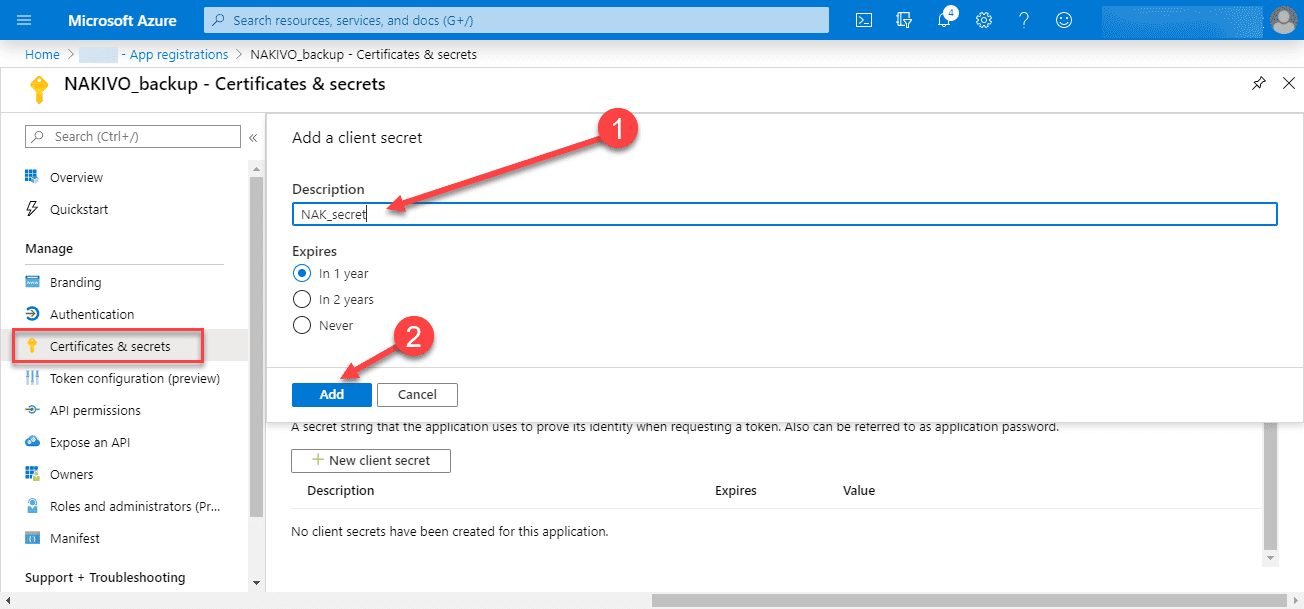
On this screen, simply enter a description and a term length for the client secret.
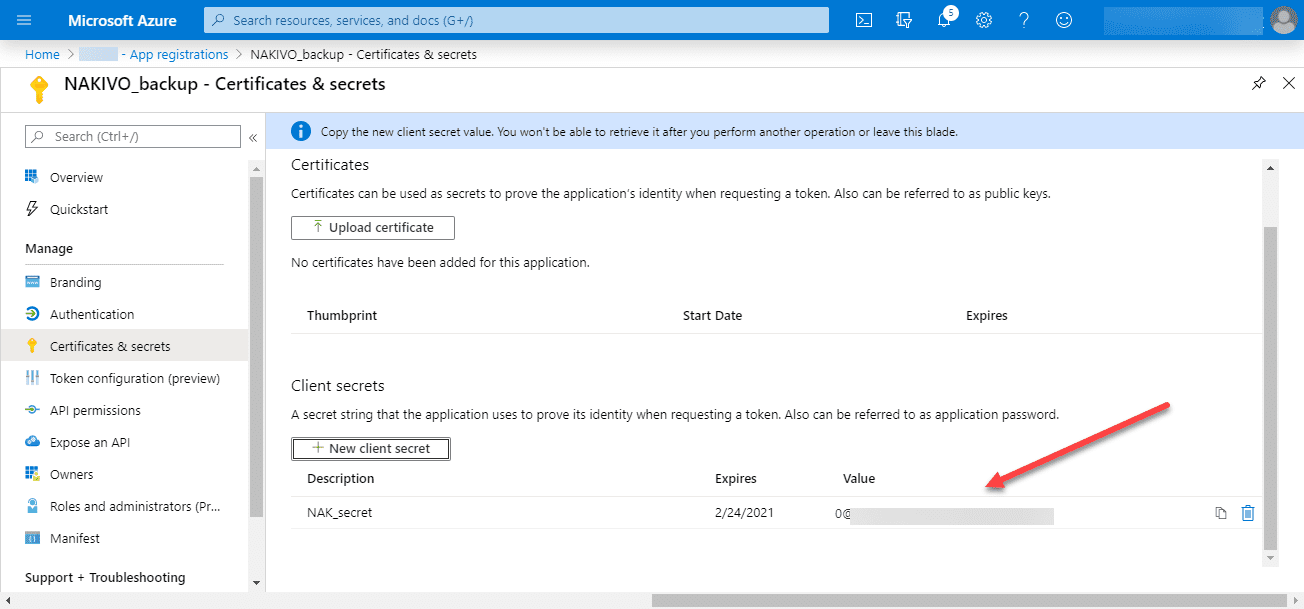
Copy the secret value you see generated on the screen. As directed, this will be the only time it is displayed where you can see/copy it, so make sure you record this in a safe place.
Finishing NAKIVO Office 365 Account Configuration
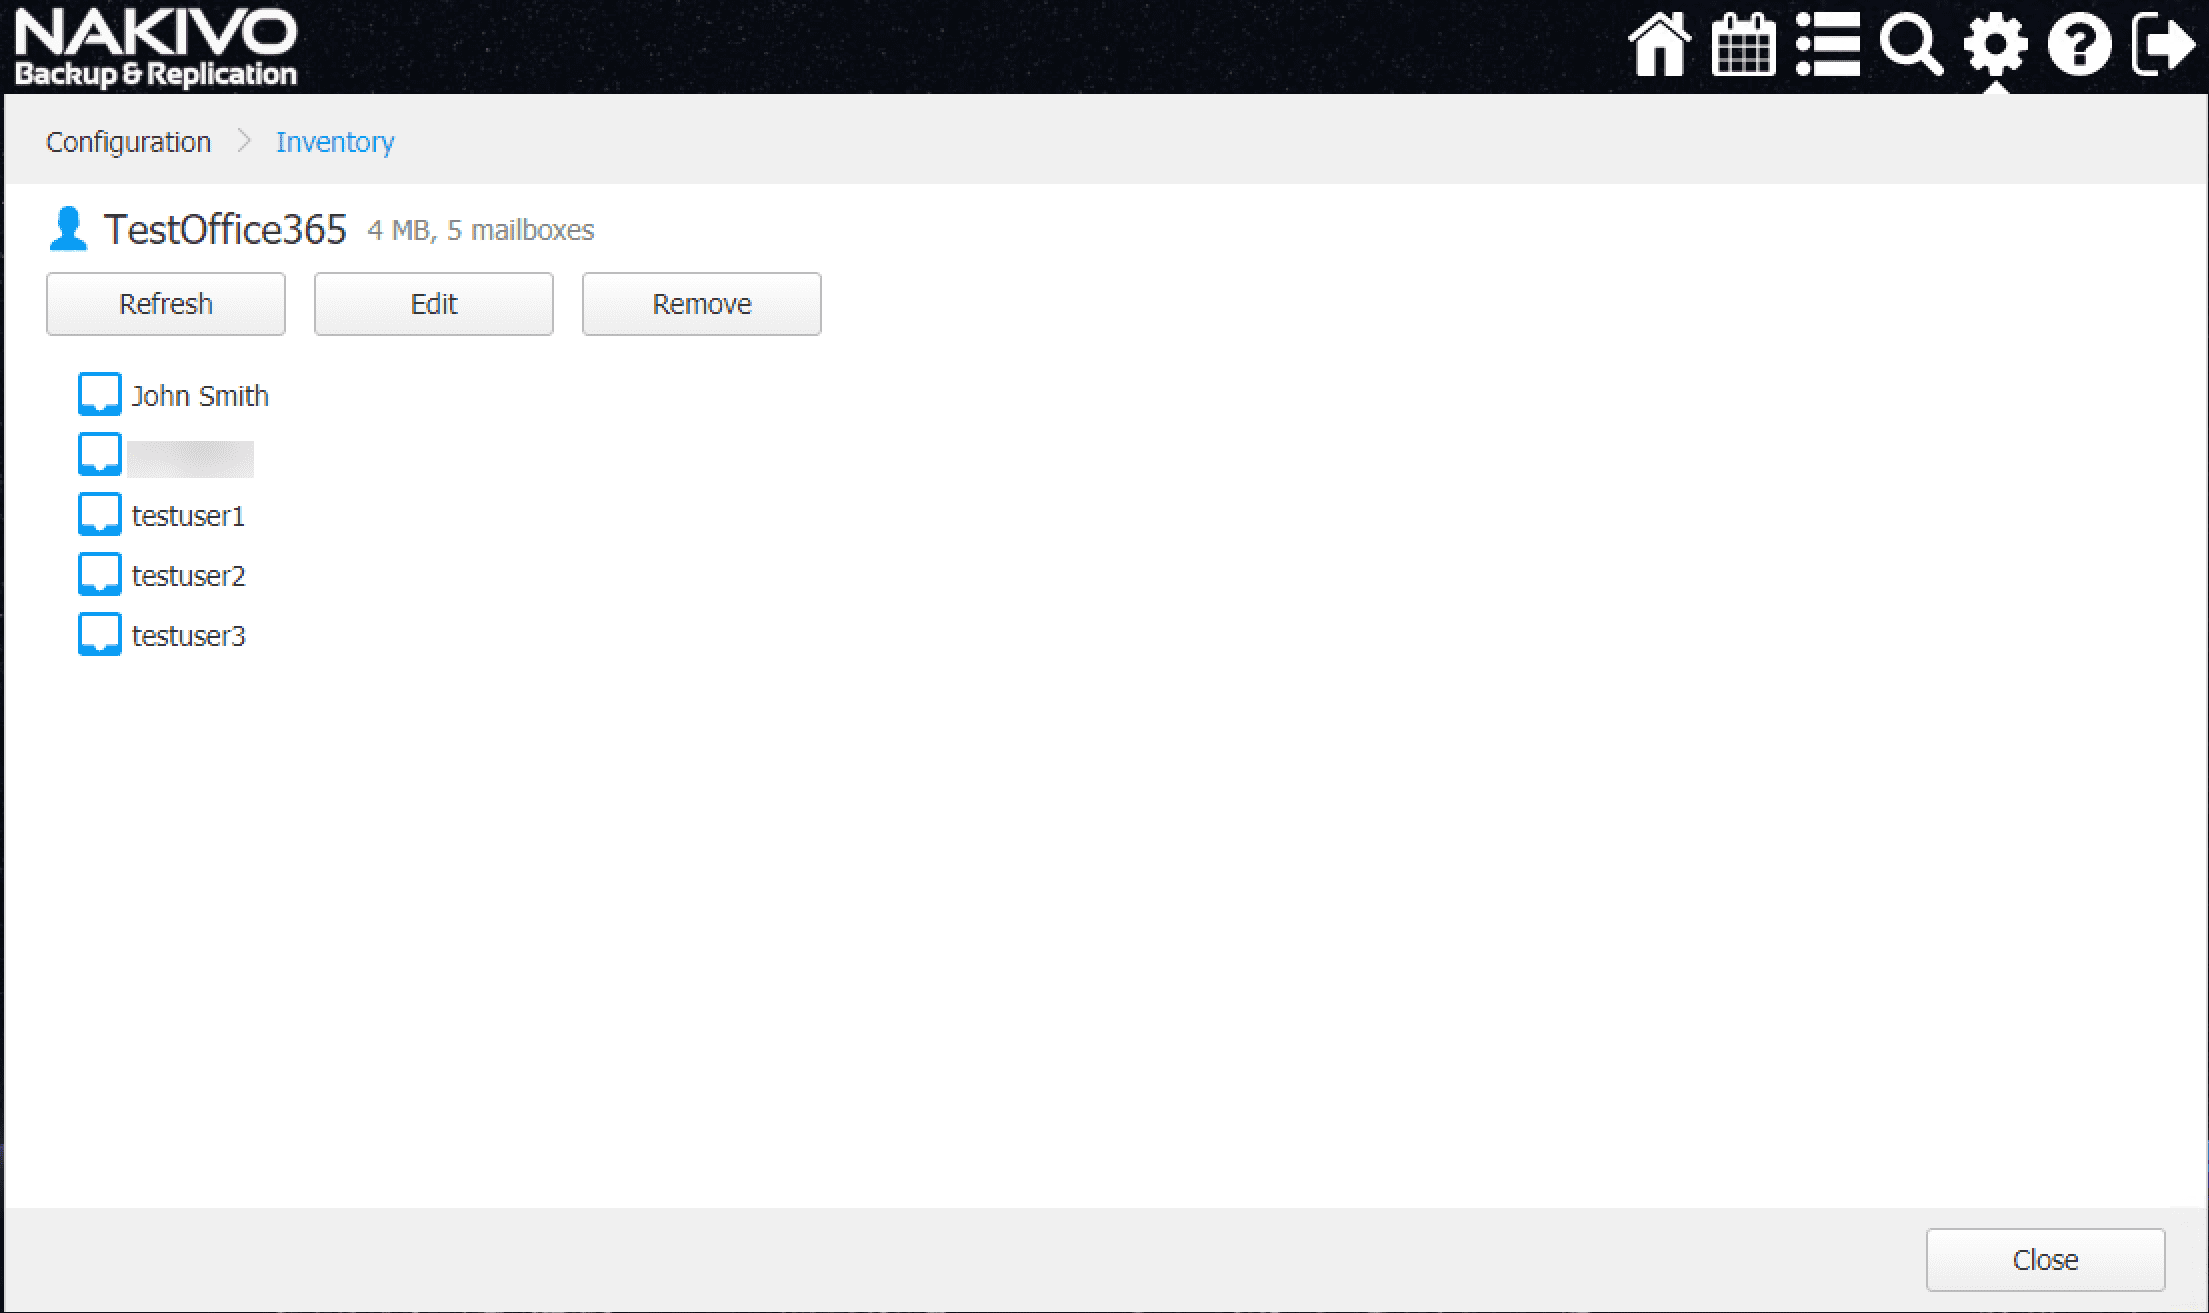
Now that we have completed the steps listed above in Azure Active Directory that is backing the Office 365 environment, we can finish out the configuration in NAKIVO. All three pieces of information that we provisioned in the steps above will be plugged into the NAKIVO wizard.
NAKIVO Office 365 Repository
After you have connected your NAKIVO Backup & Replication v9.2 appliance to Office 365, you will no doubt want to create a backup job as soon as you can.
If you notice that creating a new backup job is greyed out, it could be due to the type of repository you have configured with NAKIVO when initially deploying the appliance.
Some notes from NAKIVO about the Office 365 repository:
Microsoft Office 365: Select this repository type for Microsoft Office 365 related activities. Advanced options aren’t available for this repository type.
Important
- A remote Transporter assigned to the Microsoft Office 365 repository must be installed/updated manually otherwise this type of repository will be unavailable.
- For Microsoft Office 365 repositories only local folders are supported as a location.
Creating an Office 365 Email Backup Job
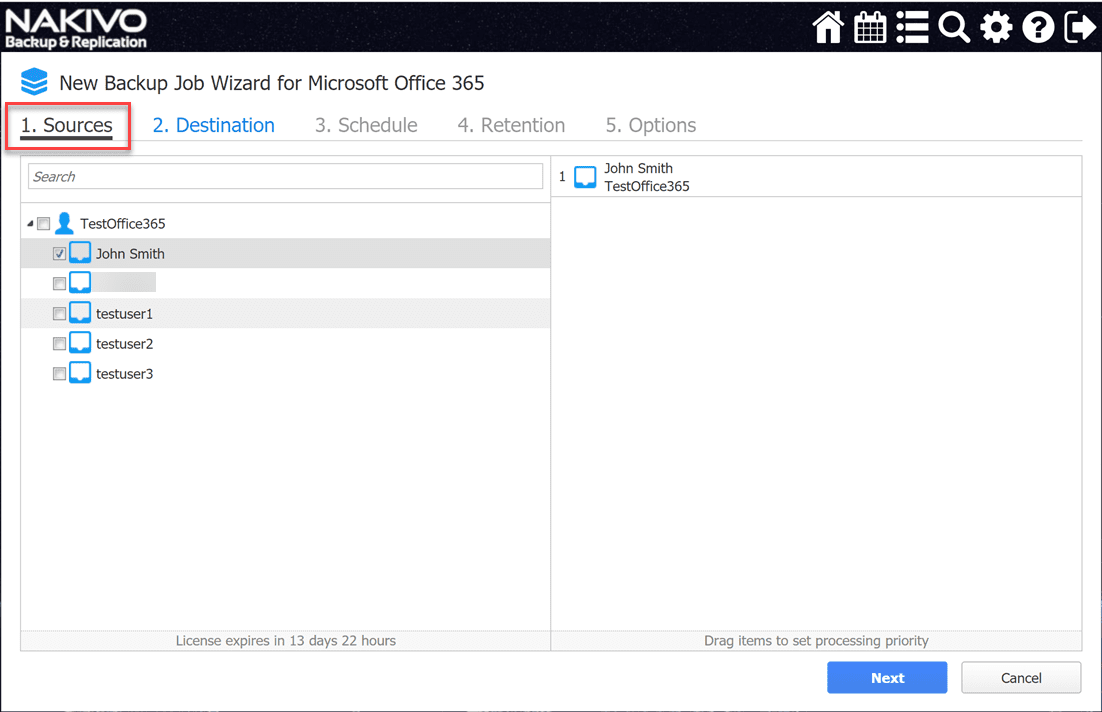
Select the source Office 365 mailbox for backing up in NAKIVO. Creating the Office 365 backup job in NAKIVO will feel very familiar to those who are already used to using NAKIVO for VM backups. It is great to see they stuck with their normal workflow as this will be intuitive and familiar across the board – either for VMs or Office 365.
First, select your source mail box. If you want to simply backup everything, select the global tree node (this will be named whatever you named your Office 365 backup environment. If you select this node, any additional mailboxes added to the environment will automatically be added to the backup.
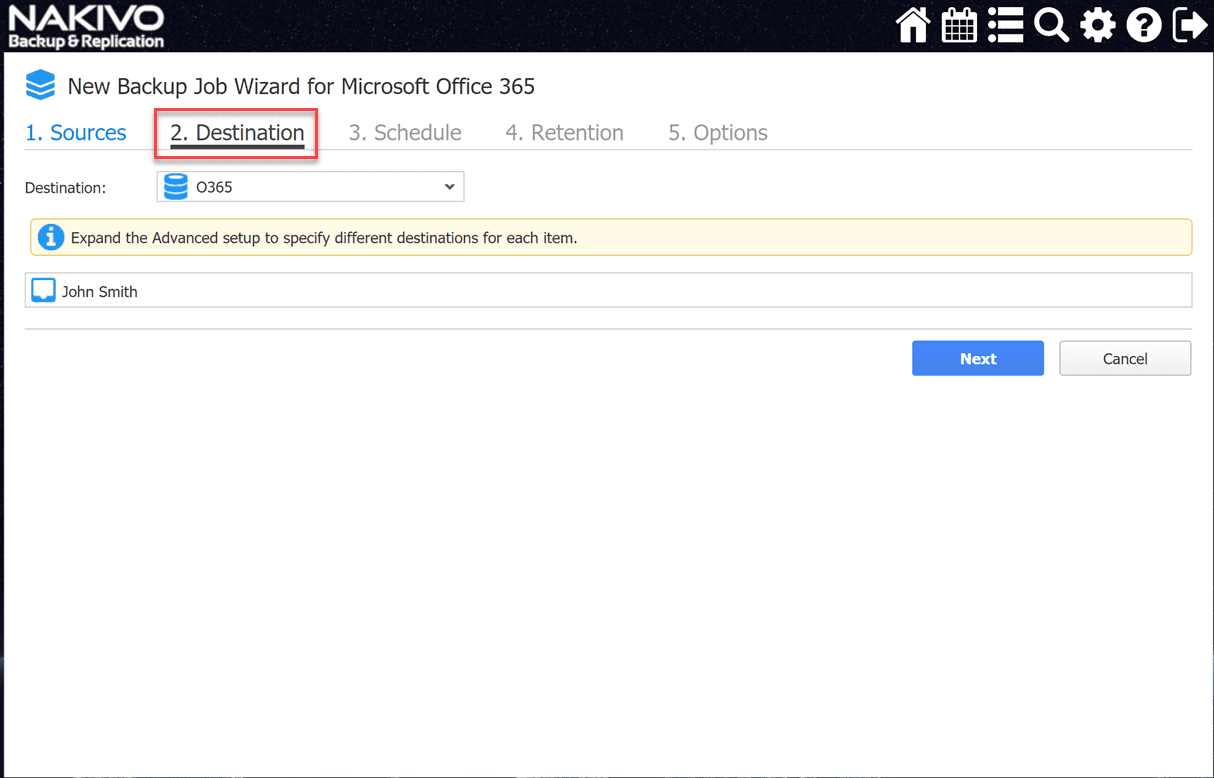
Select the Destination which will be the Office 365 type repository you have configured in NAKIVO.
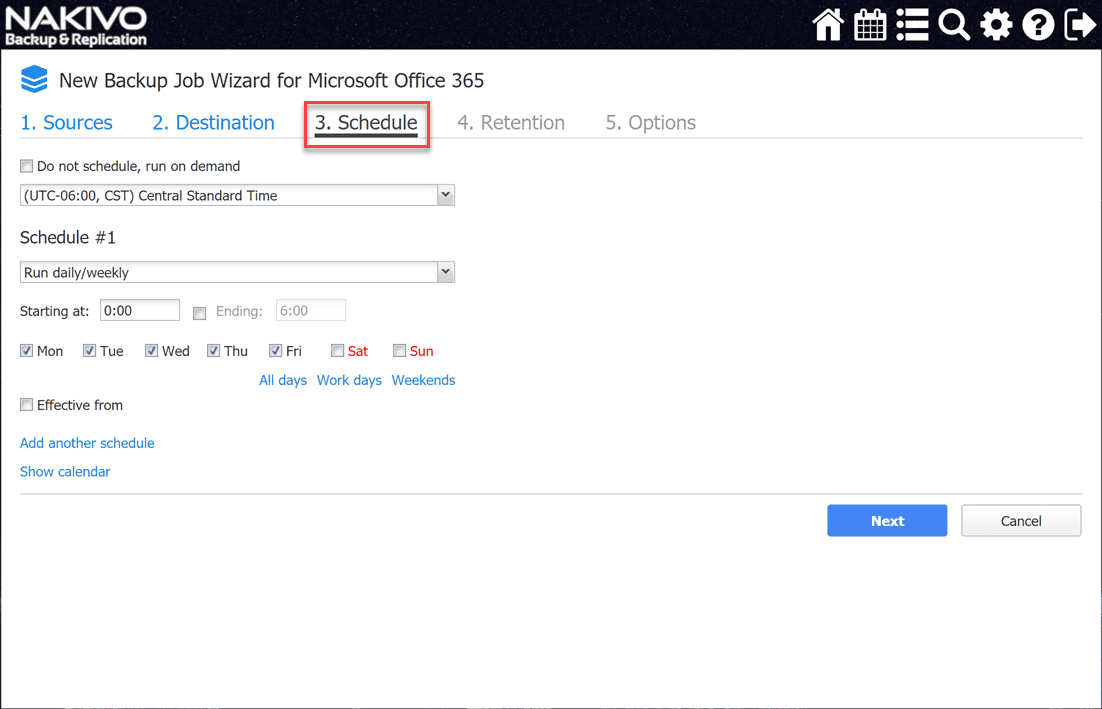
Choose the backup schedule.
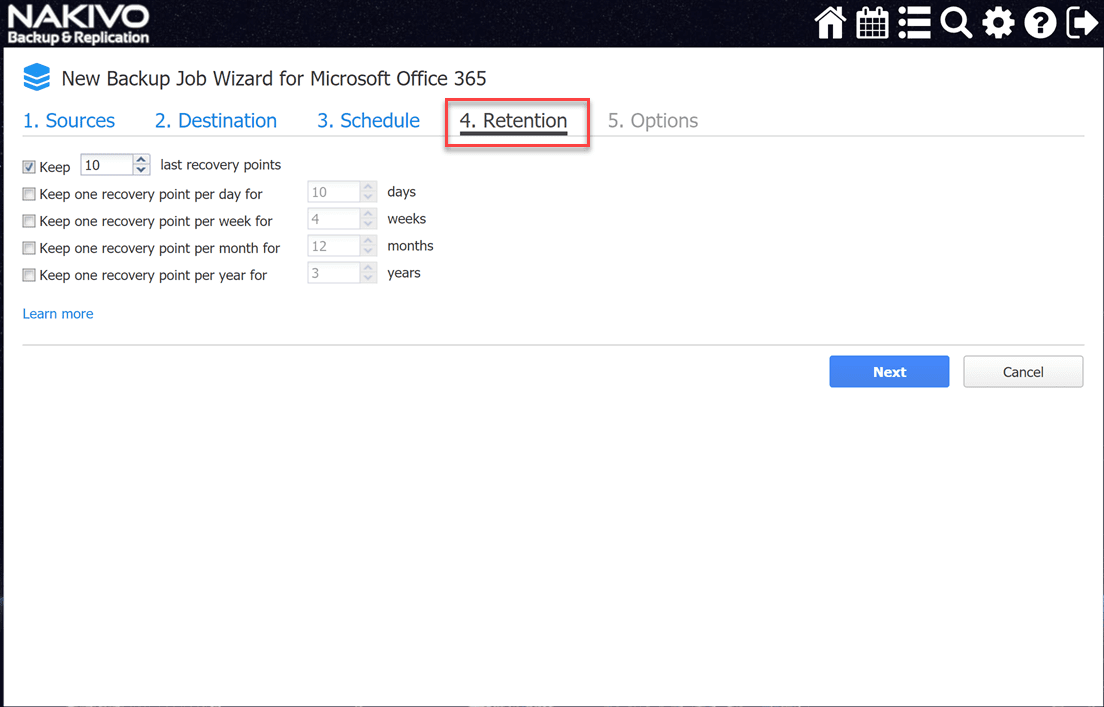
Configure your retention policy.
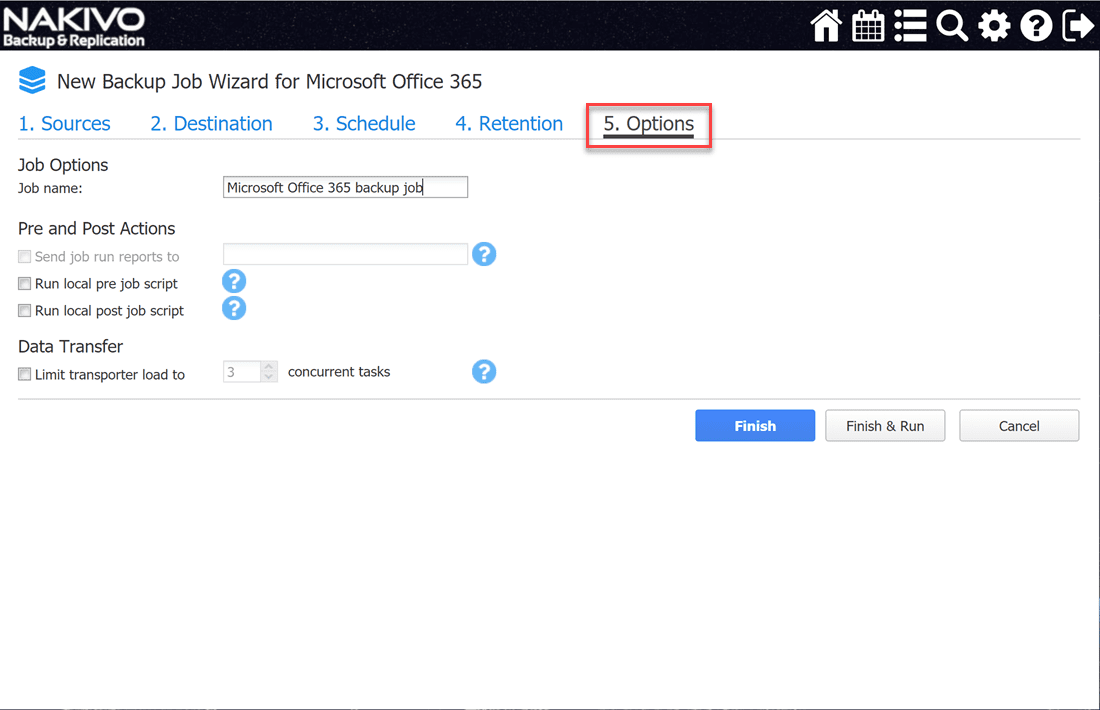
Set the job options and then finish out creating the job/run the job as well.
Recover Office 365 Email with NAKIVO
After you have created the Office 365 backup job in NAKIVO and have at least one successful backup run, you can now recover Office 365 email items. Let’s look at this workflow.
Once you kick off a recovery process on your Office 365 email in NAKIVO Backup & Replication v9.2, you will get the normal workflow that you are accustomed to with virtual machines using NAKIVO.
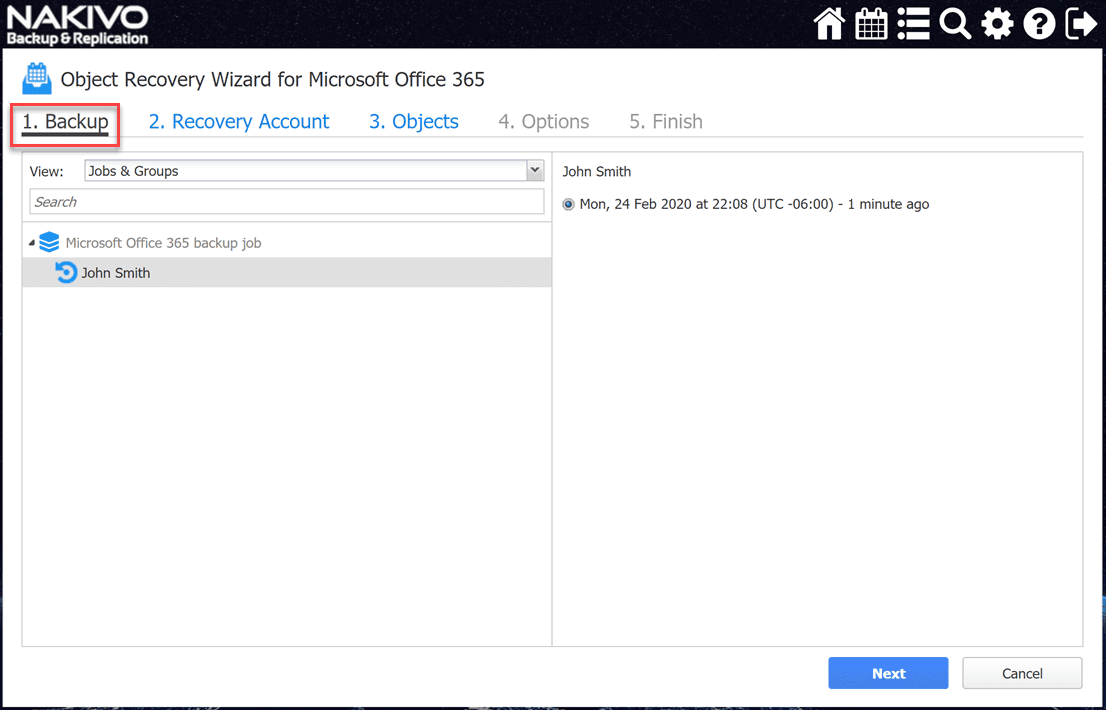
The first part of the process is to select the backup job that contains the data you want to restore as well as the restore point you want to use.
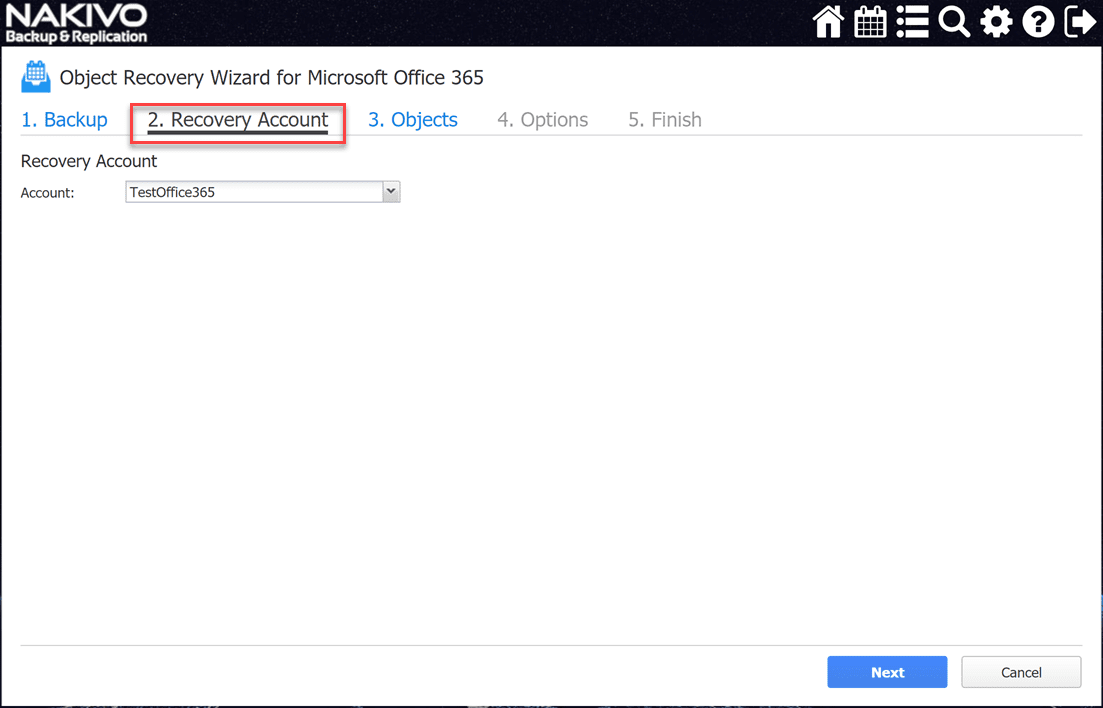
Next, select the Recovery Account from the drop down.
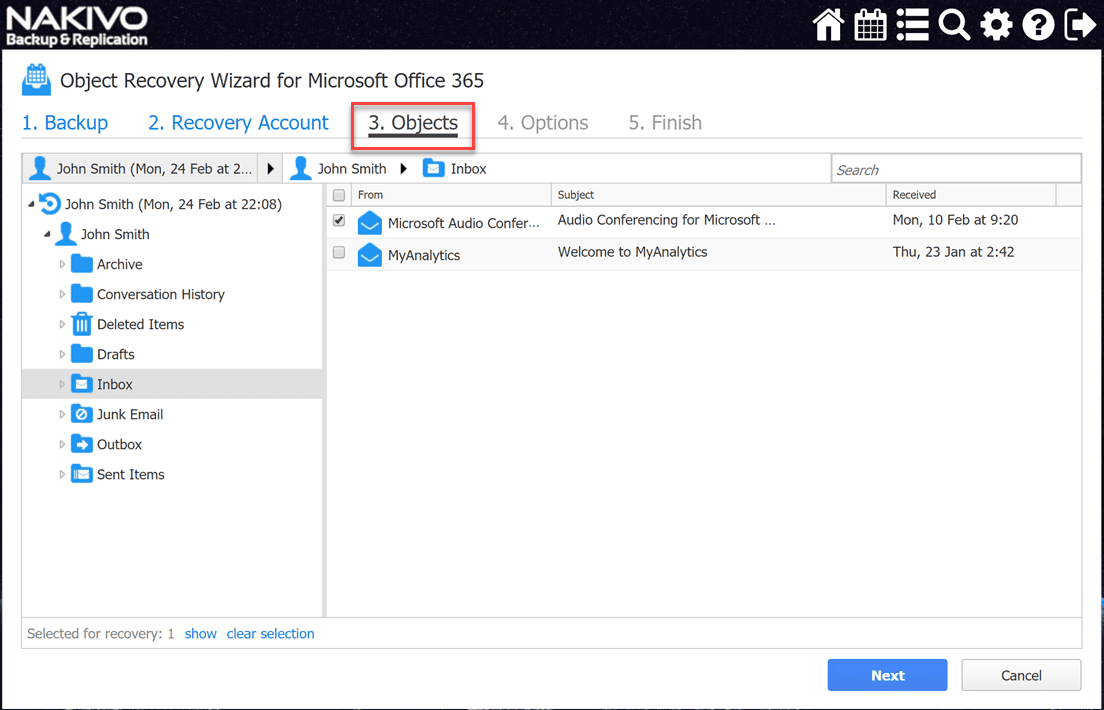
In the 3. Objects step, select the exact objects you want to recover. This could be all emails, or only a specific email as shown below.
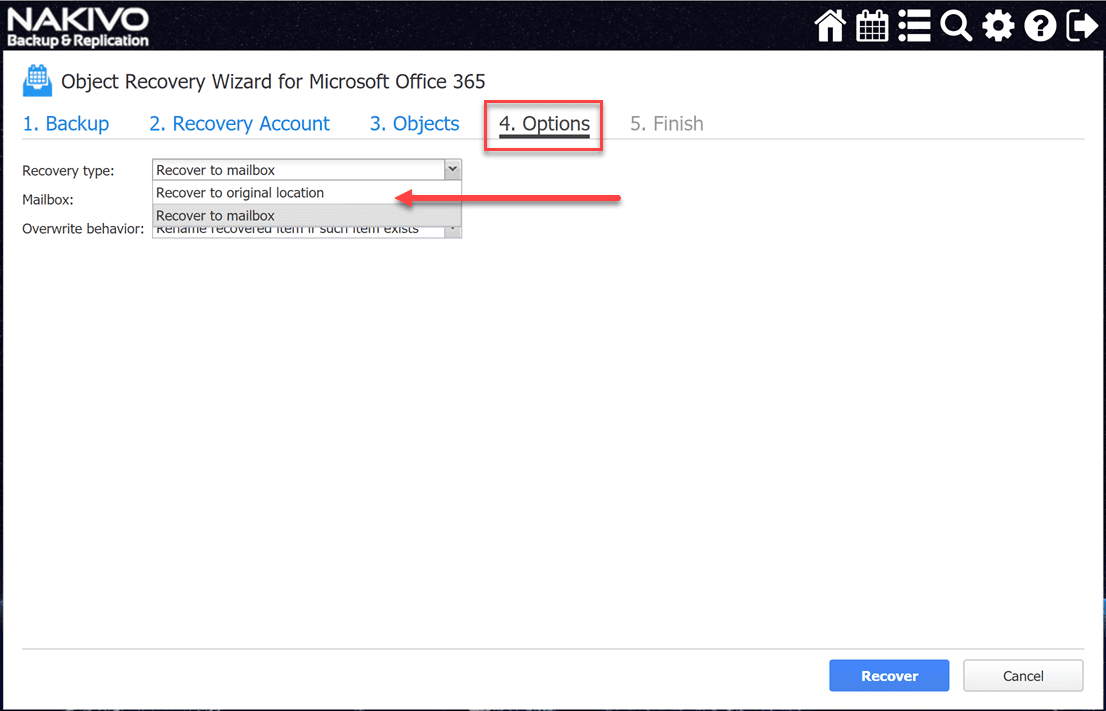
In the 4. Options step, you can see that you have the option to recover Office 365 email items to a different mailbox than the source mailbox. This is a great feature for migration purposes if you want to migrate email from one inbox to another.
Click the Recover button to begin the recovery process.
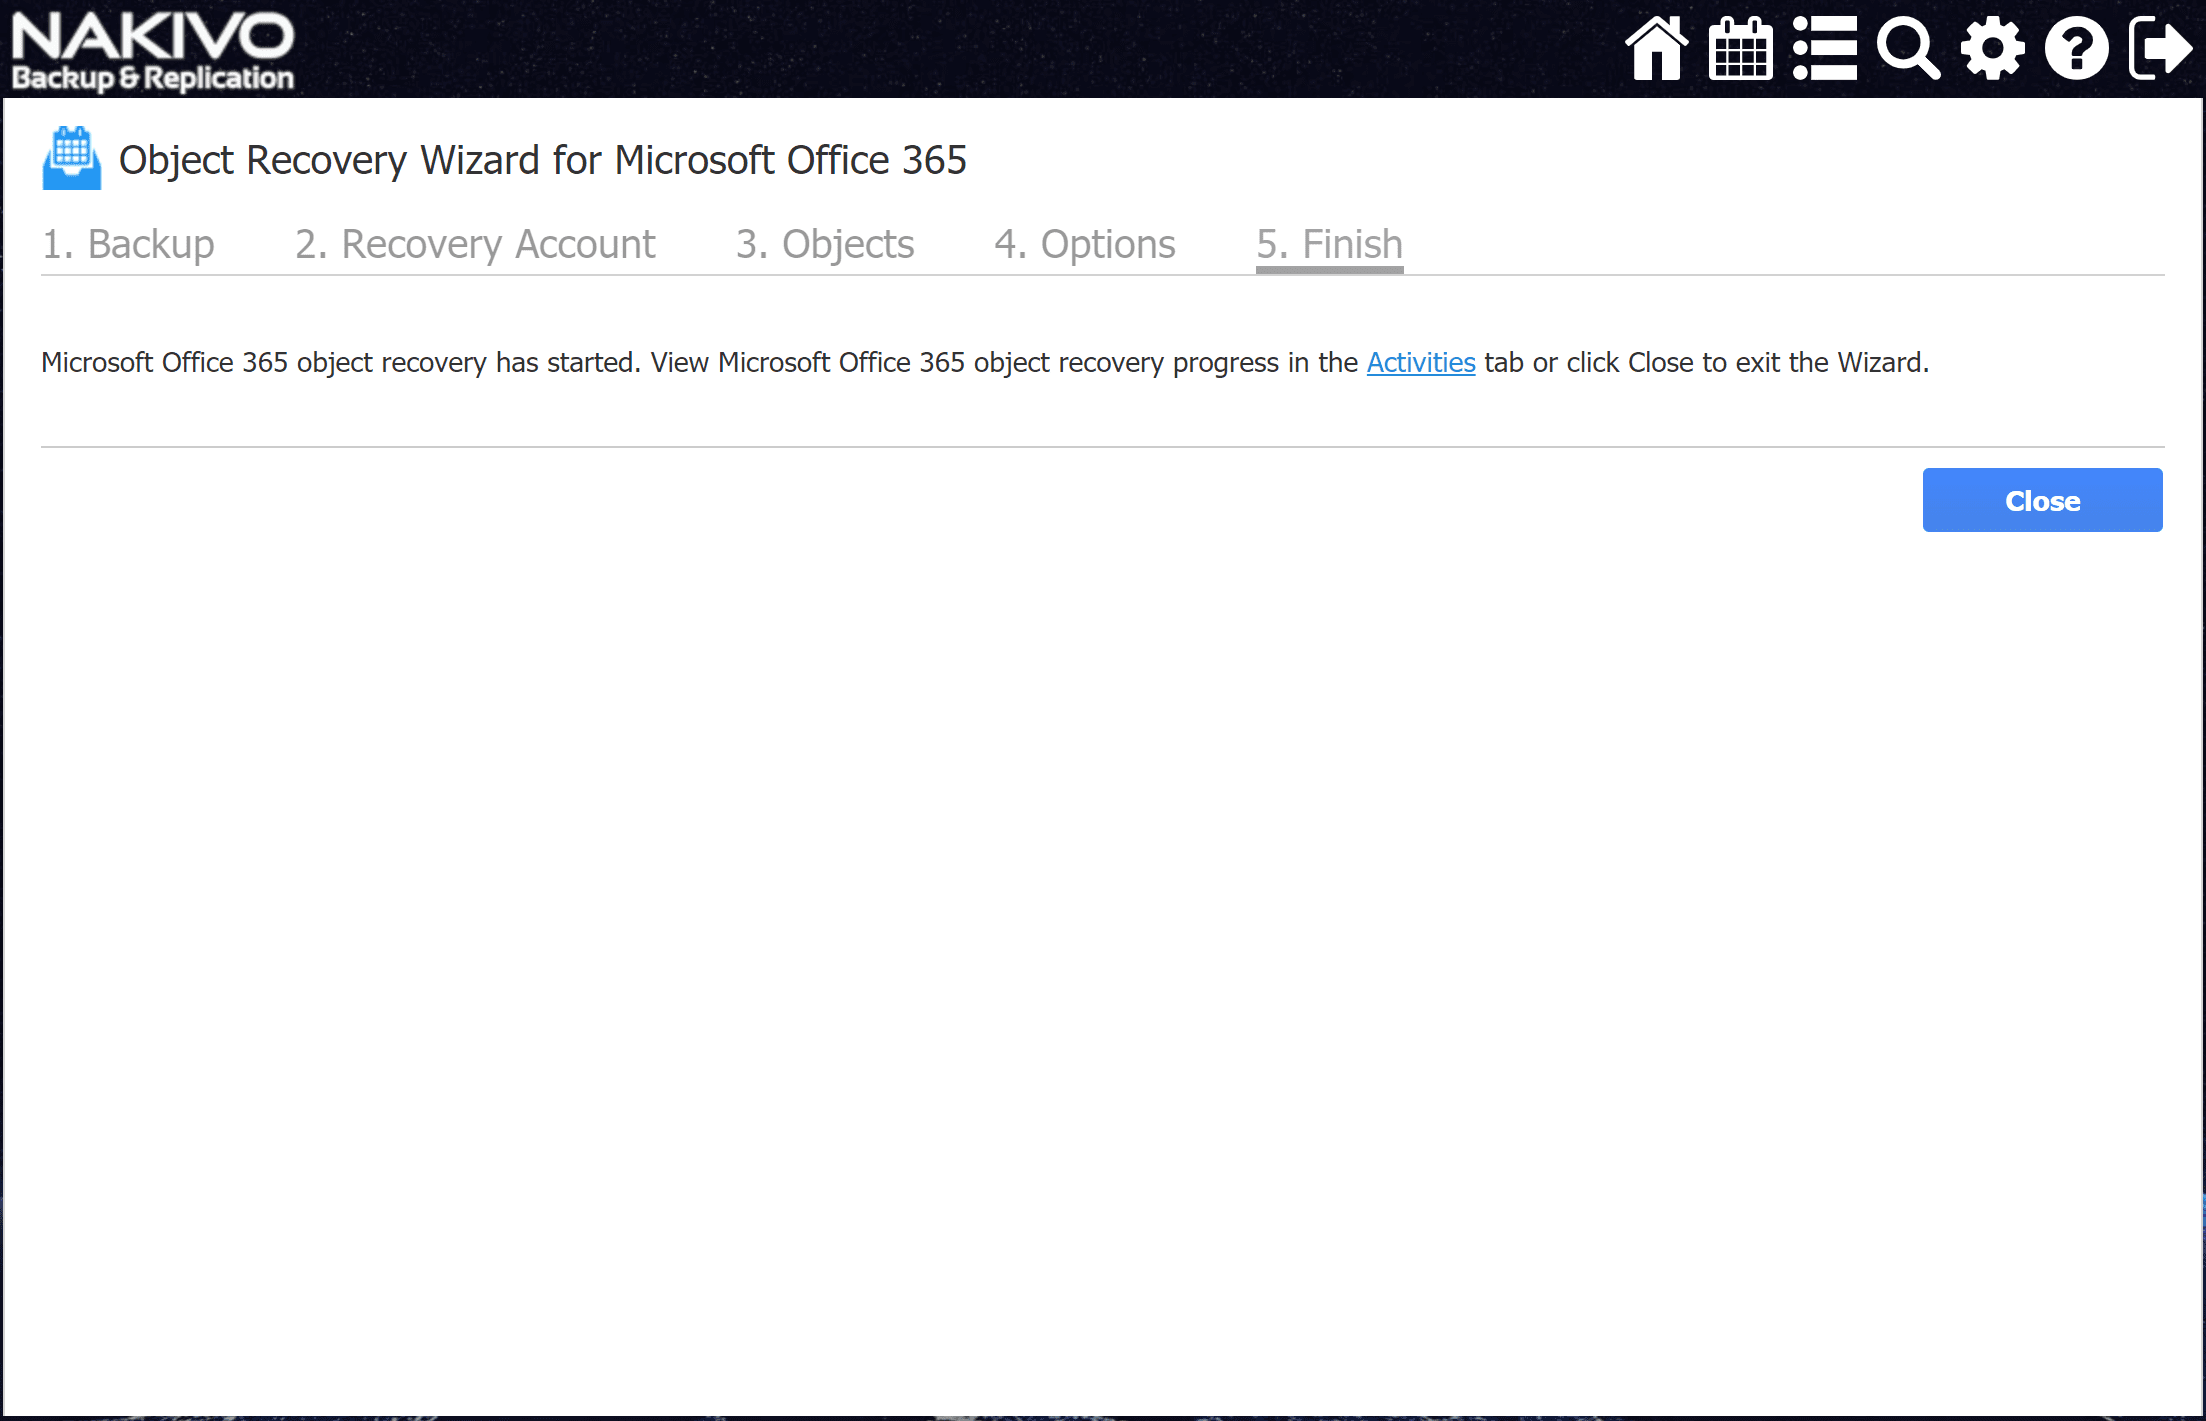
The next screen simply states the recovery process has started. You can monitor the progress in the Activities screen in the NAKIVO console.
Wrapping Up
It is great to see NAKIVO Backup & Replication add the Office 365 backup functionality to their already solid product that is gaining popularity in the enterprise backup market.
With NAKIVO Backup & Replication v9.2, you can backup Exchange Online email. As shown, there is a small bit of configuration that needs to be done on the Azure Active Directory side of things to get the API application configured for NAKIVO to communicate. Keep in mind the need as well for the Office 365 repository type.
Once this is in place, you can quickly get an Office 365 backup job configured and email data backed up quickly. Recovery is a breeze as well with the similar workflow that you have when restoring a virtual machine.
Download a fully-featured trial version of NAKIVO Backup & Replication v9.2 here.


